Efficiently tackling complexities with Docker and Kubernetes

It all started with taking on the monolith code by microservices, and shaping the final product into a lego-like software.

Services like shopping carts or the payment option began to be written as separate pieces of software. Technologies like orchestration (K8s) and containerization (Docker) are helping companies in outstripping profitable parameters from making easy-to-deploy applications to handling the huge rush on a big sale day.

K8s and similar technologies like Docker Swarm, are technically known as container orchestration platforms designed to support large and distributed systems, and the sales pitch is:

Run billions of containers a week, Kubernetes can scale without increasing your operation team. Well, even if you have 10-100 containers, just imagining we are not all Google size…still it’s for you.

If you are at the beginning of the journey or just considering adopting K8s and Docker containers for your cloud infrastructure, this post will hopefully help you evaluate some of the major advantages offered by these technologies.

Squeezing every ounce by avoiding vendor lock-in

Migrating to the cloud can bring a lot of benefits to your company, such as increased cost savings, flexibility, and agility. But if something goes wrong with your CSP (Cloud Service Provider) after your migration, moving to another cloud vendor can incur substantial costs. No portability support and the steep learning curve are a couple of the reasons why it becomes harder to switch vendors.

Kubernetes and Docker containers make it much easier to run any app on any public cloud service or any combination of public and private clouds.

Container technology helps isolate software from its environment and abstract dependencies away from the cloud provider. And it should be easy to transfer your application to a new cloud vendor if necessary, since most CSPs support standard container formats. Thus easing the transition from one CSP to another making the whole process more cost-effective.

Rolling back the deployment cycles

There is an increasing demand to decrease the delivery time and be able to ship more number of features at a time. Manual testing and complex deployment processes can cause post release issues which worked in testing, but failed in production, resulting in delays in getting your code to production.

K8s and Docker containers help you shrink the release cycles through declarative templates and rolling updates.

It is the default strategy to update the running version of your app. You can deploy such updates as many times as you want and your user won’t be able to notice the difference. Moreover, with its production readiness, you can ensure zero-downtime deployment when you wish not to interrupt your live traffic.

Adapting the infrastructure to new load conditions

When the workload to perform a particular business function suddenly increases, the entirety of a monolithic application has to be scaled to balance the workload. This results in consumption of computing resources. And in the world of cloud, redundant usage of resources costs money.

Especially, in the case when you have a 24/7 production service with a load that is variable in time, where it is very busy during the day in the US, and relatively low at night.

Docker containers and Kubernetes allow scaling up and down the physical infrastructure in minutes through auto-scaling tools.

Scaling is typically done in two ways with Kubernetes:

Horizontal scaling:

When you add more instances to the environment with the same hardware specs. For example, a web application can have two instances at normal times and four at busy ones.

Vertical scaling:

When you increase your resources. For example, faster disks, more memory, more CPU cores, etc.

Kubernetes and Docker container technologies are now seen as the de facto ecosystem. It can lead to great productivity gains if properly implemented into your engineering workflows, and adopted at the right time.

You can make the move especially when…

  • Your team is facing trouble managing your platform because it is spread across different cloud services.
  • Your company has already moved its platform to the cloud and has experience with containerisation, but is now beginning to have difficulties with scale or stability.
  • You have a team that already has significant experience working with containers and cloud services.

But what about tons of configurations and setup that is required to maintain and deploy an application, you will ask.

Well to be honest, the amount of benefits it offers deserves a little bit of complexity.

Why Design QA should be a non-negotiable part of your process?

Did you ever happen to spot some inconsistencies in your product’s design that were not there in your prototype? The color being a bit different, some changes in the font style or micro interactions not working the way they are supposed to.

You think that some of these errors could have been avoided if a designer was shown the coded version before the app release. And you are not alone in thinking like this. There is a solution to combat this problem.

The answer is… Design QA.

So what exactly is Design QA and how does its implementation resulted in streamlining our product cycle. Here are some tips and tricks for you that we learned along our journey.

Defining Design QA:

Design QA is a cross verification process done by designers. It entails checking for any inconsistencies in your copy, visual aspects, micro interactions, and the likes of the code developed before the release of your product.

Why is it neglected from design sprints?

In many organizations, design sprints are very elaborate, taking a full week or longer. And this is prior to the developer hand off. Once this is done, designers move on to other projects with no further updates on the previous product. Bringing designers back for the review is not considered by many. And some other common reasons we hear for neglecting design QA are:

  • A misconception in the design world is that a designer’s work is done after forwarding Zeplin links and Invision prototypes. But that is seldom the case.
  • Design QA discussion can cause friction between designers and developers, making it an uncomfortable conversation to have at times.
  • Design QA is seen as an add on step in an already elaborate design sprint. When teams are working under time constraints, collaborating with designers for more reviews is not ranked high on the priority list.

Why did we implement it in our process?

The reasons for design QA to be a part of our process is nothing different from what the experts vouching for it say. We pitched it to our clients explaining its importance and what benefits will they get after its successful implementation. Some major factors that drove us to inculcate it within our process were:

It’s a pretty underrated time saving hack

Design QA will be good for your long term goals. Getting a few extra hours of your designers is better than a few extra days of your developers to search, spot, and iterate for design inconsistencies after the app release.

Better collaboration between your designers and developers

When designers and developers are in the same room (or call) it will help in solving the issues at hand quickly. Your designers will be aware of the technical issues that developers are facing and will account for such issues in the future.

Developers will also get insights into how designers have envisioned the final product and code to bring out the same in the product.

No surprise design inconsistencies

A designer’s work does not end after a simple functionality test of buttons and interactions. Instead, they evaluate the design elements behavior right from the speed of the interaction to the feedback of an action being performed, will there be a slide-out option or slide in, you get the picture.

Minimum design debt

Design debt is accrued over time when small changes and improvements are kept for the next sprints every time they are brought up. As this pile keeps on growing, it results in a bad user experience. And there will be a point where no amount of small tweaks will make it better and you end up rewriting your whole product.

Integrating Design QA in our existing process ensured that we never went back to square one because of design debt.

You’re convinced that it belongs in your process, now how do you implement it?

We know that it is easier to say rather than execute any changes in your workflow. But how to transition from ‘thinking’ to ‘doing’? Here are some tips that have helped us in including design QA within our workflow.

  • Start out together

The first and most vital thing that we have learned is to involve stakeholders from various product stages in the initial meetings. This helps in seeing the feasibility of the product’s features and setting the right expectations for everyone onboard.

  • Sort issues on the basis of priority

You will face numerous issues when testing the final product from the design point. But not all these issues have to be solved right away, some can wait till the next sprint cycle or are the icing on the cake type features.

When discussing with your developers, define priorities to get the critical issues addressed before ones that are only for aesthetic value addition, this way you are making your developers life a tad bit easier.

  • Have a checklist ready

We all know how good our memory is when we need it the most. Having a reference checklist when design QA is carried out will ensure that we don’t miss out on essential checks. Look for text alignment, colors, content placement and spacing.

You also need to check for the accessibility of the design. Here again, a checklist sorted on priority basis makes it easier for everyone involved.

  • Start the review the moment you get your hands on functional prototypes

We believe that there is no fixed timeline that needs to be followed when it comes to review cycles. Infact, the earlier the review cycle starts, the better. Waiting till the last moment can lead to unexpected delays in the launch of your product.

Getting a designer review on the product’s features will keep the development going in the right direction.

  • Give reasoning behind your feedback

Just saying that “this does not look/feel right” defeats the purpose of reviews. You should back your reviews with proper reasoning and even document them for references. This will not only help your developers but your designers as well to evaluate what they like the best and why.

Design QA has helped us ship perfect products reflecting the original design intents. This has worked wonders for us, especially when collaborating remotely. To get your stakeholders onboard, you can utilize the same reasoning that aided us in actively streamlining our workflow.

Reinforcing leading training platform for heavy user load

For over 35 years, NHLS has been a robust source for enterprise technology and software training solutions offering industry-leading learning content. They provide computer courses and certifications to more than 30 million students through in-person and online learning experiences.

Understanding the challenges

NHLS turned to Galaxy to check the load the platform can withstand under certain user scenarios over different web pages, and wanted the system to be able to entertain 10,000 concurrent users. They expressed concerns over the performance of their learning platform seen during user interaction.

They wanted us to go for performance testing to pull off higher volume load tests, and implement required measures to optimize website load times and ensure zero-downtime during the busiest days.

Test planning and implementation

We developed an in-depth understanding of the client’s system architecture and the platform. We used Jmeter to simulate heavy loads on virtual servers, networks to check strength, test the ability to handle heavy loads and determine system performance for a variety of loads.

We started with 1000 users. Reports of regression and stress tests made it pretty clear that the webapp is not optimized, since even after the FMP (first meaningful paint), the load times were far from what we expected. Servers were running out of capacity even on a few requests, which was not ideal for the server architecture NHLS already had.

Their application concurrency target was 10,000 users which was initially crashing at 100 users. In order to identify the point of bottlenecks due to which application started degrading performance, we defined few performance test objectives:

  • Response Time: To check the amount of time between a specific request and a corresponding response. User search should not take more than 2 seconds.
  • Throughput: To check how much bandwidth gets used during performance testing. Application servers should have the capacity of entertaining maximum requests per second.
  • Resource Utilization: All the resources like processor and memory utilization, network Input output, etc. should be at less than 70% of their maximum capacity.
  • Maximum User Load: System should be able to handle 10,000 concurrent user load without breaking database by fulfilling all of the above defined objectives.

Bottlenecks we encountered and the Solutions we provided

We used Jmeter to start testing with 100 users and then ramped up progressively with heavier loads. We performed real-time analysis and conducted more thorough analysis using a variety of tests like load test, smoke test, spike test and soak test.

In order to get to grips first with inaccurate page load and slow page speed, we decided to test per page load. We onboarded with our team of developers and network/server engineers to look into the bottlenecks and solve the issues to get expected results.

Bottleneck #1: Obsolete code

Adding new features to old coding architecture accumulated unnecessary JS and CSS files, code controllers and models on every page. This was acquiring cumbersome and resource-heavy elements or code throughout the website, and exacerbating the page load.

Solution:

We minified static assets (JavaScript, CSS, and images) i.e. optimized scripts and removed unnecessary characters, comments and white spaces from the code to shrink file sizes. To further improve the page speed, the server team performed static code caching that reduced the bandwidth usage from the website.

This resulted in a significant size reduction in requested assets and improved the page speed taking only 2 seconds to load the home page.

Bottleneck #2: Memory

A single query was processing more data than needed, mainly accessing too many rows and columns, from so many parts of the database. This in case of large tables means that a large number of rows were being read from disk and handled in memory causing more I/O workload.

Solution:

We used RDS Performance Insights to quickly assess the load on the database, and determine when and where to take action, and filter the load by waits, SQL statements, hosts, or users.

We performed indexing, removed redundant indexes and unnecessary data from the tables to quickly locate data without having to scan/search every row in a database table every time a database table is accessed. Server team used Innodb storage engine for MySql to organize the data on disk to optimize common queries based on primary keys to minimize I/O time (minimizing the number of reads required to retrieve the desired data).

Bottleneck #3: CPU

Use of nested loops to process large data sets made it difficult to trace the flow of the code, hitting so many requests (1-10k requests) on the database by a single user. This caused the code to execute multiple times in the same execution context hitting the CPU limit and driving up its usage.

Solution:

We performed query performance optimization to remove unnecessary code in loop (by making sub queries of queries) and removed multiple loops thus reducing time of rendering content from looped code that resulted in sending only 100 requests by a single user now. This reduced page size, response time, and marked down CPU resources and memory from 8GB to 4GB on the application server.

Ridding the code off of redundancies and optimizing the database helped us get to the 5000 user traffic mark. This lessened the extra work of the MySQL server, reducing server cost to 10-20%.

We launched a single server on AWS and configured all the required packages such as Apache, PHP and PHP-fpm, load balancer, and others to run our application.

Bottleneck #4: Network Utilization

The former HTTP/1 protocol was using more than 1 TCP connections to send and receive for every single request/response pair. It utilized many resources on the web page making different requests for each file. As the overload continued, the server began to process more and more concurrent requests, which further increased the latency.

Solution:

We used HTTP2 to reduce latency in processing browser requests via single TCP connection. Enabling Keep-Alive avoided the need to repeatedly open and close a new connection. It helped reduce server latency by minimizing the number of round trips from sender to receiver. And with parallelized transfers, letting more requests complete more quickly thus improving the load time.

  • To identify the slow log queries, and requests taking long execution time in the code, we established a proxy connection between Apache web server and PHP-FPM (communicating through modules earlier) to identify the bottlenecks of individual entities by letting them functioning individually. Then we configured PHP-FPM to identify RAM capacity by calculating how many max. parallel connections RAM can handle, leaving the system memory free to process at the same time.
  • We found inadequate server capacity, while inserting the data in the login and without login scenario to create real-life testing environment.

We proposed a distributed server system so that more than 1 server can be auto generated. We added auto scaling and added 4 servers, but was still burning at the load of 8k users and saw an increased server cost. With Round Robin load balancing, we distributed incoming network traffic or client requests across the group of backend servers. This helped us identify that the load is increasing due to inaccurate working processes of sessions stored in the database.

Bottleneck #5: Session queues

The server was getting overloaded due to accumulating too many sessions when performing load of 10k users login concurrently. And because the sessions were stored in a database, increase in the wait activities decreased the transaction throughput taking session time upto 100s, thus increasing the load on the system.

Solution:

We switched storing sessions from database to Memcache server. It stored sessions and queries in memory/cache instead of files, thus reducing the number of times that the database or API needs to be read while performing operations. It cached the data in the RAM of the different nodes in the cluster, reducing the load in the web server.

Making such scalable and cost-efficient server infrastructure helped the client application achieve the load of 10k users in less than 5 mins using only 2 servers capacity.

The testing process was able to ensure a smooth customer experience and save significant capital expense by maximizing server capacity already in place.

Redesigning lessons from Super Bowl

About 100 million people tune into Super Bowl every year. The game is big because the money is big. Companies spend an average of $5 million for a 30 second screen time between plays. Apart from that the Super Bowl generates $300 million in commercial revenues. With all this money and eyes included, Super Bowl’s 2000s online persona would have been a bad fit for today. Around that time the TV spots were doing great; they were emotional and hitting the right spots, online space on the other hand was the exact opposite. A texty mess. This blog takes a dive in the website redesign of Super Bowl and helps you draw conclusion in case you’re also asking yourself ‘If I should redesign?’. Practically speaking, we didn’t have the modular frameworks back then and there was so little to work with. HTML, PHP, CSS, and maybe Flash. In hindsight lack of choices seems better. Then why even bother doing this unfair comparison, you ask? Because with this comparison we’ll help you answer a decade old and the most crucial questions of all: Whether you should redesign or not? Let’s answer this big question with a couple of smaller ones-
  • What is the end goal with your website?
  • What are the problem areas?
  • What will redesign cost?
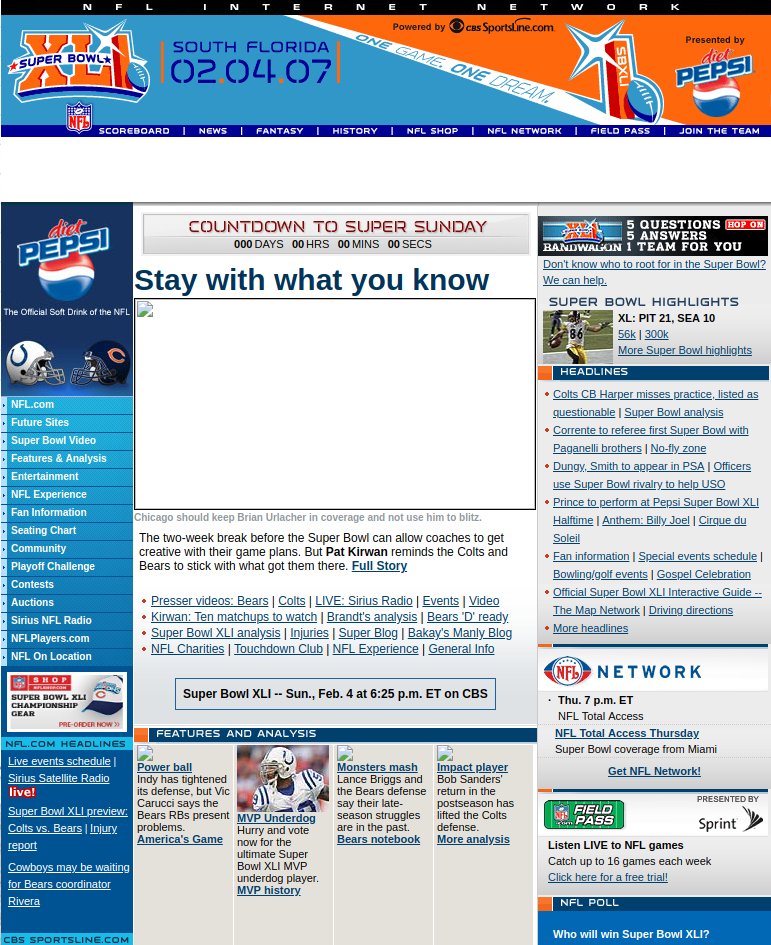
This is a capture of the old Super Bowl website before the redesign. It shows a 3 column layout filled with all sorts of content with no visual hierarchy and respect to white spaces in sight.
Screenshot of superbowl.com 2009
The Homepage looks like a headache made out of HTML. For a dedicated page this homepage sure seemed like a missed opportunity to draw attention towards the primary goal of NFL; getting more people to see the game night. Which brings us to the goal of redesign.

Goal of the redesign

Your reasons for redesign can be purely aesthetic like getting bored of your existing design to something strictly business related; existing design being not good enough for conversions. Rebranding also could be one of the reasons to redesign, when you’re trying to launch a new product or service. Like Super Bowl rebranding their colorful and lively logos for an easy consistent brand image in the form of a new logo post 2010. Once you’re clear about your goal you can start working on the website or tell the people, who are doing it for you, exactly ‘what you want’. For the Super Bowl homepage the goal would be to get more people to watch the game, while providing other information like venue and time, all at a glance. Something that doesn’t make the visitor work for little but crucial information.

A picture is worth a thou……

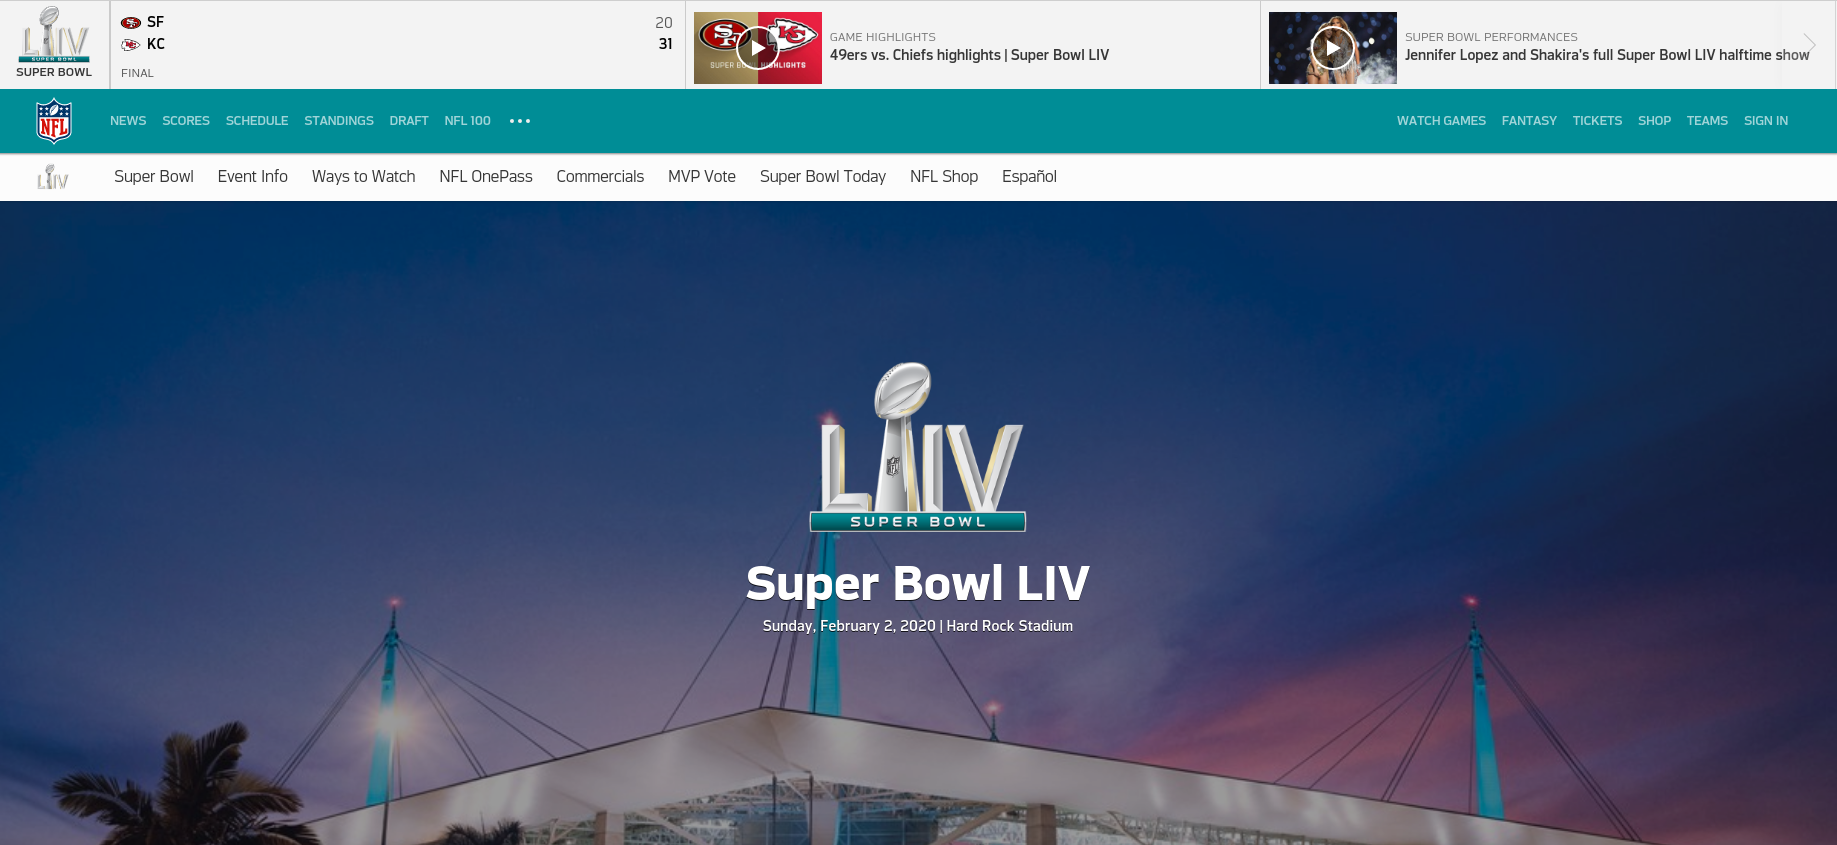
Screenshot of Super bowl website
The new design uses the same principal. Just a few days before the game, the homepage features a simple hero image with the game venue cleverly placed in the backdrop. The new website leverages contrast to make the important information stand out. Like who’s competing, when, and where? There is also a CTA, that clearly mentions what to do next. Being the only action visible before the scroll makes it easier for the readers to complete their journey to the goal.

What are the problem areas?

Like any other website suffering with bad UX, the design team responsible for Super Bowl’s also had to answer questions such as this. When you’re sure about giving a makeover to your website. Usability reports and insights will help you reaffirm the reasons for your redesign. Having the data-backed reasons to do so won’t hurt. Ask your agency or hire specialists to evaluate your website, think heuristics, visual QA, and accessibility tests. Knowing exactly what’s wrong helps you gauge the magnitude of the solution, since redesign is not a days job. So now you’ve figured out the goal of your redesign and the problem areas that you need to work upon. Now all you need is a plan.

How will the redesign work?

Redesign for an enterprise is like clockwork, where all the cogs need to be engineered to fit without fault. Ask these questions to ensure smooth operation of your clockwork:

Is the development in house or outsourced?

It’s not necessary to keep the redesigning in-house if you have a team of your own, since outsourced dedicated teams can produce equivalent or better work more efficiently. When an outsourcing team handles the grunt work, your design team can dedicate their important time for planning how the redesign will go about. If you lack resources, you can completely outsource the design otherwise you can opt for design assistance.

Who leads the overall project and vision?

Inclusion is great for collaboration but it can distract the team from the goal. It is important for your redesign that there is a nay-sayer that keeps the team on track and keeps the project and vision from becoming something else, a hybrid of everyone’s opinion. Just as a Quarterback in football.

How will progress and success be measured?

If there were no yard markings then the football players won’t know if they get another 4-downs or how far they have come on the field. Clearly defined milestones of progress and success will do the same for the team working on your redesign. It prevents constant to and fro later in the process that only results in delays and inconsistent outcomes.

What are your timelines?

Football games typically last for 60 minutes, divided in four quarters of 15 minutes. It helps decide the pace and play of the game. For somewhat same reasons timelines are important for your milestones too. After defining the milestones you’d also need to plan when you’re expecting them. Getting chunks of predefined deliverables in time helps set momentum for project completion.

How much will a redesign cost?

If you manage to find the right agency and all the cogs slide right into place, then you won’t have to worry about the overheads. A medium to large website redesign can cost around $10000 to $50000 depending on the customization and functionalities you require. Before throwing that kind of money on a redesign project you must ensure that you’re getting a handsome ROI out of the whole exercise. If you’re thinking that ‘Just doing it’ would fix all your issues then it’s nothing more than a shot in the dark.

Takeaways

  • Keep Navbar sticky and visible at all times
  • Avoid multiple CTAs on a single screen
  • Give content some room to breathe
  • Make your copy clear and concise
  • Prioritize content according to your goals
When it’s the right decision, redesigning your website can have a positive impact on your business. But, if it isn’t the right decision, a site redesign can be a huge waste of time and resource. If not redesign then what? Custom landing pages, targeted ads, and localization are a great place to start.