Micro Frontends – A Nimble Approach Towards Frontend Development

This is a two-parter series on Micro-Frontend and it’s implementation. And if you’ve already read this one, head on to the part two for 4 Things to keep in mind while working with Micro Frontends.

As the business and product expands, the software architecture leaves us with a monolithic frontend and backend, and the inflexibility that comes with this.

The prevalent practice, microservices architecture, has been used as the foundation on which feature-rich applications can be built. This made many product developers adopt microservices on the backend-side, and start extracting logic one-by-one into separate microservices. The typical setup looks like this:

These microservices get aggregated and consumed by the frontend through an API gateway. Broadly, it appeared that we cannot scale UI on the front-end. The applications, thus, developed are known as Frontend Monolith.

This time, the whole hype is about facilitating a co-existence of different front-end frameworks. And approaching the front-end development process of web apps with the concept and idea of microservices, calling them micro frontends.

To help you figure out whether you need the integration of micro frontends in your development process, let’s take a closer look at micro frontends.

What Micro Frontends can mean for your web apps?

The most popular development approach used for modern web applications is the single-page application (SPA).

The typical SPA application flow follows standard steps:The user visits the web application

-The browser requests the JavaScript and CSS

-The JavaScript application runs and provides the initial content to the browser document

-The user interacts with the application – such as adding a product to the basket or clicking a navigation link

-To show the changes, the application rewrites browser document parts

SPAs are critical to modern development, but they aren’t perfect. SPA comes with many disadvantages.

  • Framework complexity: Many frameworks can provide the SPA experience and allow you to build a solid SPA, but each targets different needs, and knowing which to adopt can be hard.
  • Browser performance: Because the SPA does all the rendering and processing of the user interactions, it can have a knock-on effect depending on the user’s configuration. Not every user will be running the application in a modern browser and at a high-speed connection. It’s important to have low processing time and keep bundle size down as much as possible to have a smooth user experience.

The above-mentioned reasons showcase the common issue, which is scale. Building a huge or complex application requires multiple developers that can help fit all your user’s needs. Working on a SPA with a monolith frontend can lead to many people working on the same code trying to make changes and causing conflicts.

So what’s the solution to all of these problems? Micro frontends!

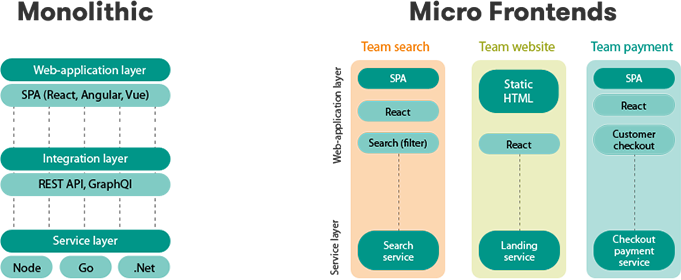
“Micro Frontend Architecture is about considering a web application as a composition of features owned by independent teams. Each team has a distinct area of business that it specializes in. It is an architecture pattern for building a scalable web application that grows with your development team and allows you to scale user interactions.” – micro-frontends.org

The typical setup looks like this:

pasted-image

Whereas, a real example looks something like this:

bitdev

The above home page is developed by the Bit team and used modern component-driven technologies like React and Bit to build micro front-ends.

In the above image, you will see two sets of components, developed by two teams. One is “evangelist’”, owned by their marketing team. The second is a “base-ui” set of components, handled by their front-end infrastructure team. Components from both sets are combined to quickly create the homepage you look at. As well as other pages like the Support Page or Enterprise Page, and even to compose more applications.

The pros: Complete Technology Isolation: you can have dotnet on one side and node.js on the other side irrespective of what technology is used in both systems.

Complete Deployment Isolation: you can implement each frontend release and batches without affecting the other component.

Fast Load Time: because you don’t need to load all libraries and resources you have in your store to the payment system.

Easy Cache: as the 2 systems are completely isolated so managing the cache is very easy.

Reasons why Micro Frontends are for you?

Here are some good reasons to accept the extra complexity and integration costs while choosing to implement micro frontends. Apart from the above reasons, there could be others as well:

-You are going to build a huge web application that cannot be maintained as a monolith (at least not for a long period).

-You want to add new features to a legacy application that is no longer maintained (or no developers are available any more for integrating new technologies).

-Your company has invested in some commercial systems like a portal, CRM, or a CMS. But when the system is going to be replaced, you want to prevent your internally developed applications from becoming useless. Also, you want to integrate existing applications there.

-Newly hired developers are not that productive throughout the development process – ideally using the technologies they prefer and are used to.

-Your business applications tend to live 5+ years and you want to avoid relying on a single web framework that might get obsolete.

Here is how Galaxy can help you

Your business is often left unable to deliver modern online experiences when release cycles take months instead of weeks. Development hold-ups slow your ability to make application updates, keeping you from innovating and iterating. And outdated or clunky UX keeps you from retaining your customers and winning over them.

Galaxy’s experts will help you implement an end-to-end vision by creating a modern development stack for building enterprise applications using required frontend and microservice technologies for your business. We will enable your team to rapidly build, design, and launch applications from microservices.

Learn about Galaxy’s suite of Frontend, Microservices and DevOps capabilities to help your enterprise build better and faster apps, sites, and portals.

About Galaxy Weblinks

We specialize in delivering end-to-end software design & development services and have hands-on experience with backend and frontend technologies. Our engineers, frontend developers, and UX/UI experts help improve security, reliability, and features to make sure your business application and IT structure scale and remain secure.

How to Migrate to .Net 5 without any hassles?

As 2020 came to an end, Microsoft announced their .Net 5 release along with a fixed schedule for release and support for future updates and EOLs. Going forward .Net, .Net Core, and Xamarin will be consolidated during the .Net 5 to .Net6 wave. This is likely to make the development process for Mobile, Web, and Desktop with .Net much more unified and easier. Here are some of the major highlights from a fairly beefy update:
  • .Net now supports single file applications that don’t necessitate for .Net to be on your machine. Now you can compile .Net in your application and get a small single file that you can copy to any machine.
  • One .Net means one SDK for mobile, web, desktop, and console.
  • Native support for ARM64 in .Net core
  • Smaller containers than ever before
  • Cross-platform Native UI

Migration Plan

As with any migration plan, first and foremost you need to be aware of everything that is not making it to the upgraded version. Earlier Core 2.0 borrowed some technologies from the .Net framework, that’s not the case with newer versions. Rather some things may be skipped in the new version for some technological reason or the other.
  • AssemblyLoadContext is replacing app domains, as the latter is quite an expensive runtime feature and not suitable for modern app development.
  • Remoting is being replaced by named pipes and gRPC
  • WebForms is being replaced by ASP.Net Blazor
  • WCF Server is being replaced by gRPC and Open source CoreWCF
  • WF is being replaced by Open source Corewf

How to Migrate your project to .Net 5

1. Ask if and why you need to migrate

The first step in migration is to understand the feasibility and goals for migration. No need to be over aggressive with the migration because .Net is not going anywhere. If you’re happy with how things are, then there is no need to migrate as .Net is part of Windows and is bound to get fixes for a considerably long period. On the other hand, if you want to innovate and leverage new features and technologies then .Net 5 is the way forward. Your migration approach will also depend on your choice of Operating System. If you’re sticking with the existing one or shifting to another. Pro Tip: Ensure that you have backups along the way so you can still ship working software. It’s futile to port in a big one-off migration. While it might work for small projects, not so much as your projects get bigger.

2. Analyze your app

Having worked months, even years on an app, one might think that they know the app inside out. It might be true for simple apps but in the case of complex projects, it’s easy to overlook obsolete things that might add to the difficulty of an already grueling undertaking. Things to keep in mind while auditing your app:
  • Use ApiPort to list outcode and its dependencies.
  • Legacy code can be a pain to carry forward. Analyze legacy code for feasibility if it seems obsolete and expensive to refactor then consider dropping before the port.
  • Analyze dependencies and ensure they have support for .net 5. If they are not supported then consider moving to modern alternatives before porting.

3. Convert Project

After understanding the needs for the port and deciding to ahead with it, you’ll need to convert your project. Conversion typically involves:
  • Replace packages.config with<packageReference> elements in the project
  • Another option would be to use Try-Convert to automate the process to migrate the project files to SDK style
Pro Tip: Consider only migrating the project files without changing the target framework as you’ll need click stops for big projects in case of unexpected downtime There are some limitations to Try-Convert method
  • It can’t convert some project types like ASP.NET and Xamarin
  • It doesn’t migrate any source code (*.cs), only project files(*.csproj)

4. Time to make the move

Replace the target framework string in the project file from the existing version to .Net 5. As stated earlier avoid moving everything at once you would want to start from the bottom with reusable libraries and make your way from there. Additionally, identify if you have shared components that need to continue to work on the existing .Net framework. Retarget those to .Net Standard and then retarget remainder to.Net 5.0

5. If you want to move to another OS

When you’re looking to change your operating system, ensure that you use a CI environment that can run your code in multiple operating systems. Azure DevOps, Github actions, etc. And last but not least, run tests to ensure that everything is working as expected. There are a lot of moving parts in an enterprise .Net project, and the scope for mistakes while porting is immense. It’s not a question of expertise but of time and resources. While the automated tools might make the process less of a pain but you’d still have to engage resources to make time-consuming changes in the source code. Currently handling numerous .Net projects, a few of which are under migration, Galaxy provides the needed expertise and resources to make the migration smoother with zero downtime. Contact us now for a free consultation on your .Net project.

Creating forms in React – The Right Way!

In the world of web development, there are several front-end frameworks. Angular, Vue, React and a few others have gained immense popularity over the last few years. However, React has surpassed other frameworks in terms of popularity and demand:

React is used to build single-page applications and allows the creation of reusable UI components. Forms are an important component of React applications. They facilitate users’ interaction with the application. Some of the common use cases of forms are:

  • Login and Registration Forms
  • Contact Form
  • Checkout Forms
  • Create/Edit Order Forms
  • Adding or updating data into the application

It is virtually impossible to develop a React-based app without forms. At the very least, you will need it for the login and sign up screen, in case the data is retrieved.

In this article, we will share some best practices for creating forms in React. Let’s get started.

Forms using Controlled Components

We know that HTML elements like input remember what we type. Similarly, we can use the React component state to store data of forms. When the input data of forms elements is handled by the React component, it’s called a Controlled Component. Here, the only source of truth is a component state, not a DOM element.

Handling Forms

This describes how the data is handled when the value is changed or submitted. In HTML, the form data is usually handled by the DOM whereas, in React, components are used. When the data is handled by the components, it is stored in the component state.

Here is the code –

This is how one can collect the data from the user and get it right there in the React.

In the same way, if one wants to update the state, one can use the event handler “onChange”.

Now, to execute it, one can use the following code.

Conditional Rendering

If you do not want to display the h1 element until the user has made any input, you can add an if statement. Look at the example below and note the following:

1. Create an empty variable, in this example call it a header.

2. Add an if statement to insert content to the header variable if the user has done any input.

3. Insert the header variable in the output, using curly brackets.

Multiple Input Fields

You can control the values of more than one input field by adding a name attribute to each element. Here is how you can achieve this

  • When you initialize the state in the constructor, use the field names.
  • To access the fields in the event handler use the event.target.name and event.target.value syntax.
  • To update the state in the this.setState method, use square brackets [bracket notation] around the property name.

Validating Form Input

You can validate form input when the user is typing or you can wait until the form gets submitted.

Adding Error Message

Error messages in alert boxes can be a tad bit annoying! We recommend displaying the error when the user input is invalid.

Using React Hooks – Alternate Method

We can also handle the form state using React hooks. To do that we have useState() hook for storing state in a functional component. Let me explain this by creating a simple form with one input element and handle its data using a hook.

import React, { useState } from ‘react’; export default function ControlledFormWithHook() { const [name, setName] = useState(”); return ( <div> <form> <label>Name:</label> <input type=”text” onChange={(e) => setName(e.target.value)} /> </form> <br /> Name is: {name} </div> ); }

Here we have used a useState() hook to handle state.

Why use React-hooks-form?

One of the primary goals of React Hook Form is to reduce the amount of code that you have to write. As you can see from our final result, the React hooks form is elementary to use, and it takes a small amount of code.

Making The Right Choice

Forms are a crucial part of most web applications. It is imperative to know how to handle them, and fortunately, React provides a lot of ways to do just that.

For simple forms that don’t require heavy validations (or that can rely on HTML5 form validation controls), you can use the built-in state handling of the DOM given to us by default. There are quite a few things you can’t do (like programmatically changing the input values or live validation), but for the most straightforward cases (like a search field or a login field like above), you’ll probably get away with an alternative approach.

When you’re doing custom validation or need to access some form data before you submit the form, handling the state explicitly with controlled components is what you want. You can use regular useStateHooks, or build a custom Hook solution to simplify your code a bit.

Whatever you decide to use, handling forms in React has never been more straightforward than it is today. You can let the browser handle the simple forms while handling the state explicitly when the situation requires it. Either way – you’ll get the job done in fewer lines of code.

Contact Us right away to discuss your website or app development according to your business requirement and complexities.

About Galaxy Weblinks

We specialize in delivering end-to-end software design & development services and have hands-on experience with large, medium, and startup business development requirements. Our engineers also help in improving security, reliability, and features to make sure your business application scale and remain secure.

Craft CMS: Building the frontend of a website using Twig and GraphQL

Craft is a mature and tested content management system. Airbnb, W3C, Netflix, PBS, Salesforce, Moz, and countless other brands switched to Craft CMS for redesigning their websites. That for sure proves its credibility against other popular CMSs.

You can use Craft to design and develop complex and intuitive sites that rely heavily on PHP, databases, and query optimizations. However, you can also use Craft to design and develop simple sites where you do none of those things.

Craft CMS has ditched the traditional CMS systems that come with ready-to-go page templates, CSS frameworks, and pre-built themes. As a result, developers have a bespoke solution to build tier solutions. Craft CMS neither offers posts or pages or any bootstrap features and themes to build the frontend.

Craft CMS supports two distinctly different ways of building a front end:

Monolithic: building Twig templates for server-generated pages.

Headless: using a GraphQL API in combination with a separate front end codebase.

But before diving into these two frontend approaches, let’s find out what web developers, designers, and stakeholders love about Craft CMS.

Why Craft is a choice of many front-enders and website projects?

Both web designers and developers find Craft CMS features incredibly useful. Before installing any plugins, the options and functions developers have to work with are impressive. Here is a partial list of features and the reasons why Craft is preferred more for which many other CMSs require plugins:

  • It allows content managers to custom page layout building and preview updates in real-time.
  • One can manage all of their brand sites under one roof, whether it’s a multi-site, multilingual, or both. This is a major problem area with the majority of other CMSs.
  • With virtually no learning curve, the UI of the Craft control panel is very intuitive.
  • Craft is fast for the front end as well as the Control Panel and tops the many reasons for choosing a modern CMS over an older one.
  • Robust sitewide content indexing and search capabilities.
  • Robust custom fields for full control over your design and content.
  • Nearly all content is in one place: Entries. Editors love this and can easily find what they’re looking for.
  • Fine-grained user permissions and group management allow publishing workflows across different departments and individuals. And no, you don’t need a plugin for this.

Building frontend with Craft CMS using Twig templates

Twig is a template engine for PHP so instead of writing PHP you write in this simple Twig syntax.

Some developers are not keen on this, but Craft uses Twig as its template engine. The word “use” should be highlighted as a requirement, as there is no option of writing raw PHP anywhere inside the template.

It is standardized in a way that, when you look at your team’s Pull Requests, you probably don’t expect to see 100 lines of custom PHP that make no sense. You only see the code related to templates.

Apart from this, Twig makes it easy to “component-ize” your elements. This way you define the markup and layout for a component once, then reuse it throughout your site and pass variables.

You can define components for different content modules like image left, image right, headings, cards, etc. This ensures you’re consistent, reuse the same components throughout the site, and reduce duplicate code.

image code

Here’s how to use GraphQL + Craft CMS as a ​“head­less” CMS

Let’s say you’re not digging Twig or you would rather use one of the latest technologies (hello static site generators!). Craft’s templating system isn’t the only way to get content out of Craft. As of Craft 3.3, it provides a “headless” mode and GraphQL built-in with Craft’s Pro features.

That means you can use tools like Gatsby or Gridsome to build static sites with the comfort of Craft CMS. That brings Craft in line with the likes of WordPress that provides its REST API for fetching content to use somewhere else.

As a web devel­op­er, you’d use GraphQL if you were writ­ing a fron­tend that is sep­a­rate from the back­end. You’d be using Craft CMS as a ​“head­less” CMS for its excel­lent con­tent author­ing experience.

Per­haps you’re writ­ing the fron­tend in a frame­work like Svelte, Vue.js, React, or one of the frame­works that lay­ers on top of them like Grid­some, Gats­by, Nuxt.js, or Next.js. You could write a cus­tom API for Craft CMS using the Ele­ment API, but that can be a sig­nif­i­cant amount of work, and you’ll end up with some­thing bou­tique, rather than an indus­try standard.

This is where GraphQL for Craft CMS excels. By cre­at­ing your con­tent mod­els in Craft CMS, you auto­mat­i­cal­ly get a GraphQL API to access it, with no extra work on your part.

Conclusion

Craft abstracts all the field creation and setup to the admin panel. You only need to point it to the right Twig template and then use the fields you connected. Furthermore, it provides localization and multi-site management out of the box with no need for plugins.

The bottom line is Craft is an open-source, modern, affordable CMS with stellar security and first-party support. The features and flexibility it offers out of the box, along with its content-first approach, make it go-to for nearly every custom web project.

About Galaxy Weblinks:

We are your offshore CMS development partner! We offer expert capabilities in developing feature-rich solutions using the latest CMS technology trends. We have hands-on experience in CMS solutions like Craft, WordPress, Drupal for different business needs. We offer assistance from building custom CMS websites to website migration and maintenance processes.

How to Avoid the Most Common Mistakes During the UX Design Phase?

User Experience (UX) has become an essential part of any online business’ success in building a connection between your users and your brand. UX is a foundational pillar of all marketing efforts for any company focusing on online business, as great user experience delights your customers, creates loyal satisfied customer base, and helps reach out to millions of users online.

The UX design phase helps map out your users’ experience long before you have spent a lot of money and time in developing a technology solution for the users. While mistakes in the UX design phase are common and often lead to rework in the product development process. However, we should always try to avoid the common mistakes, and in this article we will highlight a few important points in order to avoid mistakes during the UX design phase.

Be Succinct. Cut the fluff

The UX designers should aim to keep the messages concise. The general rule of thumb is to keep it simple. Avoid jargon and speak to them in a voice they understand, assisting them in achieving their goals more easily. The UX design should focus on an intuitive navigation that any user is likely to take. If your users are pausing to understand a certain function or are taking time to complete any task, the UX should be simplified.

Limit your user’s cognitive load

Mishmash of fonts, colors and elements are common mistakes that designers go overboard in differentiating the design; however, focus should remain on consistent layout and limiting your user’s cognitive load. Overloading user cognition reduces user experience. When we tend to put a lot of information out there, the majority of it is bound to be forgotten by your users and even overwhelm them. A good UX designer should focus on optimizing your user’s cognitive load.

Focus on your Call-To-Action (CTA) objective

Not focusing on your CTA is one of the most common mistakes in the UX Design phase. We recommend that the CTA should be the most highlighted element on the page. You can do this via color play, text labels, font, and varying size, white space, etc. There should be no other element more enticing than your CTA. Another point to keep in mind is that the CTA copy should be short but concise. CTA, in our opinion, should not exceed 5 words (ideal limit being 3 words).

Focus on testing the design with users

A product design should not be based on assumptions. Instead it should be based on user feedback – user behavior, patterns, usability, etc. A good UX design needs to be tested with users, otherwise the entire objective of the UX design phase is refuted.

Use of icons and descriptions in error states

Colors can help convey messages but don’t rely on colors completely to convey crucial information. Using only colors in your design for important information like error states is like leaving out a large chunk of the audience at the mercy of guesswork. Introduce icons and descriptive texts along with the color to make it more inclusive and accessible.

Use of shadows and borders 

Shadows and borders can help make the on-page elements appear sharper and more defined. A good UX designer utilizes shadows and borders to highlight important on-page elements. However, just don’t go overboard with the shadows, there’s a thin line between neat and tacky.

Focus on responsiveness 

It is essential to have a responsive design that looks great and loads quickly across all screen sizes and devices. The UX also needs to be optimized for slow connections and slow devices.

Conclusion

We often complicate things that are fairly simple. Good UX can be as easy as going against your experimental instincts and sticking to the basics. Keeping in mind these basic points will help you avoid the most common mistakes during the  UX design phase. If you’ve any doubts related to UX/UI and if you need assistance, then feel free to talk to us here.

Best Automation Testing Tools For Visual QA

Where did the submit button vanish?

Why is there an overlapping of text? 

Is the button size right for smaller screens? 

Visual QA can save you from numerous uncomfortable situations. Furthermore, to contribute to an already back-breaking pressure of nearing deadlines, these questions are often raised at the worst possible times, mostly post-launch of your website/ app. 

For the what, why, and when on Visual QA (used interchangeably with Design QA), read this blog. In this article, we focus on the methodologies and tools to be used for successful visual QA testing. 

There are two methods of visual QA testing, manual and automated testing. 

Manual Visual Testing 

Deploying human resources for looking for any visual inconsistencies and discrepancies across varying screen combinations is manual visual testing. It is a time-consuming, and error-prone process that requires a decent team size. However, the scope here is huge in comparison to automated testing. 

One should opt for manual testing when UI is believed to be unstable and needs human intervention. As you grow, manual testing becomes more difficult as the combination of operating systems, screen sizes, orientations, and browsers keep on increasing. 

Automated Visual Testing

Automated visual testing utilizes software to detect any visual discrepancies in the UI. It is quicker in comparison but the investment in selected software can be expensive. Even if one goes for open source tech, you will need the expertise to handle the same or train your existing team as per the selected software. 

Like mentioned earlier, the scope is limited to a defined set of issues and areas. At times what looks good to the software is not the same for the human eye. But once the trial and error phase is over, automated visual testing can save a lot of time and effort for your QA team. 

Having said that, let’s take a look at some of the tools and open source technologies for automated visual testing. 

Percy 

Percy is a power-packed automated visual testing tool. There is an option to integrate, execute, and audit the test results. Once the integration is complete via CI/CD services or frameworks, you can start the execution of your UI components. The tool takes the UI screenshots from various browsers, screen sizes, and does a pixel by pixel comparison with the selected baseline for any UI inconsistencies.  

Selenium 

Selenium is an open-source platform that supports many programming languages like Java, C#, Python, Javascript, Ruby, etc. The written tests can be run here and it handles the interaction with browsers. The tool grants great support for all visual tests and the software also generates screenshots of various web pages. With Selenium IDE, you can record actions that will be utilized for future references.    

Screener.io

All your records and test executions can be carried out in real-time, thanks to cloud computing. There is no coding required for the automation of your test flows. Your test coverage is more here as visual testing and functional testing can be done in a single test run. The visual testing components can be combined with performance testing. This helps immensely in the development cycle. If you use Storybook for your UI components, you need not worry about its testing as Screener supports storybook component testing too. 

Gemini

An open-source tool, Gemini can be run via Selenium or PhantomJS server. You can test different sections, as well as visual differences in the element sizes and positions. There are test suites that you can use without worrying too much about the coding. Another plus point is that the interface is not complicated, thus making it easy to use.  

Visual

Get on board with a dedicated QA team, contact us here, and we will get in touch. 

About us 
Our team of IT specialists has 20 years of industry experience in building and optimizing applications and websites. We strive to offer solutions for all our clients, be it design, development, or QA services.

How to Choose the Right Shopify Development Partner?

Ecommerce has been growing at a swift pace along with the several platforms such as Shopify over which these websites are built. Building your company’s online Shopify store is similar to building your new house and choosing the right Shopify development company is very crucial. There are a lot of moving parts to analyze, design, plan and set up. While setting up a Shopify store is easy, but making sure that your visitors have a good user experience is crucial for the success of your Ecommerce website. This is where the right Shopify development team can understand your requirements and help your business grow. In this article, we discuss the need for a Shopify development team and highlight a few important considerations that will help you make the right selection.

Why should you hire a Shopify development team?

Once you have decided to develop an Ecommerce website, there are plenty of things for you to worry about including getting your product-market fit right, sourcing products, managing inventory, preparing a marketing strategy, etc. Developing a Shopify platform and adding it to your list of priority things takes your crucial time away from the other important considerations that are needed to grow your business. This is where an expert Shopify development team helps you free up your time while handling the development aspects of your ecommerce website. We have listed below a few considerations why there is a need for a Shopify development team.
  • Saves your time so that you can focus on your core business objectives
  • Helps you with customized Shopify design and development for your Ecommerce website
  • Has relevant technical expertise working with CRMs, API integration, SEO optimization, page speed optimization, inventory management, email marketing solutions, etc.
  • Saves you cost if outsourced in comparison to building an in-house team
  • Helps you focus on building the right Ecommerce website that targets your business objectives such as increasing sales, maximizing conversions, enhancing user experience, etc.

How to choose the right Shopify development partner?

Once you have decided to hire a Shopify development team, the key considerations in selecting the right partner are –
  • Alignment
The Shopify development vendor should understand your business requirements, help focus on priorities, advice from a technical perspective, and execute work efficiently.
  • Expertise 
It is crucial that your Shopify development team has in-depth knowledge of the Shopify platform and its versions. The team should have required programming skill sets, have experience working with APIs integration, have expertise in building and integrating custom Shopify apps and themes, deep knowledge of database technologies for storage and information management, etc. A good approach to evaluate their expertise is to ask about a few of their Shopify project portfolio and speak to a few of their references.
  • Best Practices
A gap in understanding of the requirements can cause the complete failure of your project. Hence, it is important that the Shopify development company follows best industry practices across communications, execution, documentation, budgeting, quality assurance, security, etc. Project management methods can vary greatly between companies and for a successful engagement with a company, it is crucial that they follow a process that is organised, consistent, and supports quality control. For offshore partners, good communications is a must to understand requirements correctly and efficiently coordinate for smooth and timely execution. In order to better understand their best practices, you should discuss your project needs and evaluate how they plan to execute the development process.
  • Pricing
Cheapest isn’t the best option while selecting a Shopify development vendor, so always look at the bigger picture. Never pick a vendor purely on the basis of their rate. Rather look at the approach they came to the pricing. The best way is to review a few proposals and compare the project plans and time estimates for each phase. Understand the no. of hours, resources each vendor is proposing, and then compare their total costs. Additionally, most vendors provide support/maintenance services, and their pricing can vary. Look at the monthly support hours each vendor is proposing and at what cost. The company should handle all crucial issues for you such as version upgrades, security patch installations, bug fixing, design updates, customization, plugin integrations, performance enhancements, etc.

Conclusion

Running a successful Shopify Ecommerce website in today’s highly competitive online environment requires a good development partner who understands your business requirements and provides a helping hand in realizing your company’s vision, achieving your growth plans and having a great user experience. If you’ve any doubts related to Ecommerce platforms and if you need assistance developing one, then feel free to talk to us here.

How to decide what’s the right tech stack for your Mobile/Web App?

Choosing the best technology to build a robust solution is a very crucial decision. This is the third step while planning mobile and web application development. It comes after establishing the business perspective and product structure. With large companies, in-house and offshore developers typically make the choice collaboratively. It’s more complicated if you’re a small startup.

The decision will generally decide whether your mobile and web application will perform well and be scalable. It will also impact your budget! A well-chosen tech stack gives a competitive advantage and helps it grow, whereas the wrong technology can set you back by months.

This article will give you insights on things you need to know about the tech stack, and some clues for making smart decisions when the time comes.

Differences Between Web and Mobile App Tech Stack

What is a tech stack anyway? Bluntly put, it’s a set of software tools, databases, frameworks, programming languages, and technologies that are used to build a mobile, web app, or a website.

Web applications are generally internet-enabled. Thus, users don’t have to download them to access it. Web app tech stack uses the resources provided by the system. In this way, to build a web app, you will need to use a combination of front-end and back-end technologies.

Mobile apps are created for a specific mobile platform, i.e. a particular environment and cannot be replicated to another environment. To use a mobile app, the user should download it from the app/play store. Thus, apart from front-end and back-end technologies, to build a mobile app, you should use platform-oriented technologies – Swift and Objective-C for iOS and Java or Kotlin for Android app development.

Front-end technologies include:

  • HTML/HTML5
  • CSS
  • JavaScript
  • UI-frameworks and libraries: ReactJS, AngularJS, React, jQuery, and others

HTML and CSS Toolkit

There are several frameworks used for CSS and HTML. Some of them include:

  • Pure
  • Materialize
  • Susy
  • Bootstrap
  • UIkit
  • Bulma
  • Foundation

Popular choices among them are Foundation and Bootstrap. While Foundation is ideal for developing nimble, responsive websites, Bootstrap uses HTML, CSS, and jQuery library to make responsive web pages,

JavaScript Frameworks For Front-End Development

Modern web applications use JavaScript in the front-end. We have listed the best frontend frameworks to use in 2021 for web and mobile applications.

Back-end technologies include:

  • Operating system
  • Web server: Apache, Nginx
  • Databases: Neo4j, MySQL, Oracle, PostgreSQL, Microsoft SQL Server, and others
  • Programming languages:  Objective-C, Python, PHP, Java, C#, and others
  • Cloud infrastructures and services: AWS, Heroku, Google Cloud, Microsoft Azure, and others.
  • Various frameworks build over programming languages: Django, .NET, Node.js, and others;

Once again, we have listed the best backend frameworks to use in 2021 that you may use.

Here are a few types of popular back-end tech stack combinations used mostly:

LAMP Stack

The LAMP stack helps in building an environment for running PHP applications. It’s used for hosting websites on Linux. The stack is made up of the following technologies: Linux (the environments OS), Apache (the HTTP server), MySQL (the database), and PHP (the server-side programming language).

Wins Stack

Windows Internet Naming Service (Wins) is another back-end stack that consists of a Windows server, internet information services, .Net, and Microsoft SQL Server. It’s a system that is used to determine the IP address associated with a particular network computer.

MEAN Stack

The mean stack consists of MongoDB, Express.js, Angular, and Node.js. It is more of a full-stack structure. It‘s an open-source JavaScript software stack for building dynamic websites and web applications.

Xampp Stack

Xampp toolkit consists of X, Apache, MySQL or MariaDB, PHP, Perl. AMP stack lets you install Apache, MySQL, and PHP on your computer together with some other useful software. It’s designed to provide you an easy installation experience.

MERN Stack

MERN consists, MongoDB, Express, React/Redux, and Node.js. The MERN stack is very similar to the MEAN stack. This stack is sought after because of the growth in popularity of ReactJS in front-end development and NodeJS in back-end development and is useful for building high-end single-page applications.

Choosing the right Tech Stack | 11 must-know things

Your choice of technology stack should be based primarily on the quality and functional requirements you want to have in your app or website. If that tech stack can develop all the desired features and functions you want, then, it’s the right choice.

The Size & Complexity of the Project

One of the key factors to watch out for is the size of your project. The tech stack needed for a mid-sized or even large project will vary from that needed for a small project. Besides the size, the complexity of the project also matters a lot. Complex projects ask for thorough technologies and tools.

The Product Functionality and Specification 

You need to be sure that your defined functionalities should solve the problems of your target audience. It makes sense to run this step after or along with market research to find out what products already exist and what additional specifications your software needs to have to beat the competition. According to this, you will be able to choose your right set of tools.

Products’ Required Speed and Functions

It goes forward to double-check the compatibility and efficiency rate of pairing a project and tech stack. Here, the functions, and speed expected with the project is supposed to deliver to its users well, which goes a long way in determining which tech stack to use.

System Load Requirements

This is another very important aspect to pay attention to. Several projects have different processing loads and therefore not all tech stacks can serve all processing load requirements. With this, you will need to compare your prospective product processing loads with the capacity of the tech stack to ensure that it can meet that need.

Clearly defined requirements for MVP

MVP is the imperative to the mobile & web application development process of a product. As a bare-bones set of crucial elements, MVP is generally designed for experimental proof of the competitiveness and viability of the product in a real market situation. Thus, it’s essential to understand what matters to an app right from the start and what technologies will be needed in the future.

Scalability Requirements

It’s essential to understand that there are two types of scalability — horizontal and vertical.

Horizontal scalability means the capability of running on more devices. Vertical scalability helps in adding more elements to an application. Both are equally important for the growth and efficient operation of the product.

The tech stack you choose should be able to support your app as it scales up. When you are ready to enhance your productivity, your tech stack should be equipped with the right tools, frameworks, and aspects that would step up the process without wasting time or money. As the app landscape is dominated by MVP models, your stack should be able to support upgrade and scalability at various stages after the launch of a prototype without complicating things.

Performance Requirements

The influence of performance stats comes from two sources. One from the business requirement and the other is what the technology is capable of in a situation.

Performance requirements determine how fast the system can react and how many requests the system can process at what rate. Since the whole operation must react to thousands of events at millisecond speed – it makes sense to pick the most reliable option.

Costs

Budgeting the tech stack is probably the trickiest thing in the entire development process. Why? Well, software development is not precisely writing on a piece of paper with a pencil — it demands a significant financial resource to get the job done. There are:

  • Subsequent maintenance costs
  • Technology education & licensing fees
  • Developers’ salaries
  • Hosting costs for keeping the product

The trick is to avoid overspending wherever possible, avoid bloating, and balance things out.

DevOps & security requirement

The kind of DevOps practices you are used to, as well as the level of the security requirement, is a crucial factor, too. Will your app just serve as an informational hub for end-users or your app will manage their financial data?

If you need to manage user data, security is of paramount importance and hence, you should also consider choosing a tech stack that always facilitates a high-end security framework to fulfill app development goals.

Maintenance

The Tech stack should be easy to manage without lengthy codes. If your tech stack confuses your developers with complex codes and takes a long time to process and complete a task, then you might get stuck after a point in development.

At the same time, choosing a stack that has a very illegible coding structure can lead to additional spending on training and development of resources. So, your focus should be on finding a tech stack on which code is easy to maintain for your development team.

Seek out professional guidance

If you are new to the world of application tech stacks, then seeking out the help of an IT professional is a good idea. These professionals will be able to provide the guidance needed to get the best tech stack components.

Conclusion

These are the essential things you need to know about Tech Stack as a concept and how it affects the development of a project and defines its prospects.

With these tips, you will be able to navigate in the vast sea of options, not get caught in the shuffle, or lose sight of your goals.

Contact Us right away to discuss your website or app development tech stack according to your business requirement and complexities.

About Galaxy Weblinks

We specialize in delivering end-to-end software design & development services and have hands-on experience with large, medium, and startup business development requirements. Our engineers also help in improving security, reliability, and features to make sure your business application scale and remain secure.

Customer Journey Mapping For Better Website Performance

The most important question that project managers should ask themselves is, “How do I help my customers achieve their goals on my website while still achieving mine?” Focusing on that question is the starting point for improving your website experience and building a customer journey map. The first goal for preparing a customer journey map is to identify the customers’ requirements and what they are seeking using your website. Your team (Designer/ Developer/ Tester) should understand the entire process your customers go through.

The Journey Phases

This implies the different stages in the customer’s journey. They may vary as per particular scenarios. Each company can use data to analyze what these phases are as per the corresponding situation. Here are some examples:
  • For a B2B scenario (like rolling out an internal tool), the stages could be purchase, adoption, retention, expansion, advocacy.
  • For a big (or luxury) purchase (like test driving and buying a car), the stages can be engagement, education, research, evaluation, justification.
  • For an ecommerce scenario (like buying Bluetooth speakers), the stages can be – discovery, try, buy, use, seek support.
This will help you determine your journey phases according to your business type. There’s a common saying that you can’t understand someone until you’ve walked a mile in their shoes – and that’s exactly what customer journey maps do. They help you put yourself in your customers’ shoes and understand your business from their point of view. Based on this rationale, you can’t deny the importance of a customer journey map. Thus, we’ve created the following steps for crafting the best map to help your company website improve.

1. Set clear objectives

Before you can dive into creating your map, you need to ask yourself why you are making one in the first place. What goals are you directing this map towards? Who is it specifically about? What experience is it based upon? You can start by writing down the objectives on sticky notes or use a customer journey template. A customer experience map will help you narrow down one specific interaction with your business. You can have individual customer experience maps for each of the following scenarios of your business:
  • Reading your blog or exploring your website
  • Interacting with a customer support agent
  • Visiting your store or your ecommerce site
  • Using your product at home or work
  • Interacting with sales during the process of becoming a customer

2. Profile your personas and define their goals

Next, you should conduct research. Some great ways to get valuable customer feedback is through questionnaires and user testing. The important thing is to only reach out to actual customers or prospects. You want the feedback of people who are interested in purchasing your products and services and who have interacted with your company before or plan to do so. TIP: It’s best to pick your most common customer persona and consider the route they would typically take while engaging with your business for the first time. You can use a marketing dashboard to compare each one and determine which would be the best fit for your journey map. Don’t worry about the ones you leave out, as you can always go back and create a new map that’s specific to these customer types.

3. Monitor how your customers move on your site

It’s important to understand how users move through your website. For example, if you’re offering a discount code to all first-time visitors, then why is the sales low? The offer (or, ability) might be great, but consumers still lack the motivation to buy. In this case, it doesn’t matter how much products are discounted. This common scenario can be uncovered with the Behavior Flow report from Google Analytics. Make sure to examine different segments of users, whether it’s first-time visitors, returning visitors, purchasers, or create a custom segment for visitors with long session durations but no purchases: Google Analytics: Behavior Flow Look for trends, like specific drop-off points were so many users are leaving your site without converting. What page do most first-time visitors view after landing on your homepage?

4. List out all the touchpoints

Touchpoints are all the places on your website that your customers can interact with you. Based on your research on Google Analytics or basic research on your CMS dashboard, you should list out all the touchpoints your customers and prospects are currently using, as well as the ones you believe they should be used if there is no overlap. Apart from Analytics on your website, you need to determine how your customer might come across you online. These might include:
  • Social channels
  • Paid ads
  • Email marketing
  • Third-party review sites or mentions
This is an important step in creating a customer journey map because it gives you insight into what actions your customers are performing. If the number is more than expected, it is likely that your website navigation is complicated. However, if they are using fewer touchpoints than expected, this may imply that they are not convinced with your offerings and may leave the website early.

5. Map the pain points

Go back over the map and jot down pain points on sticky notes. Place them underneath the corresponding touchpoints on the journey. For added value, talk about the impact of each pain point. Is it trivial, or is it likely to necessitate some kind of hack or workaround? Even worse: does it cause the user to bounce off the website and leave their journey entirely? Get to know what roadblocks are stopping your customer from making their desired action.

6. Improvement Ideas

Start by prioritizing which touchpoints or pages to address first. You can rank pages by cost-effectiveness and or how easy they are to change. Improvement ideas are usually integrations, services, or features that we can enable. Then, it’s a matter of determining what to test. For instance, if research suggests that customers worry about getting locked into a particular plan after they sign up, tweaking your copy on a relevant page could minimize their hesitations.

Conclusion:

Once you have a better understanding of the customer journey, you can use that knowledge to improve your site by honing your messaging to match customer needs, smoothing out frustration points, eliminating extra steps, and even creating content. This will ensure your website is providing a seamless and effective interaction for customers, which leads to a better user experience. The companies need to anticipate the routes their customers may take, and optimize their customer experience along the multiple touchpoints rather than relying on one assumed journey. About Galaxy Weblinks We specialize in delivering end-to-end software design & development services. Our digital product designers are creative problem-solvers with a decade of experience in all facets of digital and interactive design. We create compelling and human-focused experiences delivered through clean, and minimalist UI.

A lowdown of PHP 8.0 update

The latest major update in PHP 8 has been made available to the public. It’s a typical three-year cycle version upgrade of PHP. Comes with a few radical alterations, so there’s a high chance you’ll need to make a few changes in code before upgrading. Some of the major features and optimizations introduced in this update are named arguments, union types, attributes, constructor property promotion, match expression, nullsafe operator, JIT, and improvements in the type system, error handling, and consistency. Here’s a lowdown of the official update announcement:

PHP 8 Named arguments

// PHP 7 htmlspecialchars($string, ENT_COMPAT | ENT_HTML401, ‘UTF-8’, false); // PHP 8 // Specify only required parameters, skipping optional ones. // Arguments are order-independent and self-documented. htmlspecialchars($string, double_encode: false);

PHP 8 Attributes

Instead of PHPDoc annotations, you can now use structured metadata with PHP’s native syntax. // PHP 7 class PostsController { /** * @Route(“/api/posts/{id}”, methods={“GET”}) */ public function get($id) { /* … */ } } // PHP 8 class PostsController { #[Route(“/api/posts/{id}”, methods: [“GET”])] public function get($id) { /* … */ } }

PHP 8 Constructor property promotion

Less boilerplate code to define and initialize properties. // PHP 7 class Point { public float $x; public float $y; public float $z; public function __construct( float $x = 0.0, float $y = 0.0, float $z = 0.0, ) { $this->x = $x; $this->y = $y; $this->z = $z; } } // PHP 8 class Point { public function __construct( public float $x = 0.0, public float $y = 0.0, public float $z = 0.0, ) {} }

PHP 8 Union types

Instead of PHPDoc annotations for a combination of types, you can use native union type declarations that are validated at runtime. // PHP 7 class Number { /** @var int|float */ private $number; /** * @param float|int $number */ public function __construct($number) { $this->number = $number; } } new Number(‘NaN’); // Ok // PHP 8 class Number { public function __construct( private int|float $number ) {} } new Number(‘NaN’); // TypeError

PHP 8 Nullsafe operator

In the latest version you can use a chain of calls with the new nullsafe operator instead if null check conditions. In case of chain failure, the execution of the entire chain aborts, and the entire chain evaluates to null. // PHP 7 $country =  null; if ($session !== null) { $user = $session->user; if ($user !== null) { $address = $user->getAddress(); if ($address !== null) { $country = $address->country; } } } // PHP 8 $country = $session?->user?->getAddress()?->country;

PHP 8 Match expression

The new match is similar to switch and has the following features: Match is an expression, meaning its result can be stored in a variable or returned. Match branches only support single-line expressions and do not need a break; statement. Match does strict comparisons. // PHP 7 switch (8.0) { case ‘8.0’: $result = “Oh no!”; break; case 8.0: $result = “This is what I expected”; break; } echo $result; //> Oh no! // PHP 8 echo match (8.0) { ‘8.0’ => “Oh no!”, 8.0 => “This is what I expected”, }; //> This is what I expected Since the update has breaking changes, it’s advisable to have experts help you with the migration to avoid any unexpected downtime. We have a team of experts that’s well versed in PHP. Get in touch with us here if you’re looking for a quick and hassle-free upgrade.