5 Tips to Protect Your WordPress Site Against DDoS Attacks

We all have been on the internet long enough to know that while it brings the world in our palms, it is also vulnerable to theft and attacks. When your website grows, it also gets vulnerable to security threats like DDoS attacks, phishing attacks, SQL injection attacks, cross-site scripting(XSS), password thefts, and more.

In this blog, we are going to talk about the most common threat – a DDoS attack. A DDoS or Distributed Denial of Service, dramatically slows down your website and renders it inaccessible to users. This may directly impact your conversions and business revenue, as it causes an unsatisfactory user experience.

Understanding DDoS

Distributed Denial of Service attack is essentially a process of swarming the server or a network with bot traffic, to overwhelm the system and ultimately cripple the website for real users. With the help of multiple computers, the attackers send thousands of requests to the target server, typically more requests than the server were built to support at a time.  

Here are some tips to keep your WordPress website safe from DDoS attacks: 

1. Get your Hosting right

There are plenty of options when it comes to web hosting. But choosing the right one can be a deciding factor in keeping your website safe. 

Not all web hosts are created equal! Some may kneel under even a moderate strain. Ensure that your host is capable of handling DDoS attacks and your website remains functional and accessible to users under worst-case scenarios. 

2.  Setup a Website Application Firewall (WAF)

Another way of securing your WordPress website is to set up a Website Application Firewall (WAF). It protects your website by adding a layer of protection between your site and web traffic. It also utilizes an intelligent algorithm that automatically blocks incoming malicious traffic. 

3. Disable XML-RPC

XML-RPC is a WordPress feature that allows you to connect your site with any 3rd party application. It comes enabled by default and you may find it difficult to disable it. The ability to connect with 3rd party applications is a great thing but it comes at a cost. It leaves your website vulnerable to security threats such as DDoS. 

Although it’s absent from the dashboard, there is a way to disable XML-RPC. You can do so by accessing your .htaccess file through your host’s cPanel account. Just copy-paste the code mentioned below at the end of the file.

# Block XML-RPC

<Files xmlrpc.php>

order deny,allow

deny from all

allow from // IP

</Files> 

Save and exit.

4. Disable REST API

Just like the XML-RPC, REST API also allows 3rd party applications to access your WordPress site. It allows the plugins to send/receive data or delete content. However, it also leaves your website vulnerable to attacks.

Unlike XML-RPC, disabling REST API is not a chore. It’s pretty straightforward. This plugin will disable it for you. 

5. CDN to the rescue

CDN or Content Delivery Network utilizes multiple servers spread across the world to reduce loading time and increase the speed of your website.

What CDN does is that it stores your website’s files in caches residing in their data centers. Now whenever a visitor requests your website the CDN immediately loads it through their caches without having to approach your host server. While the CDN is increasing the speed of your, it’s also filtering out malicious traffic to prevent DDoS at the same time. 

Related blogs:

9 steps to ensure high speed of WordPress website

What makes a great WordPress plugin

Final Thoughts

As you expand your business and more and more users start to show up to your website, the potential impact of a threat such as a DDoS also grows. So do what all is necessary and secure your WordPress website today. Our tips will help you along the way and if you’re looking for WordPress experts to fortify your website then give us a call.

About Galaxy Weblinks Galaxy Weblinks is your one-stop solution for WordPress solutions, We offer a complete range of IT services including WordPress development and WordPress optimization. Contact us now for the complete WordPress solutions.

Top Python Frameworks for Web Development in 2022

What does a Python programmer need to make their life a little bit easier for themselves? Using frameworks is the answer. This allows developers to focus on application logic rather than routine elements because frameworks automate the implementation of redundant tasks.

Python is one of the most popular programming languages, and there is no dearth of available frameworks. These Python frameworks have their own set of pros and cons and therefore, their selection must be based on project requirements as well as developer preferences.

When it comes to implementation, the Python programming language has a wide range of applications. In this blog, we will learn about the top Python frameworks. 

We will cover – 

  • Why Python for Web Development
  • Why Use A Framework?
  • What Are Popular Frameworks In Python?
  • Top Python Uses In The Real World
  • Conclusion
  • Useful Resources

Why Python for Web Development

Quicker prototyping: Python takes comparatively lesser time to finish your projects vis-a-vis other programming languages. Therefore, it takes lesser time to structure your ideas. This is the reason Python is the programming language of choice for startups.  

Large user base: Python is one of the most widely used languages in the world, with users from all over the globe. On account of its popularity, Python continues to add new features and libraries, as well as providing excellent documentation and community assistance. When it comes to support and framework for new developers, Python excels.

Libraries and ecosystem: Python offers a wide range of library tools and packages, which allows you to access much pre-written code, reducing the time it takes to develop applications. You can use Numpy and Pandas for mathematical analysis, Pygal for charting, and SQLALchemy for composing queries, for example. You can use web frameworks in Python such as Django and Flask, which we’ll talk about further down in this article.

Why Use a Framework?

A toolbox would be a good metaphor for what we are trying to achieve. It consists of pre-written, standardized packages and modules that make the development of web applications faster and easier, as well as more reliable and scalable. Instead of having to do all of the grunt work yourself, frameworks come with built-in components that “set up” your project from the ground up. 

As a server-side technology, Python web frameworks are primarily used to aid URL routing, HTTP requests and responses, accessing databases, and web security. When developing web applications, a web framework can help you develop complex applications in a fraction of the time.

What Are Popular Frameworks In Python?

In order to make their lives easier, Python programmers require frameworks. Frameworks reduce development time by automating the implementation of redundant tasks, allowing developers to focus on application logic rather than routine elements.

The fact that Python is one of the most popular programming languages means that there is no shortage of frameworks. There are advantages and disadvantages to using different frameworks. As a result, the selection should be based on the project’s requirements and developer preferences. Here is a list of some best python frameworks:

1. Bottle

Bottle generates a single source file for each application created with it. It is one of the most effective Python web frameworks. Python’s microframework was originally designed to help developers create APIs. One of the most significant benefits of using this framework is that it allows developers to work more closely with the hardware. 

The Bottle is an excellent choice for learning the organization of web frameworks and prototyping, in addition to creating simple personal-use apps.

 2. CubicWeb

This Full-Stack framework CubicWeb is a free, semantic, open-source, Python-based web framework developed and maintained by Logilab. CubicWeb requires a data model to be defined to develop a functional application.

Unlike other popular Python frameworks that use separate views and models, CubicWeb makes use of the cube. Then, using a database, a web server, and some configuration files, multiple cubes are joined together to form an instance.

3. AIOHTTP

This framework is asynchronous. AIOHTTP is a Python framework that heavily relies on Python 3.5+ features like async and await. The Python framework is asynchronous because it makes use of Python’s asyncio library. AIOHTTP, in addition to being a server web framework, can also be used as a client framework. It includes a request object and a router to allow queries to be routed to functions designed to handle them.

4. Django

This framework is a full-stack framework. Django is a popular web development framework for creating Python applications. It was named one of the top python frameworks to opt for.

Django is a free and open-source full-stack Python framework. It includes a range of built-in features, unlike the frameworks that use separate libraries. Django’s ORM is used to map objects to database tables.

Python Applications

1. Web Application Development

  • Web application development is without a doubt one of the most popular practical uses of Python. In the world of web applications, Python is the language of choice. Python is widely used in the real world for web development. Because of its scalability and ease of use, it makes applications safer and more convenient.
  • Python has numerous frameworks, including Django and Flask. This makes it possible to create apps very quickly. For web applications, Python has become more useful thanks to Django’s dynamic development capabilities. As a result of the framework’s inclusion of standard libraries, development time is reduced and the web application can be launched faster.

2. Internet of Things

  • Python can also be used in the internet of things, which is another real-world application. Using the Raspberry Pi and Python programming language, developers can turn any object into an electronic device.
  • Because Python can be used to create embedded software, it can be applied to smaller objects that can work with the programming language at high-performancelarge-scale levels.
  • With the Raspberry Pi, developers can use Python applications to perform high-level computations. A smart object can be created by embedding a microprocessor within a normal object.
  • Industrial IoT is widely used to track inventory, move machines and track order processing along with shipment status in large scale industries.

3. Enterprise Applications

  • Unlike regular web applications, enterprise apps have a unique set of features. As opposed to individual users, they are designed to meet the needs of an organization.
  • The use of Python in enterprise applications varies from company to company. They use it because of its scalability, readability, and ability to do a lot of different things.
  • Due to the need for a large amount of security and database handling capabilities, enterprise applications can be complex. As a robust language, Python can handle multiple database requests at the same time.

Improve your productivity with a top-notch enterprise Python application. Get a Free Consultation Here.

4. AI and Machine Learning

  • Artificial Intelligence and Machine Learning are probably the most interesting practical applications of Python. Developing Machine Learning models requires the use of Python, which is a stable and secure language capable of handling computations.
  • A large number of Machine Learning libraries are available in Python. Included in this are SciPy and Pandas as well as TensorFlow and NumPy.
  • There are a wide variety of ways that businesses can benefit from the use of Python language in AI solutions including advanced computing, data analytics, image recognition, and much more. 

Conclusion

Python can handle almost any type of request, making it extremely useful for all types of development tasks. Python is now used in a wide range of applications, from enterprise apps to gaming.

Python is quickly becoming a popular tool for developing a wide range of applications. At Galaxy, we have an expert team of Python developers who can assist you in developing a Python app. Talk To Us Today.

Useful Resources:

Blogs:

Node.js vs Python | Which Backend Framework to Choose?

Our Backend Development Technology Favorites in 2021

Choosing Django as Your Backend Framework in 2021

Choosing the best Software Architecture for your Enterprise App

Podcasts and videos:

Talk Python To Me Podcast

Python Bites

Test and Code

The Real Python Podcast

About Galaxy Weblinks

We specialize in delivering end-to-end web application design & development services and have hands-on experience with popular back-end languages and frameworks like Node.js, Python, etc. We have expertise in customizing websites for multiple business or web application development requirements, be it IoT, enterprise application, or a customized machine learning platform. Contact us for your project discussion today.

Tools and Best Practices To Speed Up The Vue.js Development Process

Does your Vue.js application take a long time to load, navigate, submit, or perform any user actions. Your users will not appreciate this delay. According to statistics, 53 percent of users do not want to spend time on applications that take more than three seconds to load.

Building a performance-optimized application will improve the user experience and gradually increase user interactions. Unfortunately, most developers fail to recognize the significance of performance and end up creating a large application with performance issues. It is difficult to create an application, but creating a well-optimized high-speed application is even more difficult.

In this article, we’ll look at best practices to follow, pitfalls to avoid, and a closer look at some useful tools to make writing Vue.js easier. The best practices we are sharing are applicable for both Vue 2 and Vue 3, the power-packed version of Vue2.

#1 Third-Party Libraries And Optimization

We almost always avoid using third-party libraries in our apps. This can, in turn, result in increasing the bundle size and slowing down our application.

We recently used the Vuetify component library in a project and discovered that the overall bundle size after minification was 500kb. This may impact the performance of our application. You can use webpack-bundle-analyzer to determine the size of your app’s bundle. You can install it by running the following command:

npm install –save-dev webpack-bundle-analyzer

and add it in your webpack config file:

const BundleAnalyzerPlugin = require(‘webpack-bundle-analyzer’).BundleAnalyzerPlugin;

module.exports = {
  plugins: [
    new BundleAnalyzerPlugin()
  ]
}

#2 Remove or Reduce Slow Components

When developing new components from scratch, but especially when importing third-party components, you must ensure that they perform well. You can estimate the rendering time of each component you’re using by using the Vue.js dev tools performance tab. When you add a new component, you can see how long it takes to render in comparison to your existing components.

If the new component takes significantly longer than your existing components, you may need to consider it, or remove it, or try to reduce its usage.

#3 Optimize Event Handling

Not all events are created equal, you must ensure that you are properly optimizing for each of them.

The @mouseover and window.scroll events are two excellent examples. Even with normal usage, these two types of events can be triggered numerous times. If your event handlers perform expensive calculations, these calculations will be repeated multiple times per second, causing lag in your application. A debounce function can be used to limit the number of times these events are processed.

Best practices for optimizing your Vue app:

  • Our main bundle should only include dependencies that are essential to our apps, such as vue and vuex. We should avoid including libraries used in specific routes in our app in the main bundle.
  • When using component libraries, you can import individual components rather than the entire library. Vuetify, for example:
<template>
  <v-app>
    <v-navigation-drawer app>
    <!– –>
  </v-navigation-drawer>
  <v-app-bar app>
    <!– –>
  </v-app-bar>
</v-app>
</template>
<script>
import { VApp, VNavigationDrawer, VAppBar } from ‘vuetify/lib’

export default {
  components: {
    VApp,
    VNavigationDrawer,
    VAppBar,
  }
}
</script>

We can reduce the bundle size and redundant code by only using the components we want to use in that specific route.

#4 The right way to use Vuex Modules

As the modules we’ve created become more complex, they also get more difficult to manually import and organize. It is recommended that your modules include an index.js file at the root of the module, bringing all the files together.

Maintainability will be improved if your store follows a consistent naming pattern. You can use camelCase to name the modules, followed by a.store.js extension. CartData.store.js is an example.

modules/
      ├── cart.js
          ├── index.js   -> auto export module      
          ├── userProduct.store.js
          ├── userData.store.js

Because of the blocking behavior of mutations, code related to business logic or async code should not be run within them. Here we recommend using actions. It is recommended that you do not directly access a state object. Instead, use the getter function, which can be mapped into any Vue component using the mapGetters function, which behaves like a computed property, with the getter’s result cached based on its dependencies. Also, ensure that each module is namespaced and that it is not accessed through the global state scope.

#5 Remove Duplicate Rendering

Rendering full lists or heavy elements more than necessary is a sneaky issue, but it’s very simple to implement.

Let’s say that you have a component with an entity property in your data object.

If you followed the previous step, you most likely have a child component that renders each entity.

<entity :entity=”entity” v-for=”entity in entities” :key=”entity.id” />

Read more: Vue vs React: When and How to Make the Right Choice

Tools to Make Vue Work Easier

When working with Vuejs, we may come across some features that we would like to implement but would take a long time to hard code or would be difficult to implement. As professional developers, we add tools and helper libraries to make life easier, and we’ll look at a few of them.

#1 Component Libraries 

A component library is a collection of reusable components that we can use in our application to make UI development faster and more consistent. Vue, like React and Angular, has dedicated component libraries. Among them are the following:

  • Vuetify

This is also a material design component framework with ready-made code scaffolding, a large community, and regular updates.

  • Buefy

Based on the Bulma CSS framework, this is a lightweight component library. If you’re familiar with SASS, you’ll have no trouble using it.

  • Material Kit for Vue

A “Badass” Vue.js UI kit based on the material design language. It is made up of more than 60 handcrafted components.

#2 Testing Libraries 

When developing large-scale applications, testing can be critical. It assists us in avoiding unnecessary bugs during development when working as part of a team. Let’s take a look at the three types of testing we can perform in our Vue application, as well as the frameworks that support them.

  • End-to-End Tests

Nightwatch.js, Cypress.

  • Unit testing

Jest, Mocha.

  • Component Testing

Vue Testing Library, Vue Test Utils.

Conclusion

No matter how large-scale your application is, it must be optimized. You are only one click away from onboarding a VueJS expert to optimize your Vue.js app and satisfy your end-users. Contact us to learn about our one-of-a-kind Vue.js best practices and Vue.js application development services.

About Galaxy Weblinks

We specialize in delivering end-to-end software design & development services. Our UI/UX designers are creative problem-solvers with a decade of experience in all facets of digital and interactive design. We create compelling and human-focused experiences delivered through clean, and minimalist UI. Get in touch with us here.

Comparing and Evaluating the Best QA Automation Tools of 2021

A test automation tool helps teams and organizations automate their software testing process. Automation reduces the need for human intervention, achieving greater speed, reliability, and efficiency.

Software is getting more and more complex. Consumer demands are growing. This leaves developers under constant pressure to deliver new apps and updates fast. Regardless of the pressure, software testing remains a necessary process to ensure quality.

Developers look to automated testing to speed up the QA and maximize efficiency. Manual testing is important and will remain so. But, automation helps development agencies save time and money. 

QA automation tools take over repetitive tasks. It frees teams to do more complex or more creative problem-solving. That said, 100% automated testing isn’t a thing yet. Automation tools only help take the mundane stuff off the developer’s plate. Time and energy saved by developers are proportional to money saved by the client.

In this post, we are discussing a handful of QA automation testing tools on the market and what they do. 

***

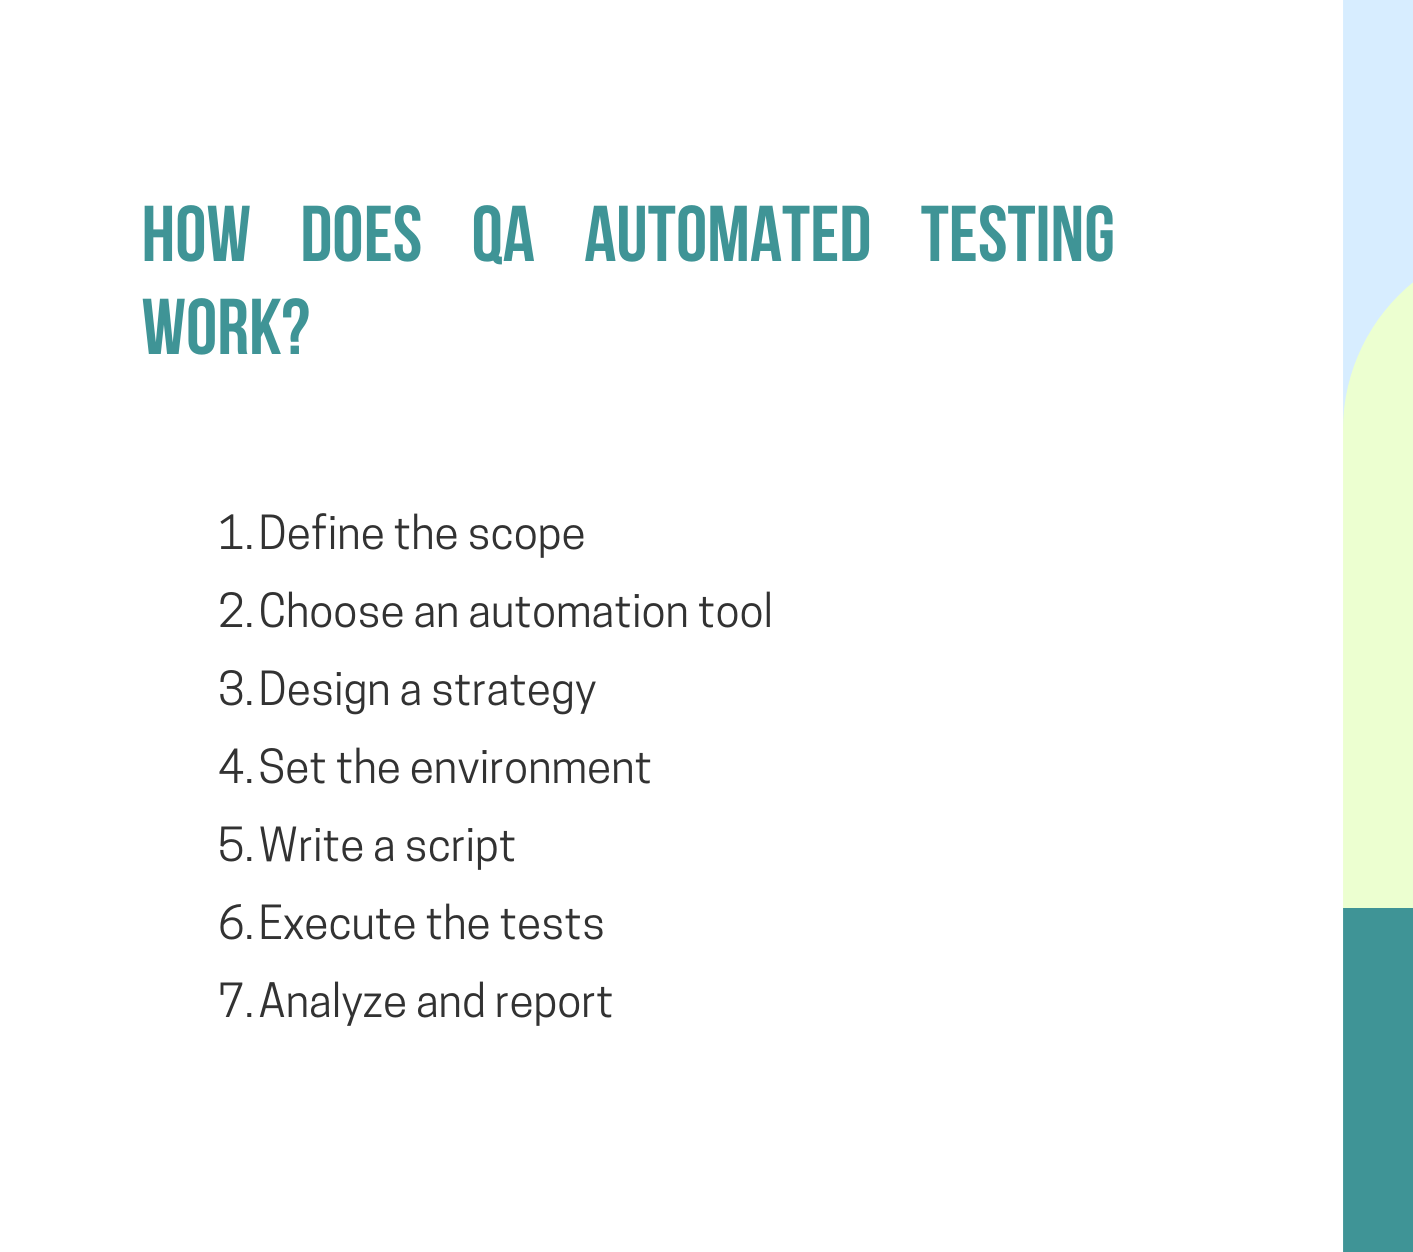
how-does-qa-automated-testing-work-1

Here are the Best QA Automation Tools of 2021/2022

  1. LambdaTest
  2. Testim
  3. Kobiton
  4. Appsurify
  5. Mabl
  6. AppliTools
  7. Zebrunner
  8. Katalon Studio

LambdaTest 

Lambda eliminates all the pain of managing a Selenium infrastructure with an online Selenium Grid. Lambda’s Selenium Grid comes with the latest & legacy browsers & OS. Selenium reporting features are not impressive, but Lambda Test takes care of that. 

  • Lambda’s detailed automation test logs help in debugging Selenium scripts. 
  • Test logs include exception logs, command logs, network logs, raw Selenium logs, and metadata. 
  • Lambda provides video recording of the entire script execution with command screenshots. 
  • It allows extraction of Selenium reports using RESTful Selenium API.

Testim 

Testime is not a tool but a platform. It includes all the prime factors of automated tests. Authoring & execution, maintenance, troubleshoots, reporting, etc. 

Testime increases the extensibility and stability of the test suites. It allows the extension of the functionalities of the platform. For that, it uses complex programming logic with JavaScript and HTML.

Testim empowers users to write customized tests that can be codeless or coded. It uses artificial intelligence to make tests resilient. It can run parallel tests across browser types on its test cloud and create and publish bug reports. Testim caters to both beginner and advanced users. Even non-technical team members can create code-free tests. 

Kobiton

Kobiton lets you build a test execution plan for a mobile app or website. You can build, test, deploy, and release mobile apps, websites, and IoT devices. Wherever users want – real devices, on-premise, or in the cloud. 

Kobiton automates AI-driven scriptless solutions and AI-assisted script generation. Also the functional, performance, and visual tests. With Kobiton, automate test scripts from manual test sessions to execute on devices. Kobiton’s NOVA AI engine auto-generates Appium scripts without any actual scripting required. Kobiton also supports integration into all the major CI/CD platforms.

Appsurify 

Appsurify’s risk-based testing tool fetches immediate test feedback from automation testing. Appsurify TestBrain is not a test tool. It is a tool that makes existing testing run faster and better. It can come as a Saas or on-premise solution. 

TestBrain addresses common testing issues. Slow test completion, flaky failures, delayed test results, unstable builds, inefficient CI pipelines, etc.

Appsurify TestBrain works with all test frameworks (UI, E2E, Integration, etc.). It gives results back in 92% less time. 

TestBrain uses machine learning to determine the application’s area that developers changed. It then only runs the relevant tests affected by those changes. It helps in running the right tests from the test suite. Saves you from wasting time and money on tests that are certain to pass. 

Mabl

Mabl follows the hot trend of using AI and machine learning to help developers with testing. Mabl is an intelligent test automation tool made for fast-paced delivery cycles. Mabl integrates automated end-to-end testing into the entire SDLC.

To start, point Mabl to your application. It will begin with running default tests, common for most applications. It also uses machine-learning algorithms to improve test execution and defect detection. 

Mabl allows standardization of the cloud-native testing platform. Every team member can contribute to automated test creation and quality. It also supports the integration of testing into existing workflows. 

It has features like issue tracking, CI/CD, communication tools, and more. AI-powered auto-healing means your tests learn and evolve as the application evolves. 

AppliTools 

AppliTools is a complete automation framework for visual UI regression testing. It runs functional and visual tests across every app, browser, OS, and screen size. If you are serious about automating UI testing, you may want to give Applitools a try. 

  • Dozens of SDKs for all major languages (JS, Python, Ruby, & PHP)
  • Capture visual differences via full-page screenshots
  • Compare visual differences across every platform
  • Run functional and visual tests

AppliTools has a clean and aesthetic user interface. Boxes and panels keep projects and tests looking highly organized.

Zebrunner 

Zebrunner is an easy-to-use Test Automation Management Tool. It provides rich test artifacts and smart analysis of failures in real-time. Zebrunner is integrated with the carina-core open-source TestNG framework. It uses Jenkins as a CI Tool. It is built on top of popular docker solutions like Postgres database, Selenium Hub, Mobile Device Farm (MCloud), Zebrunner Reporting, Jenkins Master/Slaves Nodes, SonarQube, etc. With Zebrunner, the QA team gains 24/7 access to QA processes.

The tool enables fast bug fixing and easy collaboration over test results. It gives a range of benefits to the developer: 

  • Identification of flaky tests
  • Access to rich artifacts
  • AI failure reason analysis
  • Ready-made quality trend dashboards
  • Sharing test reports via email
  • Integration with on-premise CI environment, etc. 

Katalon Studio

Katalon Studio is a complete test automation solution for mobile, API, desktop, and web testing. It changed the use of open-source frameworks by eliminating the technical complexities. It allows testers to create, run, report, and manage automated tests.

The tool provides codeless test creation for amateurs. And, endless script extension and customization for pros. Any user can generate and execute tests on different OSs.

Katalon Studio offers a host of integrations like SDLC and CI/CD management, team collaboration, etc. It also supports Cucumber which is a BDD-focused software allowing test writing in plain language. 

***

The rewards of QA automation…

Automated testing is a great way to save your company time and money. While also speeding up the testing process and delivering higher accuracy. Automation won’t do everything. You still have to pick the right tools to create and maintain the tests. Also, remember that manual testing will always be necessary to some extend. Use automated testing with manual testing and you get to catch a high number of bugs and defects. 

Experts like Galaxy Weblinks can help you combine the two methods for good. We also help you with tool selection and usage. Visit the website to learn more and chat with us.

Top 15 JavaScript Tips and Tricks to Increase your Speed and Efficiency

Most programming languages are flexible enough to allow programmers to achieve similar results in a variety of ways. JavaScript isn’t any different. JavaScript is without a doubt one of the coolest languages in the world, and it is growing in popularity by the day. With JavaScript, we frequently find multiple ways to achieve the same result, which can be perplexing at times.

Some of the applications are superior to the alternatives. With our profound expertise in JavaScript, we will happily share a few tips and tricks that would help you. Let’s get started.

1. Swap values with Array Destructuring

The destructuring assignment syntax is a JavaScript expression that allows you to extract values from arrays or properties from objects and store them in separate variables. We can also use it to quickly swap values, as shown below:

let a = 1, b = 2
[a, b] = [b, a]
console.log(a) // result -> 2
console.log(b) // result -> 1

2. Remove duplicates from an Array

This is a very simple trick. Assume we created an array with numbers, strings, and booleans, but the values are repeating themselves multiple times and we want to remove the duplicates. So here’s what we can do:

const array = [1, 3, 2, 3, 2, 1, true, false, true, ‘Kio’, 2, 3];
const filteredArray = […new Set(array)];
console.log(filteredArray) // [1, 3, 2, true, false, “Kio”]

3. Shuffle an Array

Making use of the inbuilt Math.random() method.

const list = [1, 2, 3, 4, 5, 6, 7, 8, 9];
list.sort(() => {
    return Math.random() – 0.5;
});
// Output
(9) [2, 5, 1, 6, 9, 8, 4, 3, 7]
// Call it again
(9) [4, 1, 7, 5, 3, 8, 2, 9, 6]

4. Nullish Coalescing Operator

The nullish coalescing operator (??) is a logical operator that returns its right-hand side operand when its left-hand side operand is null or undefined and otherwise returns its left-hand side operand.

const foo = null ?? ‘my school’;
// Output: “my school”

const baz = 0 ?? 42;
// Output: 0

5. Functional Inheritance

The process of receiving features by applying an augmenting function to an object instance is known as functional inheritance. The function provides a closure scope that can be used to keep some data private. The augmenting function uses dynamic object extension to add new properties and methods to the object instance.

They look like:

// Base function
function Drinks(data) {
  var that = {}; // Create an empty object
  that.name = data.name; // Add it a “name” property
  return that; // Return the object
};

// Function which inherits from the base function
function Coffee(data) {
  // Create the Drinks object
  var that = Drinks(data);
  // Extend base object
  that.giveName = function() {
    return ‘This is ‘ + that.name;
  };
  return that;
};

// Usage
var firstCoffee = Coffee({ name: ‘Cappuccino’ });
console.log(firstCoffee.giveName());
// Output: “This is Cappuccino”

6. Single-liner Palindrome check

Well, this is not a shorthand trick overall but it will give you a clear idea to play with strings.

function checkPalindrome(str) {
  return str == str.split(”).reverse().join(”);
}
checkPalindrome(‘naman’);
// Output: true

7. Simple Swap 2 values using Destructuring

let a = 5;
let b = 8;
[a,b] = [b,a]

[a,b]
// Output
(2) [8, 5]

8. Convert Decimal to Binary or Hexa

We can use some in-built methods like .toPrecision() or .toFixed() to achieve many functionalities while solving problems.

const num = 10;

num.toString(2);
// Output: “1010”
num.toString(16);
// Output: “a”
num.toString(8);
// Output: “12”

9. Short For Loop

You can write less code for a loop like this:

const names = [“Kio”, “Rio”, “Mac”];

// Long Version
for (let i = 0; i < names.length; i++) {
  const name = names[i];
  console.log(name);
}

// Short Version
for (let name of names) console.log(name);

10. Using length to resize and emptying an array

In javascript, we can override a built-in method called length and set its value to whatever we want.

Consider the following example:

let array_values = [1, 2, 3, 4, 5, 6, 7, 8]; 
console.log(array_values.length);
// 8 
array_values.length = 5; 
console.log(array_values.length);
// 5 
console.log(array_values);
// [1, 2, 3, 4, 5]

It can also be used in emptying an array, like this:

let array_values = [1, 2, 3, 4, 5, 6, 7,8];
console.log(array_values.length);
// 8 
array_values.length = 0;  
console.log(array_values.length);
// 0
console.log(array_values);
// []

11. Optional Chaining

The optional chaining ?. stops the evaluation if the value before ?. is undefined or null and returns undefined.

const user = {
  employee: {
    name: “Kapil”
  }
};
user.employee?.name;
// Output: “Kapil”
user.employ?.name;
// Output: undefined
user.employ.name
// Output: VM21616:1 Uncaught TypeError: Cannot read property ‘name’ of undefined

12. Arrow Functions

Although an arrow function expression is a more compact alternative to a traditional function expression, it has limitations and cannot be used in all situations. They refer to the environment in which they are defined because they have lexical scope (parental scope) and do not have their own this and arguments.

const person = {
name: ‘Kapil’,
sayName() {
    return this.name;
    }
}
person.sayName();
// Output
“Kapil”

However, 

const person = {
name: ‘Kapil’,
sayName : () => {
    return this.name;
    }
}
person.sayName();
// Output
“”

13. Rounding numbers

The toFixed() method converts a number rounding to a specified number of decimals.

var pi =3.1415;
pi = pi.toFixed(2);  // pi will be equal to 3.14

Note: toFixed() returns a string and not a number.

14. Quicker for loops compare to legacy onces

  • for and for..in gets you index by default, but you can use arr[index].
  • for..in accepts non numeric as well so avoid it.
  • forEach, for…of gets you an element directly.
  • forEach can get you an index also but for…of can’t.
  • for and for…of considers holes in array but other 2 do not.  

15. Ternary Operator is cool

You can avoid nested conditional if..elseif..elseif with ternary operators.

function Fever(temp) {
    return temp > 97 ? ‘Visit Doctor!’
      : temp < 97 ? ‘Go Out and Play!!’
      : temp === 97 ? ‘Take Some Rest!’;
}

// Output
Fever(97): “Take Some Rest!”
Fever(100): “Visit Doctor!”

Conclusion

In this article, we shared with you the top 15 tips for improving JavaScript performance. If you go ahead and implement all these changes, you will notice a significant improvement in the speed of your JavaScript web development and applications.

It may be difficult to remember all of these tips all at once, especially if you are working under a time constraint. If you require any additional assistance, please contact us. We hope you enjoyed this blog; please return to this space for more insightful content.

About Galaxy Weblinks

We specialize in delivering end-to-end software design & development services and have hands-on experience with popular front-end and back-end languages like JavaScript. Our back-end and front-end engineers also help in improving security, reliability, and features to make sure your business application scales and remain secure.

React Native vs Flutter: Choosing the Best Hybrid Framework for Mobile App Development

Developing apps for iOS and Android using one code base is a tempting proposition. With the introduction of React Native in 2015, the already disruptive hybrid app development framework gained momentum. Prominent organizations like UberEats, Discord, and Facebook are moving their apps to React Native.

Fast-Forward to 2017, Google introduces the alpha version of their own hybrid framework called Flutter. Since then, both of the frameworks have been proving to be a dilemma for product owners and consumers looking to build hybrid applications. Which one should you choose? React Native or Flutter? Let’s break it down and figure out what is the most suitable option for you.

React-Nativ
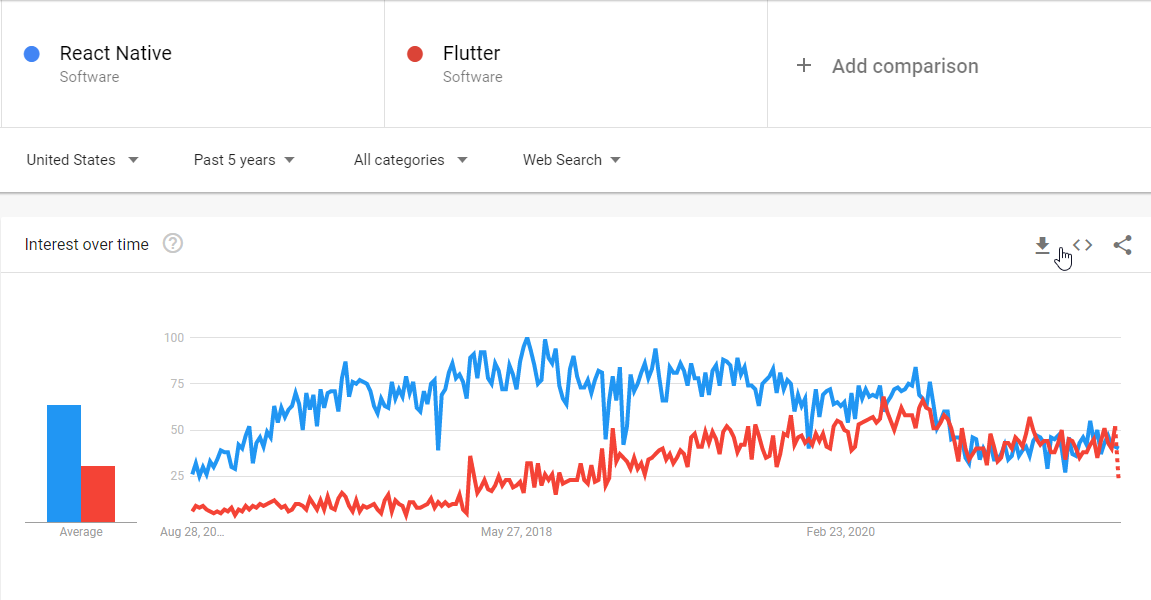
React Native and Flutter trends comparison on Google Trends

React Native vs Flutter | Productivity

One of the first things you must think about when deciding on a framework is productivity. How would it improve your efficiency? Whether the framework in question automates work functions or gets the work done in fewer lines of code.

1. Hot Reload 

This is a feature that developers love! There is nothing better than a smoothly running Hot Reload environment. React Native and Flutter both come equipped with Hot Reload. Hot Reload eliminates the need to manually recompile the application by selecting relevant commands repeatedly. This happens automatically with the help of Hot Reload whenever changes are made or new gadgets are connected. It also preserves the last state of the app. 

2. Code Structure

Unlike the previous feature, React Native and Flutter are pretty distinguishable in terms of code structure. 

  • Unlike React Native, Flutter doesn’t separate data, style, and templates.
  • You don’t need additional templating languages like JSX or XML or any special visual tools to build a layout in Flutter. 
  • Flutter lets you switch to different modes like design or code for different needs and better efficiency. 
  • Flutter has even introduced a new feature “Outline View and Flutter Inspector” to make layout building even easier. 

3. Installation and Setup

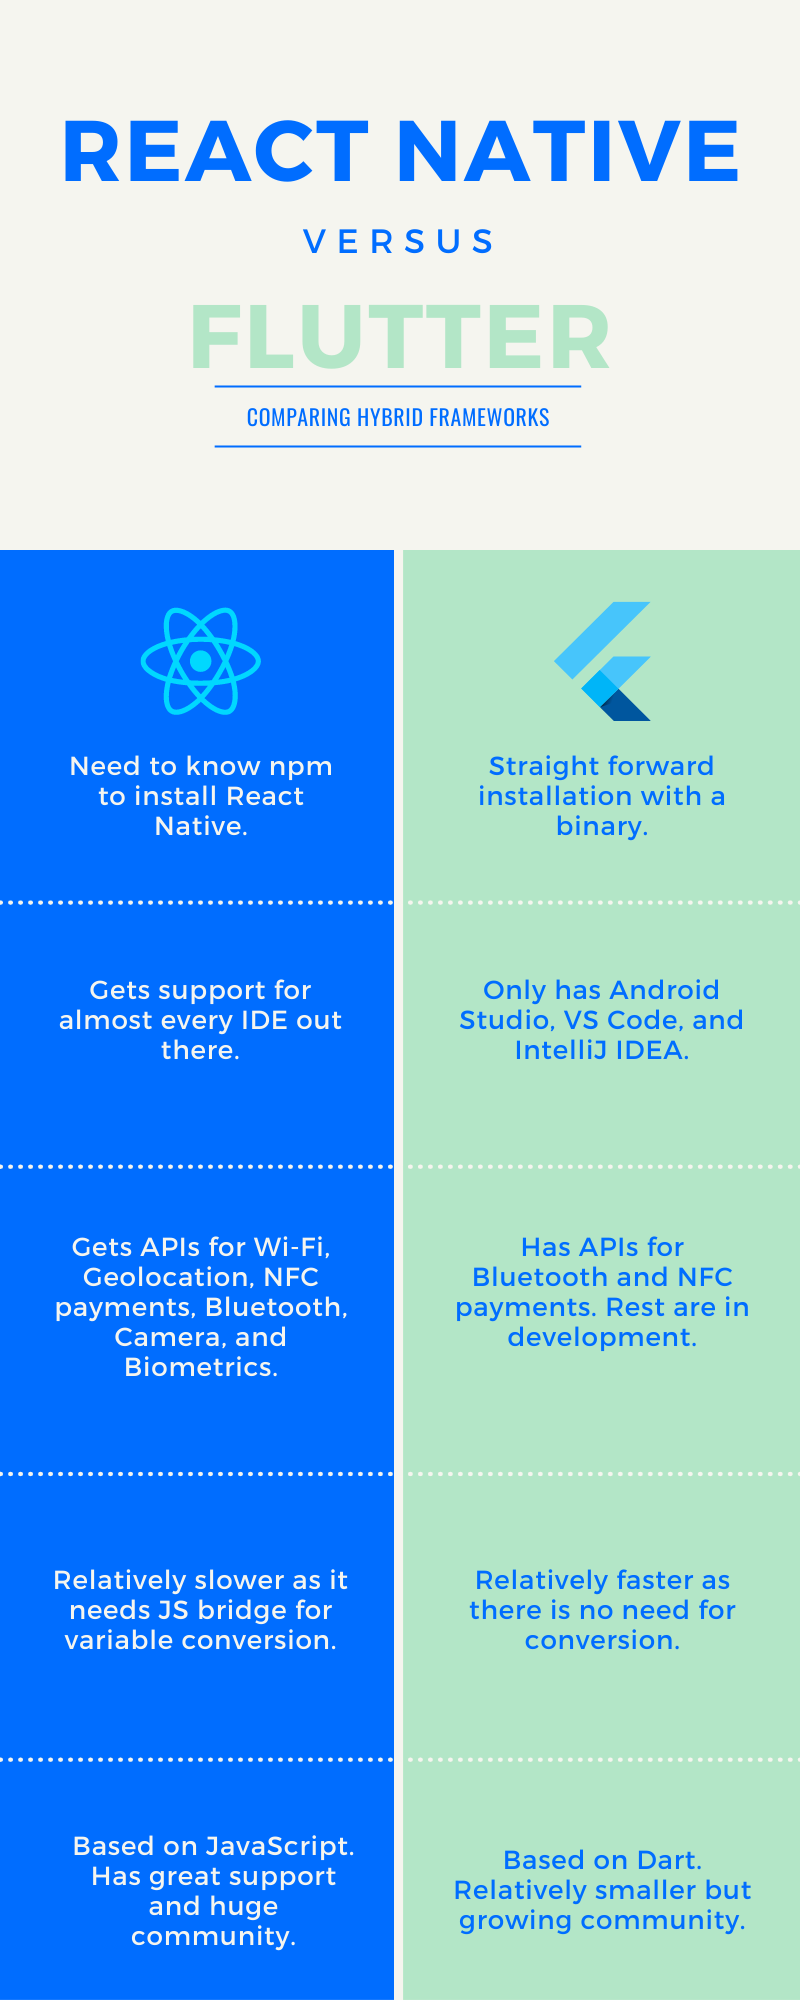
When it comes to installation, the process seems more convenient in Flutter for which you just have to download a binary corresponding to your system. Whereas in React Native’s case, the ease of installation depends on your familiarity with JavaScript. If you know your way around JavaScript then React Native installation would not be a problem. If you don’t, then you will need to learn npm for installations. 

4. IDE Support

React Native has an edge over Flutter over the IDE support department where it comes with support for almost every IDE out there. Whereas Flutter only gets Android Studio, VS Code, and IntelliJ IDEA. 

5. API

While RN lacks tools for drawing custom graphics, it makes it up in native interfaces, where it provides APIs for Wi-Fi, Geolocation, NFC payments, Bluetooth, Camera, and Biometrics. 

The APIs case for Flutter is pretty hard to make as a lot of the interfaces are still in development except for Bluetooth and NFC payments.

Programming Languages

React Native is based on JavaScript, which is quite popular in the development community. JS is the default scripting language for web development. While most of the popular JavaScript frameworks are for frontend development, Node.JS is making its mark in the backend. 

Flutter uses Dart, which is created by Google. Although it is among the lesser-known, Dart developers are quite fond of the black sheep. 

Performance

From the performance front, React Native lags behind Flutter as it requires a bridge to convert JS variables into native ones to interact with the native components. RN uses JS to build apps, and in order to interact with native components like OEM widgets, audio, and GPS, a JS bridge is required that converts these JS variables into native ones. However, RN utilizes libraries like react-native-swipe-view to make things faster.

In comparison, Flutter’s architecture lets you build fast native-looking apps without the need for a bridge for variable conversion. For this reason, Flutter is able to run animations at 60 FPS. 

Documentation

As Flutter is maintained by Google, the documentation is detailed and easy to explore and understand. React Native relies on external dev kits, and therefore, you will have to dig for documentation. However, the general RN documentation is easily available, and it happens to be quite detailed and helpful. 

UI Components

In Flutter you will find in-built UI elements named widgets in place of the native ones. These widgets are easily customizable and available for every popular mobile platform along with one that is platform-independent. 

And if you look at the external UI kits available for React Native. React Native wins by a huge margin as the number of React Native external UI kits is far greater than that of Flutter widgets. 

Community

Considering the age of the frameworks, React Native is older and has a very rich and supportive community. Whereas Flutter’s community is constantly growing to become one of the most active ones. 

React-Flutter

Popular Apps made with React Native-

  • Discovery VR
  • Adidas Glitch
  • Wix
  • Walmart

Popular Apps made with Flutter

  • BMW App
  • NU Bank
  • Tencent
  • Square 
rnflutter-1

Wrap Up

Flutter is a comprehensive package that manages to provide fast and performant apps, but it comes with a caveat that it is based on Dart. Whereas more people will be inclined towards React Native as it is based on JavaScript, but it lags in speed. 

If performance and native-like experience are on top priority on your list, the Flutter will provide you that out of the box. And if you want to stick to JavaScript, and you are willing to do additional tweaks in order to extract faster performance out of your apps, React Native is your choice.

About Galaxy Weblinks
We specialize in delivering end-to-end software design & development services. Our UI/UX designers are creative problem-solvers with a decade of experience in all facets of digital and interactive design. We create compelling and human-focused experiences delivered through clean, and minimalist UI. Get in touch with us here.

8 Reasons Why Node.js is the Best Choice to Develop Ecommerce Web Apps

From a technical standpoint, an Ecommerce platform is a complex system. It needs to be user-friendly and easy-to-navigate at the frontend, and robust yet responsive at the backend. To make all the pieces work together, you’ll need dependable technology to back it up.

The Node.js framework is fast and scalable, but is it a good fit for your platform? Let’s find out.

It is a wise decision to create an Ecommerce app or website. While the store needs to look good and have a great user experience that can lead to more conversions, we also believe that the backend must be robust. Node.js is among our favorites in building Ecommerce websites.

Why do we recommend Node.js to create Ecommerce applications

Node.js is a JavaScript environment that allows you to create high-performance, scalable apps. It’s ideal for real-time collaboration tools, chats, streaming mobile apps, and other applications that require multiple I/O operations. If you want to read more about the technology, here’s a primer to Node.JS. It is essentially a server-side platform built on Google Chrome’s V8 engine. Node.js is well-known for its fast and scalable applications, as well as its extensive library of JavaScript library modules.

One of the most likely reasons Node.js is the best choice for Ecommerce web applications development is that it provides stability and aids in the incorporation of critical features such as a cart, payment gateways, and shopping options.

Furthermore, Node.js provides the benefit of rapid prototyping. You should be aware that top brands such as eBay, Uber, PayPal, LinkedIn, Netflix, Walmart, and the American Space Agency NASA use Node.js to build their primary applications. It could then be your turn to shine brightly among the stars.

Read more: Node.js vs Python | Which Backend Framework to Choose?

Let us look at the main reasons why Node.js is the best choice for developing Ecommerce web apps:

#1 Performance

  • Node.js facilitates multitasking by producing better results at a lower cost. It is much more convenient vis-a-vis other backend options. 
  • The buyer’s journey at an Ecommerce store involves numerous operations. The list includes adding items to the basket, changing product features, selecting payment methods, and so on. It is critical from the standpoint of performance that the technology serves such tasks efficiently. 
  • Node.js is also capable of handling multiple operations at the same time, making it an excellent choice for Ecommerce development.

#2 Scalability

Node.js allows for rapid scalability. Your Ecommerce store can grow significantly in a short period. It is an important consideration when selecting a technology. Node.js includes a mechanism for managing scalability and tailoring it to your specific requirements.

#3 Cross-Platform JavaScript Platform

One of the most significant advantages of Node.js is that it functions as a cross-platform development platform. In most cases, developers must be familiar with at least two programming languages to code, but Node.js is said to be an exception.

It can be implemented appropriately for both client-side and server-side applications. It also allows developers to choose code reusability if there is any modification. Isn’t it clear why Node.js is ruling the world of web applications today?

#4 Many Plugins and Packages in npm

Node.js includes a plethora of packages that can be easily integrated into your mobile or web app. As a result, instead of having to write everything from scratch, developers can rely on dependable open-source solutions. It significantly accelerates the development of Ecommerce. There are also excellent Ecommerce packages available.

#5 Budget-Friendly

Despite working in real-time, the Node.js I/O model is very effective and does not obstruct I/O operations. The website application can be updated more quickly.

It lowers development costs because you don’t need to hire two separate teams for front-end and back-end development. Only experienced Node.js resources will do justice to your project.

#6 One Language on Back-end and Front-end

Node.js is a JavaScript-based development environment, and it is used by many popular front-end frameworks (such as React, Ember, and Angular). As a result, you can create isomorphic applications written in a single language. It simplifies the development process, makes communication between front- and back-end teams much easier, and allows them to better understand both sides of the codebase. You could have a smaller and more efficient team that is easier to manage. Finally, because there is no technological diversity, recruiting new employees in the event of growth will not be a problem.

#7 Big and Active Community

A very active and vibrant community of Node.js developers contributes to Node.js’ continuous improvement. Due to this collaboration, the framework is well documented, and is being continuously supported, which makes the development process much easier and faster for everyone involved! Plugins, modules, plugins, and many other possibilities are available. In addition, if a problem arises, you’re likely to find the solution on StackOverflow.com.

Whereas, open-source JavaScript platforms such as Node.js have the advantage of having access to professional and well-experienced developers who can assist you in code correction and adding more functionality or features to your Ecommerce website.

#8 Uniformity in Data Streaming

Using Node.js, any HTTP request and its corresponding response travel through one data stream. Consequently, the files are much easier to process, which is great for Ecommerce sites that load N items at a time. As a result of the speedy uploading of the videos, customers can make quick purchase decisions.

Final Thoughts

In addition to Node.js, you’ll also need to consider what technologies you’ll be using for building your Ecommerce store. Everything must be consistent, including the frameworks and solutions. To avoid this, it’s best to use one of the Ecommerce platforms mentioned in the previous section. As a result, you’ll be able to avoid a lot of issues that could arise during the development of the app.

Node.js can be faster than other technologies in many cases. For building Ecommerce stores, it has proven to be a stable and fast solution. Software development is made easier and faster with the help of several ready-made frameworks. 

It’s important to note that the selection of a technology stack is based on many factors. Write to us, and we’ll help you make the right decision.

About Galaxy Weblinks

We specialize in delivering end-to-end web application design & development services and have hands-on experience with popular back-end frameworks like Node.js, Python, etc. We have expertise in customizing websites using multiple platforms, be it Shopify, Woocommerce, Magento. Contact us for your Ecommerce project today.

Top Reasons (and solutions) for Cart Abandonment

Shopping cart abandonment is an Ecommerce store owner’s worst nightmare. It can be frustrating to successfully move a shopper through the sales funnel and create offers that pique their interest, only to lose them at the point of purchase. It’s extremely aggravating.

And it is for this reason that we are here with this blog. We’ll go over a variety of cart abandonment statistics to paint a clear picture of why shoppers fail to complete their purchases and shed light on how to fix common problems to further increase the conversion rate.

What Are the Most Common Reasons for Shopping Cart Abandonment?

To gain a better understanding of why shopping cart abandonment is a problem for retailers and what causes it, you must first thoroughly understand your customer persona and business processes.

When making a purchase, it is critical to understand the customer’s psychology and mindset, i.e., what turns them off and what leads to a successful transaction.

Here are some of the most common reasons why customers abandon their shopping carts:

1. Excessive/Hidden Costs: Nobody wants to pay extra. As a result, it is one of the most common reasons why customers abandon their shopping carts. Customers are always hesitant to make a purchase when they are faced with additional costs.

2. Compulsory Account Creation: Forcing your users to create an account to make a purchase can turn out into a blunder and result in cart abandonment. Some users prefer not to create an account for a single purchase, so they would choose not to purchase if there’s no guest checkout.

3. Complicated Checkout Processes: When designing your Ecommerce website’s checkout flow, keep in mind that each additional step and form field limits the users’ ability to make a payment.

4. Technical errors and lags: Technical difficulties and flaws can happen on any website. However, you should make every effort to avoid these situations because they may make the customers uncomfortable. 

5. Payment methods are insufficient: Having only the traditional options is no longer prudent. Nowadays, everyone is used to a different payment method, and you can easily lose a customer if you do not offer a variety of payment options.

6. The website does not appear to be trustworthy: No matter how secure your transactions are, customers are unlikely to trust you with their credit card number and personal information if the page lacks a security icon.

While the six reasons listed above are the most common, there are several other reasons why customers abandon shopping carts.

Conversions can be increased by a whopping 35.26 percent by implementing the right checkout optimization strategies, according to experts. 

(source – https://baymard.com/lists/cart-abandonment-rate)

The Ecommerce store owners need to determine what isn’t working and make a concerted effort to improve the design, promotions, offerings, checkout flow, and other aspects of their store.

What Are Some Strategies for Reducing Ecommerce Cart Abandonment?

Every Ecommerce store is unique, and the methods for reducing checkout abandonment will also differ. We will go over some of the most important yet simple strategies for online retailers.

1. To avoid confusing and losing prospective buyers, make directions and CTAs as clear as possible.

Why it matters: Your purchasing path should be clear and simple. The better the UX, the more sales you can expect to make. Conversion rate optimization is distinguished by clarity and simplicity.

2. Display trust seals and use secure transaction methods to make shoppers feel safe when providing payment information.

Why it matters: While shoppers are much more comfortable with online shopping than they were when it first became available, they are still wary. The threat is kept alive by news of data breaches. Trust seals, such as Norton Secured (shown below), reassure customers that you are protecting their data.

3. Make it simple for customers to make changes to their shopping carts to avoid frustration and keep them engaged.

Why it matters: This part of the checkout process can be especially aggravating. You reach the end of the procedure and realize you have forgotten something. So, what now? Changes to the cart will be simple and instantaneous, thanks to the optimization.

4. To maximize conversions, audit the entire checkout process.

Why it matters: When an obvious problem is discovered, spot checks of stuck points along the path to purchase are typically required. Regular full-system inspections of the entire checkout process can identify revenue-draining areas before they become visible.

5. Use one-click shopping for repeat customers to make it even easier for them to return.

Why it matters: Online shopping is no longer a novelty or something you do because a particular item is not available locally. Ecommerce is now the preferred method of ordering for many people. There will be no driving, no fighting crowds, and no waiting in line. Shopper loyalty will increase if you make shopping with you as simple as loading a basket and clicking the Buy Now button.

6. Use testimonials and reviews liberally as social proof that doing business with you is a good idea.

Why it matters: Social proof is critical in Ecommerce. You, like the rest of the online shoppers, frequently read reviews before ordering an unfamiliar product. We are more likely to believe others (even if we have never met them) than we are to believe the seller. It’s just human nature.

7. Display contact information clearly on every page to establish trust and the ready availability of customer service.

Why it matters: Highlighting the various ways your customers can contact you is akin to reaching out and holding hands with them. Nothing beats company when it comes to removing fear. You can’t physically walk them through your online store, but you can guide them virtually and be there for them every step of the way.

8. Profitably stop cart abandonment by removing shipping costs or disclosing them.

Why it matters: The most obvious solution to high shipping costs is to eliminate them. This, however, may not be possible depending on your product mix. One effective strategy is to include the additional cost of shipping in the product price.

You can employ a personalized message bar to inform customers that if they meet a certain threshold, they can avoid paying shipping fees. This is a fantastic way to boost AOV and conversions, and it’s all made possible by personalization software tools.

If you are unable to reduce costs, fully disclose them. The product page is the best place to do this. Transparency is highly valued by digital shoppers and is essential for store success.

Conclusion

We hope that these tips and tricks will help you manage the shopping cart abandonment rate in your online store.

It takes time and effort to create an exceptional shopping experience. Do not pass up this opportunity, as it has the potential to help redeem what has been lost. To put it succinctly, you only need to be concerned with one thing: creating an experience that your visitors and existing customers will enjoy.

And, while your Ecommerce shopping cart abandonment rate is unlikely to drop to zero overnight, your efforts toward successful conversions should not be put on hold. The trick is to never stop striving to improve your company and its customers.

Begin by A/B testing the aforementioned techniques, keeping what works, and discarding the rest. You can even seek help from industry experts, whose knowledge and experience can help you stay ahead of the competition in this competitive Ecommerce landscape.

About us

We, at Galaxy Weblinks, specialize in developing the best online experiences for your users. We have expertise in customizing websites using multiple platforms, be it Shopify, Woocommerce, Magento. Contact us for your Ecommerce project today.

Enhance Your User Interface With These 5 Tips

When it comes to design, even the trivial seeming things can have a huge impact in creating efficient, accessible, and beautiful UIs. This blog will address those tiny changes that yield big results in terms of your design and user experience. 

As the nursery rhyme goes “Little drops of water, little grains of sand, Make the mighty ocean, and the pleasant land”

1. Be Succinct. Cut the fluff

Work with your UX resources to keep the messages concise. Speak to your user in the language they understand. The general rule of thumb is to keep it simple. Avoid jargon and speak to them in a voice they understand, assisting them in achieving their goals more easily.

copy-trip

2. Increase the body font if your typeface allows

Articles, project descriptions, and other long-form content read better if the body copy is 20pt or more. It would also depend on the typeface that you’re using, but the more common ones look great at 20pt and provide for a better reading experience when going through exhaustively long texts. 

body-text

3. Use Icons and descriptions in error states

Colors can help convey messages but don’t rely on colors completely to convey crucial information. Using only colors in your design for important information like error states is like leaving out a large chunk of the audience at the mercy of guesswork. Introduce icons and descriptive texts along with the color to make it more inclusive and accessible. 

error-states-tips

4. Decrease spacing and height in headings

Headings are shorter allowing you to play with letter space and line-height. But they are also bigger in font size than the body text, so the spacing between the letters appears optically larger. Reducing the letter-spacing will make headings look more balanced and provide a more optimal reading experience. 

line-height-tip

5. Utilize shadows and borders to highlight important stuff

Shadows and borders can help make the on-page elements appear sharper and more defined.  

With this nifty little tip, you can easily highlight on-page elements. Just don’t go overboard with the shadows, there’s a thin line between neat and tacky.  

Source: Smart_boy Dribbble

Wrap up

Us humans, we often complicate things that are fairly simple. Good UX can be as easy as going against your experimental instincts and sticking to the basics. These tips will help you in that basic pursuit. Use these tips as a guide for your next project, and you’ll be sure to deliver not only a functional product with great UX, but one that users will want to return to. 

About Galaxy Weblinks

We specialize in delivering end-to-end software design & development services. Our UI/UX designers are creative problem-solvers with a decade of experience in all facets of digital and interactive design. We create compelling and human-focused experiences delivered through clean, and minimalist UI. Get in touch with us here.

User Onboarding – Principles and Best Practices

A good user onboarding flow is much more than a simple tour of the product. Designing a good user onboarding process is essential for product growth and user retention. Without it, you may risk the retention levels plummeting. A product that does not assist the user in understanding its utility has a very low level of engagement.

That is true for any product, physical or digital. Try something that isn’t intended to be simple and self-explanatory. Remember the last time you bought something new and read the instruction manual before using it?

Continue reading for some core principles and best practices with fantastic examples!

Why User Onboarding?

According to a Profitwell user onboarding study, customers who said they received good onboarding on a new product were between 12% and 21% more willing to pay than the median. Users who responded negatively had a willingness to pay from 3% to 9%, indicating that poor onboarding does not necessarily detract much, but your product may lose a good willingness to pay.

However, retention is where things get interesting. When comparing the first 60 days of customers with poor integration perceptions to those with positive perceptions, customers with positive perceptions fall much lower in the first 21 days.

And they conclude that good onboarding is critical to encompass the value of a product with a customer or, at the very least, mitigating the slippage your customer will experience when you begin using the product. Especially for him or her to begin to see the value, significantly speeding up their journey.

However, this isn’t the case most of the time. Every step of the way, there’s a hidden risk of that user clicking the little red ‘X’ and never returning.

It occurs between 40% and 60% of the time.

It is rightfully referred to as the SaaS killer! Fortunately, that’s what we’re here for. We will share with you the 3 Principles of User Onboarding that will help you immensely. 

#1 For a business to succeed, onboarding must be a continuous process.

It all starts and ends with the idea that onboarding is a continuous process. Anything you look at can be viewed through the lens of Onboarding. Is this beneficial to the user? Is this moment clear to him as he navigates through your product offering? If we stop looking at the user’s journey at some point, what was once simple becomes a supplement that will require human assistance to solve. This is closely related to the day one mentality, in which every day is like your first day of attempting to assist the user.

#2 Onboarding is not a metric; it is a result.

That means we shouldn’t measure onboarding. We need to know how many users are registering, what the dropout rate is, and where, if any, our product’s “bottleneck” is. All of this is critical. The issue here is that the metric is the result of a job. If you follow the first principle (user obsession), this will almost certainly have a direct impact on the outcome. And how can the results be improved? Talk to your user all the time; don’t let this opportunity pass you by. Assist your user, and the results will follow.

#3 Obsession with Onboarding

Obsession with making your life easier and assisting you in getting started with your product. Obsessed with assisting the user in getting started autonomously without the assistance of others. It is unlikely that the user will engage if he or she is unable to enter your software or get started with your product. Understand your users’ realities. You don’t want to design for a market you’re unfamiliar with.

We’ve compiled six best practices for user onboarding to help you achieve your goal of converting new users into fully engaged customers who have integrated your product into their lives.

#1 Reduce Friction

Make experiences simple and practical! Determine what is not required to perform the key action on your product. Initial barriers are responsible if the user is abandoning just after the first few steps. Consider whether the content being inserted assists the user in achieving their goal or if it serves to solve a product problem. Even if the implementation is complex, the paradigm shift here is to guide decisions to solve problems for users.

Notion determines the type of account and requests authorization (if it is a Gmail, Hotmail, or similar account).

Source: Fullstory

#2 Know your customer and their needs

Sift Science has identified the two most important motivations of their ideal user: fighting fraud and preventing bad users. This onboarding model reassures the user that they are in the right place and reminds them of the value of the product.

Source: Sift Science

What is the reason your customers require your product?

If you don’t understand the big “why” for existing users, you won’t be able to master new user onboarding. Conduct customer surveys to learn what customers truly get out of the product, and then design your user onboarding experience around that value.

To properly serve your customers, you must be aware of the following:

  • Who are they? (e.g. their role)
  • What they desire (e.g. the metrics they care about)
  • What is the pain that your product alleviates?
  • What tasks must they complete? (e.g. what they report in their standup)
  • What is it that would prevent them from using your product? (e.g. what they consider risks)
  • The reason why any churning users end up churning (e.g. where they got stuck)

Once you’ve mastered these crucial (but easily overlooked) details, you can start treating user onboarding like a jigsaw puzzle rather than a guessing game.

#3 Use an onboarding checklist

A great way to organize your user onboarding is to create a checklist with a progress bar that includes all of the steps your new users must take. Checklists naturally elicit our desire to “close the loop” and encourage users to implement the key activation points. Add an incentive at the end, and you’re set.

Source: Postfity

Make it clear what skill level is displayed, what should be done, and, most importantly, why it is necessary. People like to have a reason for doing something. The combination of these factors aids in the development of simple and objective steps. Display a few steps at a time, and if possible, divide the task into smaller tasks. A 10-step onboarding process is a lot of work for the user and a waste of their time.

#4 Remove barriers to the Aha moment

An empty account equals an unsuccessful user on a platform that thrives on user content. Wistia lowers the barrier to entry by providing users with three simple options for getting started.

“Aha! I completely understand. I need this.”

That is what you want your users to experience as soon as possible. The Aha moment occurs when users recognize the value of your product and are willing to pay for it.

Source: Wistia

Tips for removing hurdles: 

  • Do not require account creation before attempting to use the product.
  • Request the user information in the later stages of onboarding
  • If you don’t have a free trial, share the Aha moment on your marketing site (include testimonials or highly relevant screenshot gifs).

#5 Videos for quick introductions

Videos are excellent tools for user onboarding. They can be used as a 1-2 minute introduction instead of a walkthrough or in a resource list. The more videos there are for highly visual products, the better. Why? Even if your user does not have time to use the product right away, they will remember it if they see someone else quickly reach the Aha moment. Snappa provides a one-minute blog header image tutorial so that users can see how useful the tool is right away.

Source: Airtable

#6 Webinars to help users master the tool

SEMrush has mastered the art of user onboarding webinars. Their “101” webinars teach new users how to use the platform, whereas their high-level SEO webinars increase user engagement over time, reinforce brand authority, and help push out content that attracts new users looking for professional development content.

There are few companies that do this well, but every SaaS platform has the opportunity to create introductory tutorials and professional development content tailored to their specific users.

Tailoring the onboarding journey does not end there 

Send emails based on behaviors such as time spent in-app or task completion after the initial welcome series to guide experienced users to the star features, and inexperienced users to the Aha moment.

Consider a project- or task-based trial rather than a time-based trial to avoid losing users who would be a good fit (just not right now)

Where in a user’s journey is it most likely that they will upsell and cross-sell? The answer will differ depending on whether the user is highly engaged or has not yet used the product.

Upselling and cross-selling can be automated by identifying the right subsets of users and presenting them with more product options. When you customize the experience and sell the right product add-ons to the right customers, you increase revenue while increasing customer satisfaction and delivering more value.

Every user onboarding flow differs depending on the type of product, but there is always an optimal way to entice users. We hope that the best practices and examples have provided you with some ideas for your next user onboarding design!

If you’re thinking ‘we do not have enough experience to deal with this or “what if I don’t have enough time”, contact us to get in touch with our UI/UX experts.

About Galaxy Weblinks

We specialize in delivering end-to-end software design & development services. Our UI/UX designers are creative problem-solvers with a decade of experience in all facets of digital and interactive design. We create compelling and human-focused experiences delivered through clean, and minimalist UI.