Category: Mobile App Development
Flutter 1.22 Update| All You Need To Know
Flutter iOS 14 Updates
iOS app development is now set to be a better process than before with Flutter 1.22 update. There is now support for XCode 12 and as Xcode requires iOS 9.0 or higher versions, the default template is now 9.0 (previously it was 8.0). Developers are getting preview support for App Clips too. Crashes reported specific to iOS and font rendering issues were also fixed in this update. And not to miss, when a developer is using cupertino_icons 1.0 with Flutter 1.22, they are getting access to almost 900 new icons via the CupertinoIcons API.Flutter Android 11 Update
There are two updates for Android developers. Flutter now supports exposing the safe insets of various Android displays i.e. notches, cutouts, and the display of waterfall edges. This will facilitate the placement of elements via MediaQuery and SafeArea APIs. And the second one is that animations are now in synchronization with the Android keyboard.Google Maps And WebViews
Both these plugins are now ‘production ready’. One can write the code, build the APK, and release it, as per convenience. There is a note here by the Flutter team. They say that Android developers will have to manually enable webview_flutter until it becomes a default setting.Extending The Buttons Family
Keeping up with the Material guidelines, there is now an additional ‘universe’ of buttons. Now developers won’t have to make widgets from scratch because of the lack of a few buttons. One can mix and match the older and newer buttons as per their requirements.Analysis Tool For App size
Your developers won’t be quizzed for app sizes ever again. They can get their hands on the breakdown of native codes, assets, and even package level details of the compiled dart code. This size and composition summary is given by the analysis size tool. Such insights will help your team for keeping the app size within the set limits.Smooth Scrolling
This feature is still in preview but it is an interesting one. It is present to bridge the gap between input and the display frequencies when they are not the same. Enters, resamplingEnabled flag. Flutter claims that you can see almost 97% improvement by enabling this flag and removing said discrepancies. Once there is a certain consensus about this feature, you can expect it to be the default setting. Apart from the above-mentioned features, there are some notable ones listed below:- Support for new internationalization and localization
- Improved navigator 2.0
- Improvement in the output linking of VSCode
- State Restoration option in Android (In Preview)
- Developers can host the inspector tab from Dart DevTools directly inside IntelliJ.
About us
We, at Galaxy Weblinks, are all for new ideas and experiments. We believe that being up-to-date in this fast-paced world gives us adequate time to explore and implement new changes. Our mobile development team is proficient in building apps that are well aligned to our client’s and platform requirements. Contact us for a free consultation!Top iOS 14 features you MUST know!
Apple unveiled the latest version of its iOS operating system, iOS 14, at the WWDC keynote in June 2020.
iOS 14 is one of Apple’s biggest iOS updates to date, introducing Home screen design and widget changes, picture-in-picture, Siri improvements, updates for existing apps, and many other tweaks that streamline the iOS interface.
Apple has seeded a total of seven betas yet of upcoming iOS 14 and iPadOS 14 updates to developers for testing purposes.
Let’s look into some major UI updates and features that stole the spotlight.
Widgets
iOS 14 introduced a redesigned Home Screen that supports widgets on iPhone for the first time, breaking up that stagnant tiled-grid-of-apps look. Widgets have been redesigned and can now be customized in three sizes through the new widgets gallery.
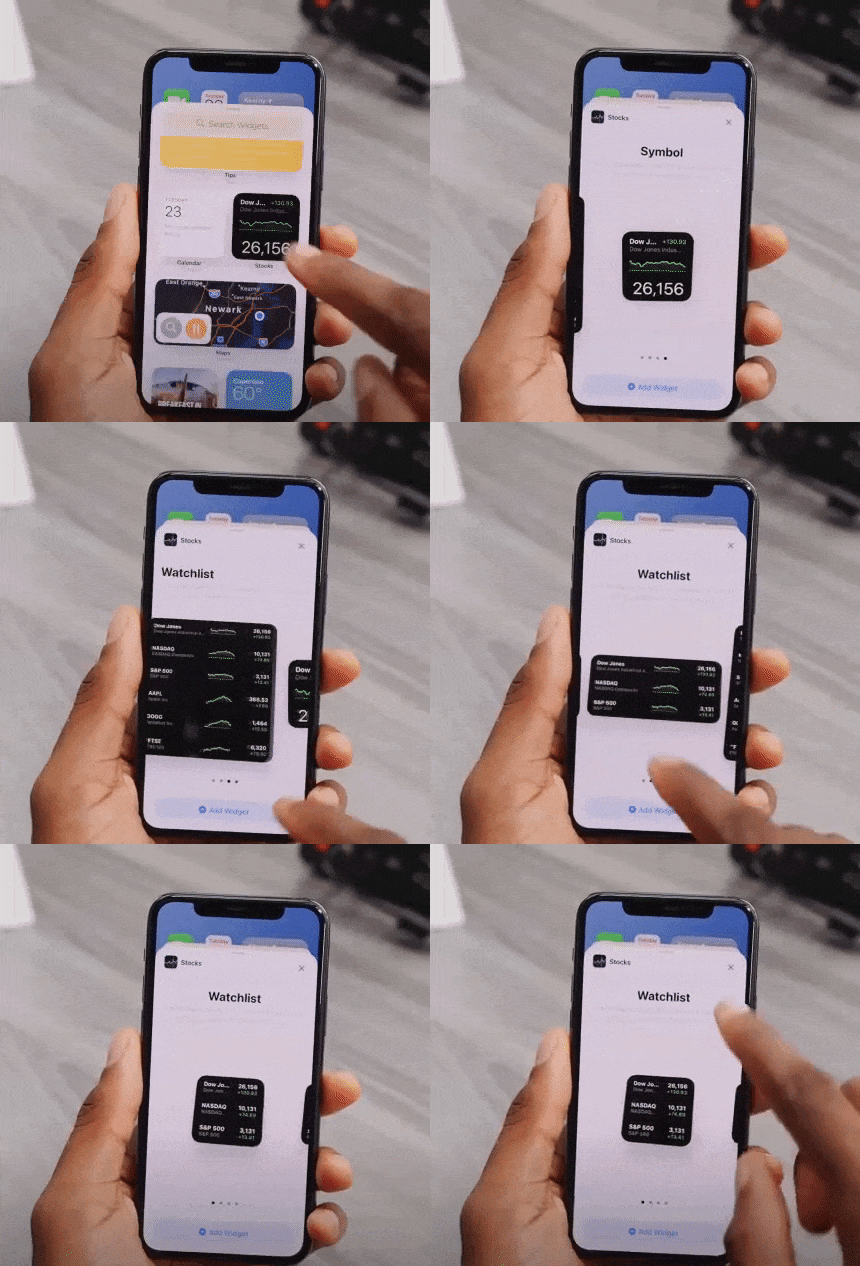
Widgets provide more data than ever to provide more functionality, and Apple redesigned its widgets for default apps like Weather, Stocks, and Calendar. There are also new widgets for Apple News and Screen Time.
Widget Gallery will comprise all of your widget options — by long pressing on the display, choosing “Edit Home Screen” and then tapping the “+” button.
These suggestions are based on what users are installing the most, and third-party app developers can create new widget experiences for their apps.
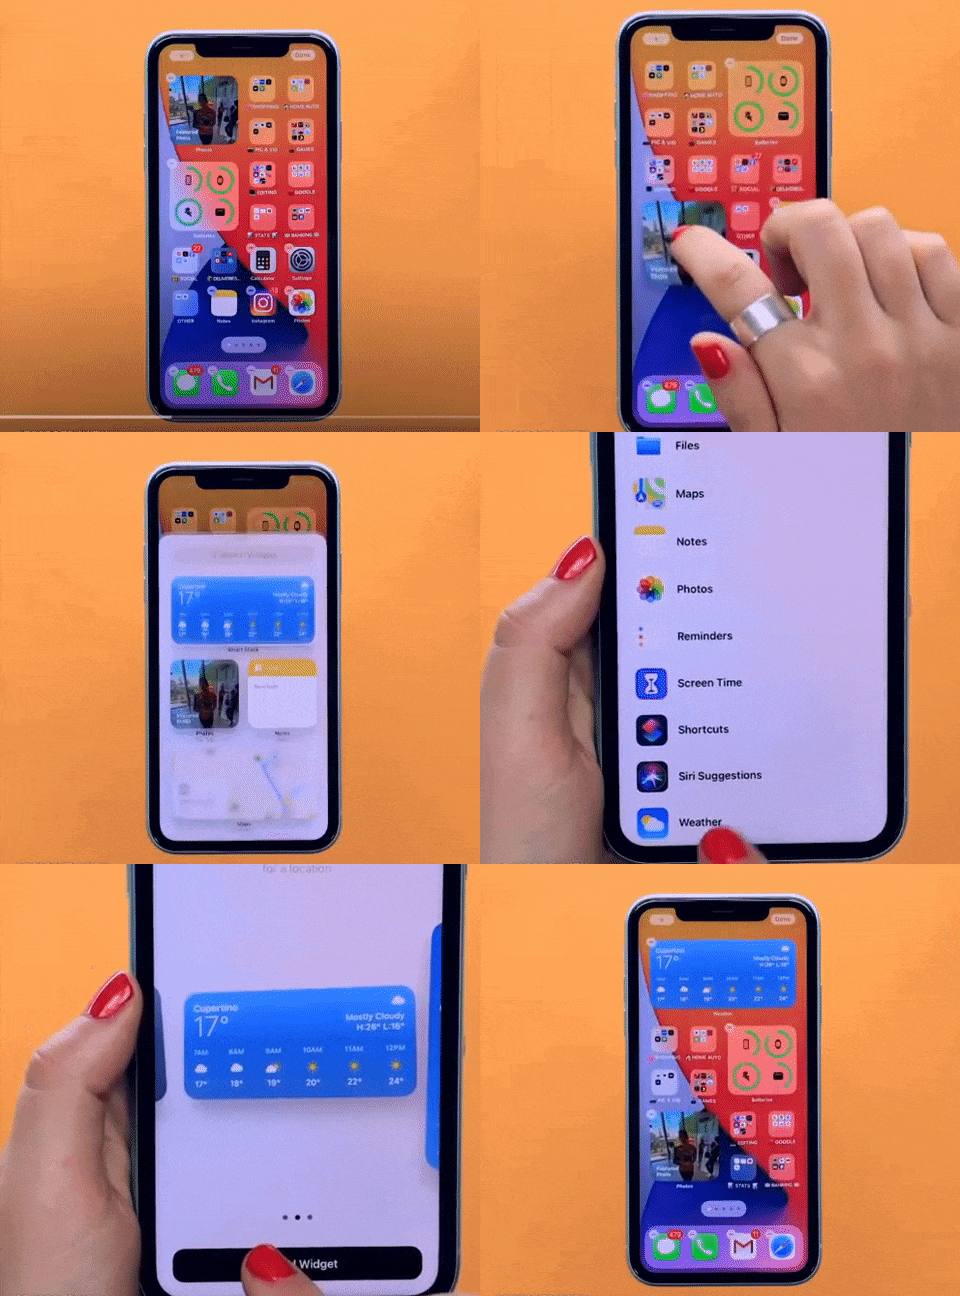
Widget Smart Stacks
You can stack up to 10 widgets on top of one another to better utilize space and can swap between them with a swipe, both in the Home Screen and Today view.
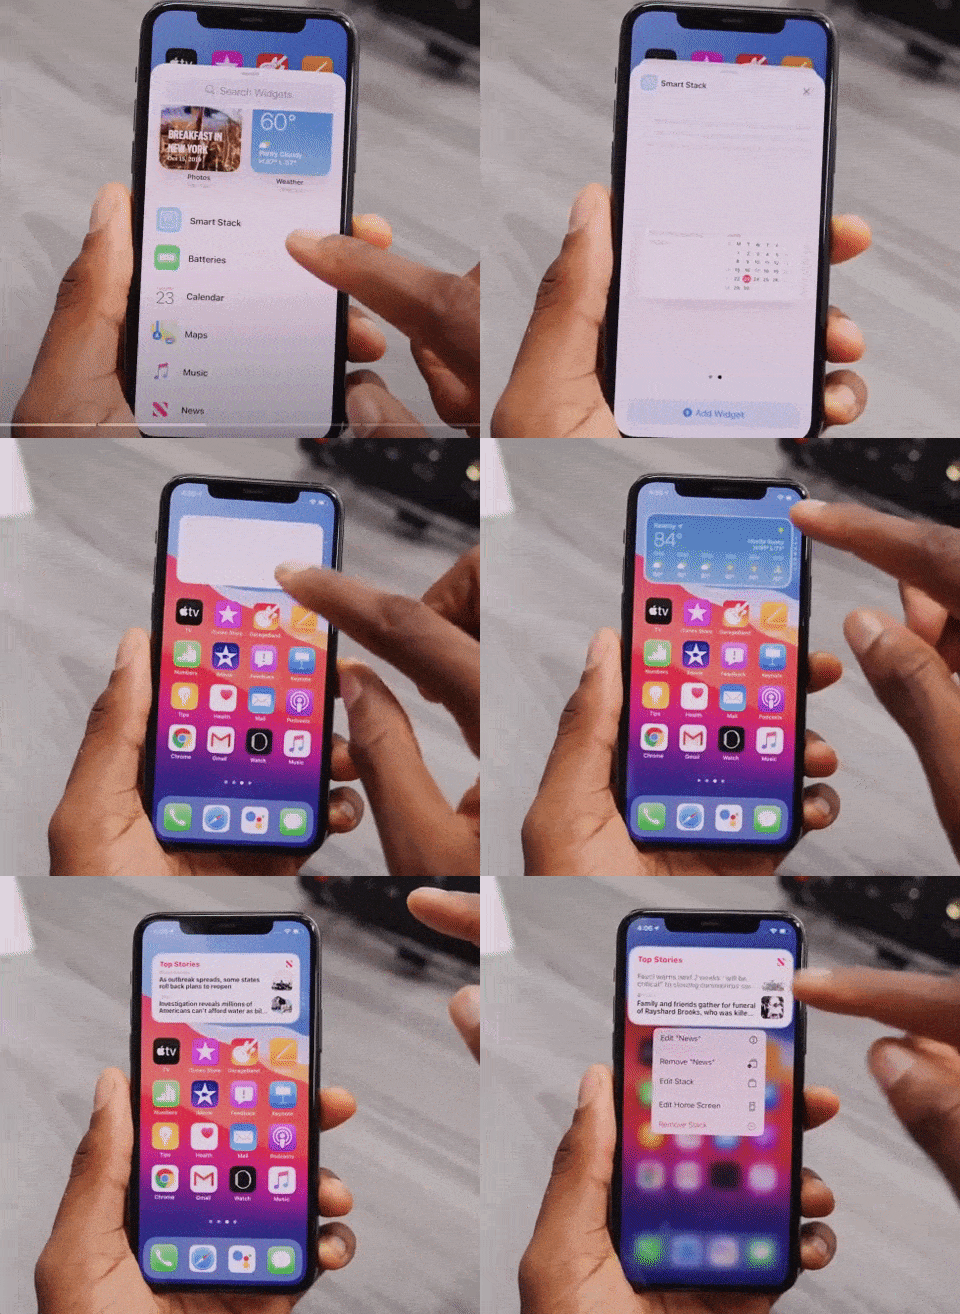
There’s a separate Smart Stack feature that’s different from widget stacking. A Smart Stack is a widget stack, created in the Widget Gallery view, that automatically surfaces the best widget option based on activity, location, and time – making sure you’re looking at what’s most relevant.
You can, of course, swipe through the Smart Stack yourself.
App Library
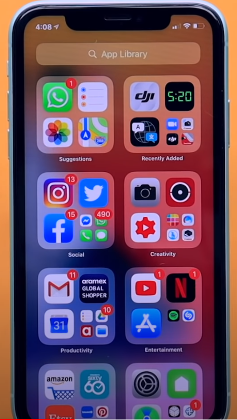
App Library is a great new feature that shows all of the apps you have installed in an organized, simple-to-navigate view that’s similar to the app list view on the Apple Watch. That is categorized into Health and Fitness, Social, Reference and Reading, Productivity, Utilities, Education, Games, Creativity, and Lifestyle.
Compact UI
In the previous version, there are plenty of apps and actions that just unnecessarily take up the entire screen. Now they are all fixed.
Incoming phone calls no longer take up the entire screen in iOS 14 and instead show up as a small banner at the top of the display that you can easily hide, ignore, accept or reject based on your preference.
This also applies to Siri, FaceTime calls, and third-party VoIP calls.
While doing a FaceTime, you will experience a Picture-in-Picture UI that you can easily swipe up, go home, and do other things without pausing the video.

Picture-in-picture has been widely supported throughout the entire OS. So, if you are watching any video in Safari or a movie on Apple TV or an app, you can shrink the video in a picture-in-picture window while getting other things done in the background.
Siri Search Updates
Like before, Siri does not take up the whole screen in iOS 14 now. You can call Siri long-press the power button and can see a small animation at the bottom of the screen. It pop-ups an answer at the top of the screen. (But it doesn’t let you interact with anything underneath directly without exiting Siri- if you want to).
Unique iOS 14 Accessibility Features
These upgrades may look minor for iOS 14, but they will be immensely helpful for visually and hearing-impaired users.
Within the new update, you’ll be able to set up your iPhone to listen out for specific noises such as a siren or fire alarm or even a cat. If the phone hears the noise, it’ll notify the user.
According to Apple, it won’t be sending any of your data onto the internet to allow for this feature as this is all done using on-device technology.
Another unique feature in accessibility settings is that you can now map double-tap or triple tap on the back of the phone to a shortcut like Siri, mute, volume down/up, lockscreen, and others.
There are so many other minor changes that have been made in each beta version. iOS 14 and iPadOS 14 are available to registered developers and public beta testers at this time. Stay tuned to find out which features we are finally going to see in the iOS 14 final release this month.
Understanding cost breakdown of an app via IKEA
A smartphone without apps and a home without furniture are of no use for the people living in it. Although living in a smartphone is metaphorical but it’s true.
A lot of things can go wrong when you’re trying to put together an app or IKEA furniture. Both these tasks have a buffet of customizations, making it even more difficult to stick to one’s decisions. And not to forget, more customization is synonymous with an increase in the overall estimated cost.
To ensure that your estimated and actual costs are not miles apart, we have curated a list of major factors that affect the overall cost of building an app. With an IKEA twist.
DIY or Outsource

Besides modularity, digital applications and IKEA furniture have other things in common. And before you disagree with this, allow us to elaborate.
As a first time entrepreneur, you are all geared up to start building your own app, equipped with all the know-hows, and a good amount of experience, similar to a person who is all set to assemble their own Liatorp Entertainment System or PAX wardrobe.
But as both the DIYs project proceed, a realization dawns on the creators after the initial user research is carried out. Your app is not optimized for device performance and UI is poorly designed. The same way the sliding doors are not at all sliding, there seems to be shortage of screws despite having counted them before starting off.
These results surface only after you are neck deep into both these projects and you start thinking if you should have hired the specialists altogether.
Lucky for us, there are freelancers and app development agencies who are happy to complete your projects and get them up and running in minimum possible duration. Thus, take this decision before it’s too late and save your time and efforts.
Design Requirements

Your UI/UX design is what will differentiate your app online. Your design should minimize the cognitive load of your users. If you are looking for customizations like parallax scrolling, custom cursors, micro interactions and other animations, be prepared to shell out more money. Just as you would do for your PAX wardrobes.
All these requirements will increase your design and development time, taking anywhere from 500 to 1500 hours, thereby increasing your cost accordingly.
Yes, IKEA furniture can be hard to assemble at times, but once completed, it does make the daily life of the users easy.
Your app design should be on similar lines. It should become a part of your user’s daily life without their realization. And this can be achieved with an intuitive and easy to use app design.
Type of Applications

This will be determined by your target audience and the quality of user experience you’re aiming to achieve, keeping in mind the available budget.
Web app
A web app is the least expensive app version. It is an optimized version of your mobile website but with limited functionalities and minimum amount of complexities. The cost of developing a simple web app can range from $3,000 to $15,000.
Native app
Native apps are built in the languages specific to the platform(s) they are developed for. You can make a feature rich app and add loads of functionalities to it. They can be downloaded from the Apple app store or Google play store only. Since they have to be developed for the platforms individually, the cost of development is on the higher end. These apps can cost anywhere from $20,000 to $100,000 for each platform.
Hybrid app
These apps are platform independent and are developed using a single language. It helps in catering to a larger audience from the start. The development and maintenance costs are also less in comparison to native apps. It ranges from $10,000 to $30,000. But it fails to beat native apps in the user experience it provides.
Features and Functionalities of Your App

The estimated cost and time required in building your app depends heavily on the functional complexity and features.
Think of Stuva loft bed. It comes with a table, wardrobe, open shelf and of course, a bed. Does your kid really need all this?
Relate this with your app. There are tons of features to choose from for your app. Like, user login, search option, social media integration, chat bot support, geolocation, Google map integration, multi language support, push notifications, payment integration and a lot of others. In the initial phase, you will not require all the functionalities.
It is always good to see how well your app does after the initial releases by focusing on the core features of your app. This will also reduce your time to market. You can do the refining process in the next app releases.
Selected Platforms for Your App

Selecting a platform for your app depends on who and where your target audience is. Android users exceed iOS users by a good number. But this does not mean that you take the android only approach.
Developing an iOS app is more complicated as it requires more expertise and needs to align with the strict App store guidelines. But an android app’s compatibility and functionality have to be tested across a wide range of devices and versions. And you can’t possibly test for all of the available devices.
If your budget allows development for both platforms, it is the best approach to go by. Ensure that you know who is your target audience. For example, if your target base is largely in Asia and Africa, then you must focus on developing an android app first. But if you are aiming for the US and Western Europe, iOS should be your priority for these regions.
When developing an app for any single platform, the cost variation is negligible. A simple app costs around $15,000 but the cost increases with more complexities. But in case you are thinking of developing for both the platforms, the cost will be doubled.
Required Level of Expertise and Specialization

Assembling a PAX wardrobe complete with drawers, sliding doors, pullout trays, is a task even for the expert furniture assemblers.
When developing an app, you will need a project manager, UI/UX designer, developer, and QA tester for starting off your project. Even when you are able to fulfill some roles, you will be required to hire experts for other fields to get the best results.
Sure the cost of experts will be more, but your app will have a good headstart with such a team. And these requirements will keep on changing with your user base and your team will keep growing with your business.
Location of Your Developer

Whether you’re outsourcing partially or completely, geography plays a significant role in deciding your app development costs. With density, competition also gets stiffer. For this very reason, development costs in Asian countries are much less in comparison to North American and European countries. The costs vary from $20 per hour in Asia to as high as $200 per hour in Europe.
There is no rule of thumb that says that lower hourly rates will lead to poor product delivery or higher rates will give the best products. You can save huge costs by researching and outsourcing to the right remote teams.
Hidden Costs

While you were busy buying your BESTA wall mounted unit, reading up on assembling guides and organizing the flat pack furniture on its arrival, you forgot to buy a drilling machine and the extra care essentials for maintaining that high gloss finish.
Conceptualizing, developing and deploying your app is not when you get to take a goodnight’s sleep. Instead after the release of your app, you will have to keep some money aside for app maintenance and support. This would include fixing bugs, giving additional support for new OS versions and third party integrations, implementing new features, storing your user data and even monitoring your user activity are all a part and parcel of your app after it’s release.
Thus, be it DIYing your own furniture or app development, these projects are no cake walk (but don’t forget to cut a celebratory cake after completion of the projects). Having an accurate estimation of time and cost is a good starting point for any app development venture.
Your cheat sheet to delivering a robust and crash-free app
You’re working happily on your app and all is well, then suddenly – POOF! – it crashes. Aaargh!!
Apparently ‘Crashes decrease with new session the very next day by almost 8x’ (Cue sad violin).
It happens to the best of us.
Stability issues can derail the success of even the best apps. Buggy apps can drive your users away, uninstallations aside, they have the potential to wreck your reputation when users leave one too many distasteful reviews.
Something to bear in mind is that it’s not only about crashes. Users face errors that are not necessarily a crash, so tracking user-facing errors such as error messages and API response times is also important. There are several types of crashes an app can experience- either it can be ANR errors or crashes related to API integrations.
Bug fixing doesn’t need to be hard. You’re likely to worsen the situation if you freak out and start changing things at random, hoping the bug will magically go away.
Instead, you need to take a methodical approach and learn how to reason your way through a crash and maintain app stability.
You can’t fix what you can’t find

The first order of business is to find out where exactly in your code the crash occurred: in which file and on which line.
You do have control over some of the errors and can find them. You can let the user know of the problem via building a communication channel when a user loses their WiFi connection while file transfer is in the process.
When errors are from unexpected app behaviour, your mobile app testing kit will need app monitoring and tracking tools to detect the behaviour that leads to app crashes. There are tools that are not only for mobile apps but also for OTT and Unity as well. In addition, no matter what tool you use, it’s normally an SDK that reports you about the crash alerts.
Even if you are able to collect all this data, it’s difficult to figure out which crashes to troubleshoot and fix first. And this issue follows our next approach to a stable app.
Follow Eisenhower’s Urgent/Important Principle

It’s important to prioritize and sift the problems most users are facing first.
As it’s common that teams tend to tackle bugs on a first come first served basis. Especially if the report comes from a loud voice or a key stakeholder.
This principle comes handy in such a situation which is more like a Rule of Thumb. This principle can tell you to quickly identify the activities that have an outcome that leads to us achieving our goals (Important), and activities that demands immediate attention (Urgent) that you should focus on, and the ones you should ignore.
Basically there are a couple of crashes or bugs that might be causing complaints, solve those first and iterate your priorities accordingly – you will see your crash rate and complaints decrease dramatically.
Practice better Exception Handling

An exception happens when something goes wrong. Tried to open a file but it doesn’t exist? You’ve got an exception. Attempted to call a method on an object but the variable was null? Boom! Exception.
And here comes Exception handling which is an error-handling mechanism. When something goes wrong, an exception is thrown. The exception causes your application to crash, if you do nothing.
For example: Developers often find themselves in a situation like- Is there a way to avoid an EXC_BAD_ACCESS from crashing an app, and handle an exception gracefully?
To handle the exception that was thrown, you need to catch it. You can do this by using an exception-handling block i.e. by using ‘try block and catch block’.
Proper Memory Management

One of the biggest causes behind app crashes is the lack of memory because not all users possess powerful smartphones and high-end tablets. Whereas, people write code as though only their apps exist.
Taking the similar example from above: You can also get EXC_BAD_ACCESS (while attempting to access nonexistent memory) because of the usable memory already being assigned to other processes. The unavailability of enough memory will prompt your app to shut down.
How to go on about this?
- Do your best to avoid using too much memory and use caching whenever possible.
- Find where your app holds the biggest data structures or uses the most amount of data and see if everything is absolutely necessary.
- You can profile your app to see if there is any memory leak.
- If there is no way to save memory, then prioritize what data/ features to dispense and keep, to save memory when it is already low.
These kinds of crashes become very rare with just a little defense and care in programming, and using “treat warnings as errors”.
While improving app usability, knowing how to deal with dysfunctional apps can be of great help. If you want assistance in development and testing of mobile applications, you can chat with us here.
Forging Automation Testing Framework for an E-Commerce mobile platform
The client was looking for help to test critical functionalities of its mobile application for which they found a solution in Galaxy’s automation testing.
Our client is a trusted peer-to-peer rental marketplace for buying, selling, and renting almost anything. Our client’s dream is to offer a platform where all goods from cufflinks to computers can be borrowed within minutes. Why? Because we all own something that could be of value to someone else.
And with so many users constantly engaging with their mobile app daily, they needed to be certain that the UI runs smoothly on every device and platform without frustrating the users – which could be achieved through a comprehensive well-written automation testing.
Challenge
The client follows agile methodology in its software development process. This allows them to detect bugs earlier in the cycle, which results in speedy bug fixes. While testing early in the software development life cycle, there are certain tests that need to be repeated.
Such cases, when handled manually, were taking a lot of time and effort. Here, they felt the need to implement test automation that can overcome various challenges and help them improve the quality of the product in less time.
The main challenge for our client was to test major functionalities of their app on Android device. The goal was to complete test execution in a less amount of time. Due to the complexity of the application, it was difficult for them to zero in on the best automation framework for their app. They wanted to adopt an automated testing environment to ensure a highly reliable and secure system, and reduce the cost of future changes to their system. Seeking to adopt an efficient automated testing environment and reduce testing time, the client turned to Galaxy.
Solution
Our client came to us with the aim to develop a scaffolding that is laid to provide an execution environment for the automation test scripts. A framework that could increase test speed and efficiency, improve test accuracy, and minimize test maintenance costs while eliminating the scope for human error.
We needed to automate test cases for user portal of their core application. And for that we decided to solve their mobile test automation challenges and build the automation framework from scratch using open-source frameworks for their hybrid App.
Our testing team identified automation objectives and goals. This is determined through consultation between our client’s testing & development team and our testers. We then identified the test cases for automation based on different test case categories like difficulty to be tested manually, chances of human error, repetition, and data required for testing.
Login Test Scenarios:
- Verify if a user will be able to login with a valid username and valid password.
- Verify if the ‘Enter’ key of the keyboard is working correctly on the login page.
- Verify homepage after login
Renting Flow Test Scenarios:
- To click Search icon from the homepage and start searching for the product.
- When user starts typing words in text box, it should suggest words that matches typed keyword.
- To select date from date-picker/calendar for starting to end date of renting.
- To validate that the application supports payment gateway transaction as required by the application.
- Ensure that user can access the Checkout Page after adding a product to the cart.
- To check the logout session and whether the link or button for logout accessible for all users.
- To validate the rest of the test cases like scrolling, navigation, double taps, etc.
Having covered all the crucial scenarios and cases to ensure a smooth user experience, it was time to see how the tests pan out.
Testing the functionality
The client needed a team who can collaborate with them having the knowledge of web testing techniques and the e-commerce domain. We undergo discussion over special considerations of various aspects of project understanding such as business goals, current state of automation, and future roadmap.
To further ensure that the app was performing as expected, we did functional and smoke testing on major features, themes, and structure of the application i.e. from login to logout.
We created a testing framework using Java, Appium, Selenium, TestNG, and Maven. Such approach to select multiple open source tools and combine them with a custom framework helped us leverage a number of benefits:
- To reduce the time to create and maintain scripts.
- We used data-driven automated testing to separate test procedures from test data, allowing to cover more scenarios with a minimum amount of effort.
- We used POM concept, and developed special features that could be reused by all scripts, such as to create automated reports with screenshots for failed case/step, common methods for AppiumDriver (click, wait, etc.).
Integrating testing in development cycle
We integrated the script with Jenkins in the client’s environment in windows machine using the batch command. We configured Jenkins in such a way that smoke tests were first executed for sign in, flow of renting a product (on the same day), verify homepage, and verify rental page. And after the successful completion, functional tests were executed for verifying a renting a product on different days.
Results
Our testing team worked with the client and successfully crafted a testing and development plan tailored to their release cycle and pace of customer demands. We helped the client automate the system installation, smoke testing, functional testing, and system deployment process as well.
How we helped the client to get the best out of their automation testing:
- Selected test tools that leverage the best-of-breed approaches.
- Completed test execution in a less amount of time.
- Updated tests in accordance with changes in the UI and function of the application.
- Ensured verification of test results generated by automation testing.
- Ensured timely submission of test results to the client.
- Ensured that the user’s search experience in the site is of the highest quality.
With effective automation testing, our client managed to reduce time-to-market and launched a bug-free product. In addition, integrating continuous testing in the CI/CD process helped shorten mobile app release cycle and ensured high customer satisfaction. And as we took care of repetitive tasks with less number of resources on-board, we thereby helped in maximizing Return on Investment for our client.
The ultimate best practices guide to a robust mobile application
No software is perfect, just like humans. But the pursuit of perfection is not futile.
If you look around the web you’ll find thousands, maybe millions of posts telling you how to code, improve performance & stability, scale, and secure your applications. What you might not find is a comprehensive guide that has all the aspects that are needed for a robust mobile application.
In this blog you’ll get to learn about the best practices from design pattern and server setup to coding and security.
Design
Designing is the most crucial stage in an applications development life cycle. Conversions rely heavily on designs and how they’re implemented. Here are some of the best practices that can make your app a usability treat.
- Create efficient onboarding: The goal of onboarding is to show the value of your app to the user by demonstrating how they can achieve what they want in a quick and efficient way. If the user is having trouble within the first few screens, they’ll likely drop off without hesitation.
- Improve usability: Help your users by telling them which icons can be selected, tapped, or swiped. Ensure that you remain consistent with gestures throughout the app to optimize usability, e.g., if swiping up deletes an item, make sure that the same is true for all screens within the app.
- Prioritize actions: For each screen, there should be a primary action. This results in an easy-to-learn interface. You can show prioritization with contrasting colors, different fonts, or buttons.
- Construct a navigation that’s easy and apparent: But, how do I do this? Here are a few points that we follow during our development :
- Don’t hide it — the more obvious it is, the better. Never make a user hunt for it.
- Deliver consistent navigation throughout the app. If you hide it on internal pages, you’ll only add confusion.
- Indicate to users where they are by highlighting their location. This can be a problem for apps as users become “lost” and may abandon the task.
- Utilize a standard navigation platform. For iOS, “Tab Bar” is a good option, while Android works well with “Navigation Drawer.” Stick to simple — it will help you more than spending time on clever.
Scalability
An app that isn’t designed and developed to seamlessly handle continuous growth will eventually end up being a failure. Hence here are some scalability best practices that ensure your app holds up as your business grows.
- Choose the right architecture that way the app can grow organically with increasing traffic to the user base. Based on your needs you can go for MVVM, MVP or MVC pattern.
- When it comes to the server side, it must use “Auto Scaling” so that the server can perform well when the user base grows.
- Try going stateless: Keep APIs stateless. In each request, the client should provide all the information which would be required to fulfill that request. This might not be possible in all cases. Sometimes, we might have to query our database and other services. But try to follow as much as possible.
Security
We know that security is key to putting web/app users’ minds at ease as well as your own! There are six essential security elements that will protect users’ information. If one of these six elements is omitted, then the information is at risk.
- Availability refers to how you’re able to access information or resources in a particular location as well as in the right format. When a system isn’t functioning properly, information and data availability is compromised and it will affect the users.
- Utility isn’t always considered as a pillar in information security, but let’s say that you encrypt one copy of some important information and then the encryption key is accidentally deleted. The information would be available — it just wouldn’t be accessible or usable.
- Integrity references methods of guaranteeing that the data is real, accurate, and protected from any changes from an unauthorized user.
- Authenticity aka “authentication” makes certain that the user’s identity is validated.
- Confidentiality allows authorized users to access sensitive and protected information. Sensitive information and data needs to be disclosed to only authorized users.
- Nonrepudiation is a method of ensuring that message transmissions between parties have a digital signature and/or encryption. A data hash will help you acquire proof of authentic data and data origination.
Cloud and DevOps
Now that almost every app is on cloud with user bases exceeding millions on an average, it is business-critical to have a proper cloud infrastructure and DevOps in place. Here are some practices related to the same.
- Create isolated environment with the help of VPC (virtual private cloud) and define subnet on GCP (Google Cloud Platform) .
- Using IAM(Identity and Access management) services is handy to provide role-based access to any external users.
- For database services, we recommend using cloud SQL.
- For some of our clients, we have used Kubernetes engine for container based hosting.
- Use Continuous Integration (CI) and continuous Delivery/Deployment (CD) to make deployment strategy automatic.
- Using GCP Firewall for server security.
- Configure server environment with auto scaling.
- For email servicing, being experienced in configuring G-Suite will help.
- Use multi-region, load balancer on GCP to route the traffic region wise.
Testing and Optimization
Testing is crucial for a successful project as it enables developers to reveal performance gaps at early stages preventing any development overheads. Based on the identified performance gaps the app can optimized for quality and stability.
- Apply profiling tools for monitoring: Use tools like X-code profiler and Android profiler. With the help of profiling tools, you can detect the crashes and, thereby, get an alternate code against the same instantly.
- Test the app on multiple devices in order to make sure it performs well on most popular devices.
- Prepare for varying network speeds: A mobile user would mostly be using the app on the go, so make sure the app works well in case of switching from WIFI to mobile data or vice versa.
- Optimize queries:
- By optimizing queries, you can control output at the first end, which helps to prevent use of looping, reduce the number of statements, and the excessive use of other controls on the code end. This results in optimal performance for your site.
- Optimizing will create database normalization rules.
Monitoring and Maintenance
Contemporary applications are accessed from different platforms like phones, tablets and desktops. These platforms come with different operating systems, software/hardware platforms, security setups and other limitations. Therefore, continuous application performance monitoring is an essential part for smooth operations.
- Load testing: Check performance of the site with speed test tools, such as GTmetrix, pagespeedtest.org, etc., and implement its suggestions
- Use crash reporting: We recommend integrating a crash reporting tool, such as Fabric Crashlytics
- Make use of short statements — fragmentation of a big function to reduce the same code across multiple places
- Maintain error logs: This helps keep you organized
- Write rules to send email notification to developers/responsible person in case of any issue/error occurs.
Combining the above best practices will help you deliver a site/app above the rest
If the above seems like it’s overwhelming to handle or even for your team to handle alone, reach out to us and we’d be happy to help you in all things related to optimizing your site or app.
Galaxy Weblinks has a dedicated team of designers and developers that are well-versed in creating efficient websites and mobile apps, so reach out to us a
Kotlin 1.3.50 | More than just a performance upgrade
Kotlin has emerged as both substitute and supplement to C++ and Java. In 2018, the language had over 96,000 repositories on GitHub and had already reached 1.5M+ users.
More than 50% of professional Android developers now use the language to develop their apps. Google claims that this figure will increase dramatically. Since in future Kotlin will be the first to receive new Jetpack features.
The new Kotlin 1.3.50 release kicks off with various tooling and quality improvements to develop applications much faster. Let’s take a look at the major improvements from this release.
Convert Java-Kotlin with fewer compilation errors
The one-click Java to Kotlin converter tool helps to convert an existing Java project, one file at a time. The converter is not meant to produce 100% error-free code, instead it’s built to reduce compilation errors.
The converted code might show nullability issues that require human intervention. Manual corrections fixes the code for the time being but it doesn’t foolproof the code from runtime errors that show up in the form of nullability mismatch.
The new improved version of Java-to-Kotlin converter (available in preview) tries to infer nullability more correctly based on the Java type usages in the code. And helps in making it easier than ever to convert code with fewer compilation errors. The generated Kotlin code is easier to manipulate too.
Improved Debugging
Bytecode has a lot of technical information and displaying all of that can make the code bulkier and unreadable. Kotlin ‘Variables’ view now highlights only the most relevant variables, which aids in easier debugging.
- You can set a breakpoint inside lambda expression or at the end of the function as well.
- Improved support for the “Evaluate expression” functionality in the debugger for many non-trivial language features. You can now modify variables via “Evaluate expression”.
New Intentions and Inspections in IntelliJ IDEA
This addition helps in learning how to write idiomatic Kotlin code, improve performance of IDE actions, and fix several known situations that were causing the UI to freeze.
- IntelliJ IDEA now highlights deprecated imports from the completion list
- You can convert normal properties to lazy properties and vice versa
- You can automatically replace the primitive lateinit property with the by Delegates.notNull () syntax
Kotlin/JS now supports Dukat-Gradle integration
Dukat is a converter of TypeScript definition files to Kotlin declarations. By running the build task in Gradle, typesafe wrappers are automatically generated for npm dependencies and can be used from Kotlin.
You can now comfortably use the JavaScript ecosystem libraries in Kotlin in a type-safe manner without the need to manually write wrappers for JS libraries.
Other Kotlin/JS updates
- Incremental compilation for Kotlin/JS is now up to 30% faster compared to 1.3.41.
- Support for running and building Kotlin/JS Gradle projects using the org.jetbrains.kotlin.js plugin on Windows.
- As with other platforms, you can use Gradle tasks to build and run projects and resolve NPM dependencies needed for Gradle configuration.
Kotlin/Native updates
Earlier version names of Kotlin and Kotlin/Native differed from each other. This release uses version 1.3.50 for both Kotlin and Kotlin/Native binaries, reducing the complexity. As the standard library updates to support the kotlin.reflect.typeOf() function for Kotlin/Native types.
- Kotlin Native now ships with an exhaustive set of platform libraries on macOS/iOS and embeds actual bitcode in produced frameworks.
- Kotlin-platform-native is now replaced with Kotlin-multiplatform
Here’s a link to the change log if you’re curious about the other features that are packaged in the Kotlin 1.3.50.
Let us know how you feel about the multiplatform Gradle plugins and handling nullibility errors manually. And ping us here if you need Kotlin development assistance.
What are Google Play’s new mobile app requirements?
Google Play set out many criteria in their app guidelines that you need to follow. These changes may cause some issues as you try to stay up to date. In this post, we’ll tell you what changes you need to make in order to guarantee that your app is fully compatible with Google’s new requirements.
Google made changes to the behavior of the API to increase security and privacy. The bindService() implicit intents in Android 5.0 aren’t supported currently. There are also new changes in the Runtime permissions. Since every Android app runs in a reduced-access sandbox, so the app has to ask for permission when it wants to use materials or information outside that sandbox. Google Play asks that you state the need in the app manifest and then you have to approve each permission right before the actual runtime.
This permission change is for Android 6.0 and higher. You can still use the Android Support Library to make older versions of Android compatible. Google Play also updated the Android Support Library with the release of Android 9.0 (API level 28); the new version is called AndroidX and is part of Jetpack. The existing support library still exists with the AndroidX library, but it also includes Jetpack’s most recent components.
Google Maven holds onto all versions prior to API 27 and Google Play says that they’ll be packaged as “android.support.” But, all new development will take place on the AndroidX library, so Google Play recommends that you develop new projects here. If you have an existing project, they recommend that you migrate it over.
To further increase secure connections, Google Play has changed the user added CAs to not be trusted by default in the case of Android 7.0. They also require explicit user approval from apps to access the user account in Android 8.0.
For MetaData, Google now has a small MetaData on top of each APK so that each app release is officially verified by Google Play. They don’t allow apps with any deceptive, incorrect, or explicit metadata that isn’t pertinent to what the app is about. This entails every area of the app — the title, description, all images, and icons. They also don’t allow user testimonials in the app’s description any longer. Authentication is important for users to know that an app is legitimate, so they’re spending time to ensure that each app functions as advertised.
Here Are Google Play’s New Requirements for Texts & Images
Google Play store now allows 2–8 screenshots for each supported device, i.e., smartphones, tablets, Android T.V, Android Wear, etc. But, to publish your store listing, you have to upload at least two screenshots for each device type. It needs to either be a JPEG or 24-bit PNG (no alpha) with minimum dimensions of 320px and maximum dimensions of 3840px.
Screenshots aren’t the only images that need to be formatted. Google Play requires one splash screen for an iPhone display and one for an iPad display, both retina and non-retina displays. Whether you’re using a photo or video, dimensions should be 1024px by 500px. If you choose a video, make sure to use an individual video’s YouTube URL, not a YouTube playlist or channel URL. The video shouldn’t be longer than two minutes.
Google Play now requires icon images to fit into the new, standardized icon shape — the square with rounded corners known as a “squircle.” It needs to be hi-res, material icons used through Android M, and adaptive icons for Android O.
For your text:
Titles – Should be between 4 and 30 characters – But, the new limit was moved from 30 to 50 characters
Descriptions – The short description has an 80-character limit – The detailed description has a 4,000-character limit
Keywords – They’re required and the new version has a 500-character limit – Users can also fill in this field while updating the application version
Before Launching, Follow Google Play’s Checklist

Key Takeaways
- Google Play changed API behavior
- Android 5.0 implicit intents are no longer supported
- Android 6.0 and higher has changes in Runtime permissions (app must request permission of a material, then approve permission before runtime)
- Develop new projects on AndroidX library
- There is now MetaData on top of each APK
- There is new length requirements for, Titles (new 50-character limit), Descriptions (80-character limit), and Keywords (500-character limit)
- There are new requirements for images
- Icon must be the square with rounded edges — aka a “squircle”
- Two screenshots per supported device type (smartphones, tablets, etc.)
- One splash screen for iPhone and iPad screen displays
- For videos, link to an individual video, not a playlist
Good Luck on Your Launch!
Galaxy Weblinks stays up to date on these developments so that our clients don’t have to do time-consuming, detailed research. That’s why our clients love partnering with us for mobile app development — we don’t leave them in the dark nor overload them with lengthy information. We provide overviews, outlines, and how-to guides so that clients can feel confident when updating their app.
Feel free to use our above checklist to keep yourself on track. If you have questions about this process, leave us a comment or contact us. If you have questions about other app topics, then browse our blog!
