Top 5 Python Frameworks To Opt For

Building the backend for a web application or service?

It doesn’t matter if it’s simple or complex, there’s a Python framework that can address your needs. Choosing the right one can make tedious implementations like user management, data design, form submissions, and security, less of a headache.

If your project is simple you can opt for something implicit and minimal rather than explicit and complex. Whereas, if you’re working on a big project then you’d need all the firepower a framework can pack. Here are 5 Python backend frameworks that you might want to consider for the backend of your web application.

1. Django

Undoubtedly one of the most known and deployed frameworks, Django has been the go-to choice for enterprises for building web applications for years. With its 3 stable releases, Django has come far in terms of deployment speed. It is now equipped with the new asynchronous ASGI standard for Python web applications.

One of the reasons that Django is so popular is that it comes with batteries-included, meaning all the components that you’d need to develop a generic web application. For instance – user management features like tracking, sessions, passwords, and admin permissions, etc. are common to most web applications. Django provides these features natively.

From a safety POV, Django has some practical defaults to prevent attacks and cross-site scripting issues. While placing a variable in a page template, such as a string with HTML or JavaScript, the contents are not rendered literally unless marked safe.

This Python framework sure is powerful but it comes at the cost of unnecessary complexity; even simpler applications need a lot of configuring to install and run. Django applications are heavy and come with many moving parts. Django is monolithic, meaning apps are chunky and tightly coupled, so everything gets deployed together.

2. CubicWeb

CubicWeb is an object-oriented semantic web app framework. It uses reusable building blocks of code called “cubes”. Cubes are made up of a schema, logic, and views. These components can be utilized as in any other modular framework, each having its function. It lets you build apps by reusing your code and of others.

It’s a powerful Python framework featuring the fundamental building blocks of a modern web application. In CubicWeb, you set up and manage instances with a command-line tool and its built-in templates let you generate HTML output conveniently.

Since CubicWeb doesn’t support the native async functionality some workarounds are required. One of which is to use the cubicweb-worker cube to perform tasks asynchronously. Moreover, it also comes with a lot of dependencies which translates to a daunting list of manual tweaking on the local environment. You can use pip install instead to get them all in one go or you could also use a Docker container to set up shop.

The CubicWeb development has been slow and is not the most promising but it still powers some of the large-scale semantic web and linked open data applications.

3. Web2py

Inspired by the simplicity of Rails, Professor Massimo di Pierro created a simple and easy to set up framework called Web2py. It’s a scalable, open-source full-stack framework for Python which comes with its web-based development environment and features like Role-Based Access Control (RBAC), Database Abstraction Layer (DAL), and support for internationalization.

The data abstraction system in Web2py is a bit different from Django’s ORM, which uses Python classes to define models, whereas Web2py uses constructor functions like define_table to instantiate models.

Just like CubicWeb, Web2py doesn’t explicitly use Python’s Async functionality, but it makes up for it with a scheduler for handling long-running tasks.

4. Weppy

Looking at features like data layers and authentication, Weppy will remind you of Django. But when you look at the code it starts looking like Flask, with minimal instruction to get a basic single route setup ready.

Weppy is a lightweight framework and comes with convenience functions, which makes it great for building RESTful APIs. You just have to use @service on a route to get data that is automatically formatted in the format of your choices like JSON or XML. Though lightweight, it packs some big framework features sans the weight and complexity. Validation mechanisms, form handling, response caching, internationalization, and user validation among others are such features.

The not so complex ‘Just enough’ features come with some trade-offs. Weppy extensions try to make up for these trade-offs but unfortunately the list of official add-ons is not that long.

The upcoming Weppy 2.0 will support async and sockets as low-level first-class entities. Also, all the upcoming versions will require Python 3.7 and above to run.

5. Zope

In contrast to every framework mentioned in the list (except for Django) Zope is meant to be a full-blown, enterprise-grade application server stack. For templating, Zope uses a flexible Zope Page Templates (ZPT) system or a basic DTML markup system. While ZPT can be a powerful way to design templates but the syntax takes some getting used to.

While the complexity can be beneficial for enterprise-grade applications, when it comes to installation Zope can be a bit difficult. So much so that it also offers a specialized setup tool called zc.buildout for installation .

If there are no resource constraints and you can look past the unnecessarily complex setup then Zope might prove to be the best for a large undertaking.

One thing to note is that there is no direct support for Python’s async. However, Zope utilizes the zc.async package to distribute tasks across machines and synchronize them in a ZODB instance.

There are a host of choices to base your backend on. It boils down to how much functionality and freedom to tweak are you looking for? All of these frameworks offer something that makes it a unique offering. You just need to truly understand what your solution needs and your choice will be easy and best suited.

Galaxy Weblinks

With over a decade of experience in creating and delivering robust software design and development services, our developers know the backend technologies like the back of their hands. Galaxy has expertise in all major backend technologies, be it PHP, Java, Node, and Python. You can spell out your requirements and leave the rest to us. For more information, do visit us here.

What are the key Mobile App design considerations?

Mobile devices are an integral part of our lives. They are used to cater to different needs of the users, including business and social networking, banking, entertainment, and even grocery shopping. Mobile apps are a great way to improve your product or service and reach out to more users. One of the key differences between a successful mobile app and the one that fails are the design elements – user experience (UX) and user interface (UI). UI is the components and the layout of the mobile app with which the users can interact, whereas UX is the overall experience of the user using the app.

The UI/UX design is one of the most important factors to consider while building a mobile app. Having said that, the global trends in UX design and UI design are constantly changing and it may seem like a challenge to keep up with the latest trends. In this article, we have compiled some of the key mobile app design considerations.

Keeping the app simple

Mobile devices are short in real estate, and hence knowing what are the most important elements of your offering is crucial for a successful mobile design. Keeping the app layout simple ensures easy navigation and a great user experience. It is very important that the app navigation is easier, faster, and smoother to use. Having unnecessary features in the app reduces the app speed and leads to a poor user experience.

However, simplicity does not mean minimalistic design. The design should be creative and such that the users complete their tasks in as few steps as possible. Unnecessary steps will likely leave your user frustrated and unhappy with their experience.

Finger-friendly design

With mobile devices, we use our fingers to navigate through the app. Hence, having a finger-friendly design is a crucial consideration while designing your app to understand how your users will interact within the app. Over time, users have been familiarized with certain finger movements and these have become standard use for tasks such as swiping to go to the next page, double tap and pinch to zoom, etc. Additionally button design plays an important role in designing the app. These buttons should be adequately sized and should be located at the right places on the screen. Excessive scrolling inside an app can be frustrating and lead to a bad user experience.

Responsiveness

Mobile devices have a very wide range of sizes and your app should be able to respond to these. Additionally, each device have two different screen modes in which the devices can be viewed — landscape and portrait mode. App designers should design the app such that important elements respond to different screen sizes and orientations and are displayed appropriately. Hence, mobile responsiveness has become an integral part of the app front end development.

Consistency of design

Maintaining consistency across your app provides familiarity and ease of use for the end user. A good practice is to define your elements and then repeat them throughout the app. These elements include but are not limited to style, color, fonts, buttons, etc. A consistent app design ensures a rich user experience. On the other hand, a non-consistent hampers your app’s intuition and will mostly frustrate the user leading to a poor user experience.

Conclusion

Mobile apps are increasingly becoming part of our daily life and the focus of good developers remains to keep the user happy. Keeping the basic mobile app design considerations in mind ensures that the focus remains on the user. If you’ve any doubts related to mobile app development and if you need assistance developing one, then feel free to talk to us here.

What are the best practices to build a Mobile App?

Turning your great mobile app idea into reality requires a significant amount of time, effort, and money. Mobile app development is a complex and long process that involves different tasks to get the final product. These tasks require decision-making and can be crucial to an efficient overall development process that not only has cost implications but also determines the overall success of your app.

This necessitated the need for a well-outlined app development process. In this article, we have compiled some of the key mobile app development best practices for developers.

Carrying out research and formulating a plan

Each app idea aims to solve a specific problem catering to the needs of its user base. So it is a crucial first step to –

  • Carry out thorough research to know your market
  • Understand the target audience
  • Identify the market gap
  • Research your competition, and differentiate your product offering.

Better research leads to a better product when it comes to app development. If you don’t invest your time in research, you will end up with a lot of iterations which would mean increased manhours and capital.

Choosing the right development platform and app type

Choosing the right platform for your application at an early stage is crucial since the iOS and Android app development processes are different from each other and take time to develop. It is important to choose the right app type (native, hybrid, or web apps). All these types have benefits and limitations, and the right selection is usually determined based on answers to these questions.

  • What is the objective of building your app?
  • What are the key features to be included in your app?
  • What is your budget to develop the app?
  • How quickly do you want to develop the app?
  • Are you more interested in building an MVP across different platforms?
  • Do you want to build it in-house or outsource?

Focusing on design and user experience (UX)

Design is the most important aspect that helps you build a connection between your users and your product.  A good design enhances usability, accessibility, and pleasure the user has while interacting with your app and ultimately your company. Before starting coding for the app development, the focus should be on carrying out a detailed design phase to create prototypes to check their effectiveness. If an app is built without a good UX and after spending huge amounts of time and money, the customers will not stick to the product. So a revamp after launch would be very expensive and brand-damaging in many cases.

Carrying out debugging and testing 

Debugging and testing are the most important parts of mobile app development best practices. Tests need to be carried out extensively to ensure that your app is running efficiently. These tests should run for different test scenarios and conditions to make sure the app is ready for the users.

Focusing on app security 

App security is crucial when it comes to customer data and sensitive user information. Many times developers ignore the security risks while developing the mobile app and thus allow vulnerabilities risking user information while collecting, using, and transferring such data. A developer should carefully implement best practices around privacy at all stages of the app’s life cycle. New privacy rules and policies are developing quickly and developers should be on top of these changes in regulation and policy matters as well as follow the app development rules and guidelines for the different operating systems (App store, Play store, etc).

Planning app updates post-launch

An app requires frequent updates and maintenance support post-launch to accommodate user feedback, feature enhancements, technology enhancements, privacy policies, operating system updates, etc. A good development team should plan for these updates timely to roll out bug fixes, minor changes, or features enhancements.

A few common mistakes during the app development process

We highlight below a few common mistakes that are mainly due to not following the best practices during the app development process.

  • Lack of research around the market, users, competitors, etc
  • Not addressing user requirements and incorporating user’s feedback
  • Focusing only on budget and not adhering to budget management
  • Poor design UI/UX
  • Overloading the app with complex features and functionalities that are not user friendly
  • Not creating an MVP and testing out different prototypes
  • Hiring a development team that does not follow best practices and are misaligned with the overall objective
  • Poor planning and communication during the app development process
  • Lack of maintenance activities and no timely updates of the app

Conclusion

Mobile app development is an ongoing process and it will continue to evolve over time and during the development process. Following these best practices during the app development process can help you avoid common mistakes that can prove to be expensive and damaging to the company’s brand. If you’ve any doubts related to mobile app development and if you need assistance developing one, then feel free to talk to us here.

Micro Frontend | 4 Things to know before switching

The first part of this series uncovered the idea of Micro Frontends that is to break down the frontend monolith into smaller, more manageable pieces. (Read the blog here)

Each team can constantly deliver small incremental upgrades, work in their proprietary codebase, independently release versions, own their features end-to-end, and also integrate with other teams via APIs so that they can manage and compose applications and pages together.

This article will share some important decision points to help you decide whether micro-frontends are right for your project, and if so, how do you proceed?

1. Consider the size of your team

Micro frontends enable teams to develop faster and deploy end-to-end features from the database to the user interface on large web applications. An independent team can own and maintain a component without sharing technology or a release process with other teams. That means when a team uses components from other teams, all they need to know is the custom HTML element and its attributes.

Whereas, companies with multiple teams each using a different frontend framework can build a unified component library. For shared code like cookies, local storage, the DOM, and CSS, teams would agree on a namespace convention without any dependencies.

Sep Nasiri from Upwork who leads its UI Infrastructure Team says, “Migrating to a micro frontend architecture introduced some challenges but the benefits of modernizing Upwork’s frontend along the way made it worthwhile. Modernization will help deliver more consistent user experience, streamline certain services, and future-proof our site for Upwork’s 17 million global registered users.”

In essence, micro frontends will help change technologies for an existing application. The team could deliver value gradually by launching parts of the application without attaining much technology debt whenever there is a change in the existing application.

2. Organizational Structure

Similar to building microservices, the basic idea is to allow the DevOps teams to operate and build their micro frontends without any dependency. Remember, their goal is to ship something of value to the business people faster. To allow them to work quickly regarding integration and platform complexity, there should be a Platform Team to support them. The Platform Team is responsible for the platform and ensuring guidelines so that new micro frontends can integrate easily. Ideally, the DevOps teams can ship, develop and plan a new micro frontend without the Platform Team. Besides, they should be able to monitor operational problems and access logs by themselves. Otherwise, the Platform Team will be overloaded and the approach will not scale.

Here is a simplified diagram of the organizational structure:

What is missing from the structure is Governance. If you’re using this approach on a large scale, you need some supervision to avoid uncontrolled growth and to maximize the reuse of existing micro frontends. If you already have a lot of microservices or a WebService catalog, you can do something very similar in that scenario as well.

3. User Experience

Beyond any doubt, User Experience and User Interface Design are the most decisive parts when building systems with micro frontends. This is because a completely heterogenous UI with different behaviors, fonts, and colors is difficult to accept by users and business people alike. So, choose to implement micro frontends after ensuring these decisive points:

  • Provide the developers with CSS (a theme) they can apply during development so they can see how it will look when integrated.
  • Define all common UI components in pure CSS. Then the teams can use the JavaScript framework of their choice as they just have to use the predefined CSS classes.
  • Make sure you have an expressive UI component library that covers not only the single UI elements but also the most important interaction patterns.

4. Multiple client-side libraries and frameworks

Should a team use Vue, Angular, or React for the frontend of a particular component? There are reasons why one library or framework fits better in a situation over the others, and there are pros and cons for each as well. Irrespective of your choice, keep in mind you are not building the web application just so you can use the frameworks; you are choosing the frameworks so that you can build your web application. Just like any architecture, the users will benefit from faster response times from the fewer number of libraries and frameworks you are loading on the client-side.

Because adding another framework means the user experience might become slower due to the additional load. The teams should mutually agree on using the same JavaScript framework whenever possible.

Let’s imagine, the teams got to agree on the same JavaScript framework. Now the teams need to decide that because of the given independence, whether they’re gaining efficiencies on deployment and development or not.

Build modern web apps using microservices with Galaxy Weblinks

The micro frontends and microservices approaches are great techniques to help divide the workload for multiple teams and to isolate code for each Custom Element. It might not be a good idea to choose the added complexity before you need it! Keeping in mind that micro frontends come with extra overhead, the considerations in this article will hopefully help you before implementing this approach.

About Galaxy Weblinks

We specialize in delivering end-to-end software design & development services and have hands-on experience with backend and frontend technologies. With our hands-on experience with Kubernetes, Docker, you can automate the deployment of scalable, future-proof applications.

Micro Frontends – A Nimble Approach Towards Frontend Development

This is a two-parter series on Micro-Frontend and it’s implementation. And if you’ve already read this one, head on to the part two for 4 Things to keep in mind while working with Micro Frontends.

As the business and product expands, the software architecture leaves us with a monolithic frontend and backend, and the inflexibility that comes with this.

The prevalent practice, microservices architecture, has been used as the foundation on which feature-rich applications can be built. This made many product developers adopt microservices on the backend-side, and start extracting logic one-by-one into separate microservices. The typical setup looks like this:

These microservices get aggregated and consumed by the frontend through an API gateway. Broadly, it appeared that we cannot scale UI on the front-end. The applications, thus, developed are known as Frontend Monolith.

This time, the whole hype is about facilitating a co-existence of different front-end frameworks. And approaching the front-end development process of web apps with the concept and idea of microservices, calling them micro frontends.

To help you figure out whether you need the integration of micro frontends in your development process, let’s take a closer look at micro frontends.

What Micro Frontends can mean for your web apps?

The most popular development approach used for modern web applications is the single-page application (SPA).

The typical SPA application flow follows standard steps:The user visits the web application

-The browser requests the JavaScript and CSS

-The JavaScript application runs and provides the initial content to the browser document

-The user interacts with the application – such as adding a product to the basket or clicking a navigation link

-To show the changes, the application rewrites browser document parts

SPAs are critical to modern development, but they aren’t perfect. SPA comes with many disadvantages.

  • Framework complexity: Many frameworks can provide the SPA experience and allow you to build a solid SPA, but each targets different needs, and knowing which to adopt can be hard.
  • Browser performance: Because the SPA does all the rendering and processing of the user interactions, it can have a knock-on effect depending on the user’s configuration. Not every user will be running the application in a modern browser and at a high-speed connection. It’s important to have low processing time and keep bundle size down as much as possible to have a smooth user experience.

The above-mentioned reasons showcase the common issue, which is scale. Building a huge or complex application requires multiple developers that can help fit all your user’s needs. Working on a SPA with a monolith frontend can lead to many people working on the same code trying to make changes and causing conflicts.

So what’s the solution to all of these problems? Micro frontends!

“Micro Frontend Architecture is about considering a web application as a composition of features owned by independent teams. Each team has a distinct area of business that it specializes in. It is an architecture pattern for building a scalable web application that grows with your development team and allows you to scale user interactions.” – micro-frontends.org

The typical setup looks like this:

pasted-image

Whereas, a real example looks something like this:

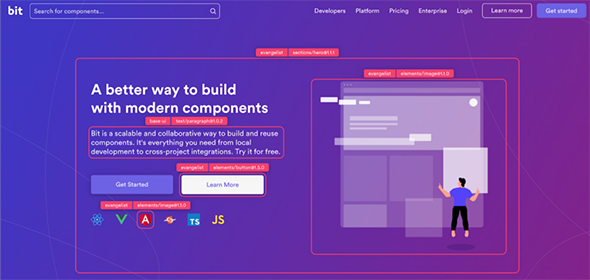
bitdev

The above home page is developed by the Bit team and used modern component-driven technologies like React and Bit to build micro front-ends.

In the above image, you will see two sets of components, developed by two teams. One is “evangelist’”, owned by their marketing team. The second is a “base-ui” set of components, handled by their front-end infrastructure team. Components from both sets are combined to quickly create the homepage you look at. As well as other pages like the Support Page or Enterprise Page, and even to compose more applications.

The pros: Complete Technology Isolation: you can have dotnet on one side and node.js on the other side irrespective of what technology is used in both systems.

Complete Deployment Isolation: you can implement each frontend release and batches without affecting the other component.

Fast Load Time: because you don’t need to load all libraries and resources you have in your store to the payment system.

Easy Cache: as the 2 systems are completely isolated so managing the cache is very easy.

Reasons why Micro Frontends are for you?

Here are some good reasons to accept the extra complexity and integration costs while choosing to implement micro frontends. Apart from the above reasons, there could be others as well:

-You are going to build a huge web application that cannot be maintained as a monolith (at least not for a long period).

-You want to add new features to a legacy application that is no longer maintained (or no developers are available any more for integrating new technologies).

-Your company has invested in some commercial systems like a portal, CRM, or a CMS. But when the system is going to be replaced, you want to prevent your internally developed applications from becoming useless. Also, you want to integrate existing applications there.

-Newly hired developers are not that productive throughout the development process – ideally using the technologies they prefer and are used to.

-Your business applications tend to live 5+ years and you want to avoid relying on a single web framework that might get obsolete.

Here is how Galaxy can help you

Your business is often left unable to deliver modern online experiences when release cycles take months instead of weeks. Development hold-ups slow your ability to make application updates, keeping you from innovating and iterating. And outdated or clunky UX keeps you from retaining your customers and winning over them.

Galaxy’s experts will help you implement an end-to-end vision by creating a modern development stack for building enterprise applications using required frontend and microservice technologies for your business. We will enable your team to rapidly build, design, and launch applications from microservices.

Learn about Galaxy’s suite of Frontend, Microservices and DevOps capabilities to help your enterprise build better and faster apps, sites, and portals.

About Galaxy Weblinks

We specialize in delivering end-to-end software design & development services and have hands-on experience with backend and frontend technologies. Our engineers, frontend developers, and UX/UI experts help improve security, reliability, and features to make sure your business application and IT structure scale and remain secure.

What Are the Best Practices to Build an Enterprise Software Application?

Building an enterprise software application is a complex journey involving several team members with varied skill sets, requiring significant time involvement, and costing a lot of money. There are several phases during the enterprise software development life cycle – requirement gathering, analysis, design, development, testing, deployment, and maintenance.

Due to the complexity of interacting with several team members and dependency of output from one phase to another, it is important to have a well defined process during the entire life cycle. In this article, we have compiled some of the key best practices while building an enterprise software application.

– Identifying the goal and formulating a plan

Each idea aims to solve a specific problem catering to the needs of its user base. So it is a crucial first step to identify the end objective and carry out a thorough research to know your market, understand the target audience, identify the market gap, research your competition, and differentiate your product offering. Better research leads to a better product application. If you don’t invest your time in research, you will end up with a lot of iterations which would mean increased manhours and capital. Hence it is important to carefully think out your product idea, define why and how you want to build the product.

Choosing the right partners

Several phases during the enterprise software development life cycle require people with varied skills such as design, coding, QA, product management, etc. Building the entire team in-house can not only be expensive but can be a daunting task managing all the resources. Hence, it is important to identify the right technology partners that can help your team in building the application in the most efficient and cost-effective way.

However, choosing the right partners can be challenging and a crucial part of the overall development process. While selecting the right partners, keep in mind that the companies should be aligned with your organization as well as with the project requirements. The companies should have relevant expertise and experience, and this can be evaluated by looking at their portfolio, looking at the company’s reviews on Clutch/Dribble, as well as speaking to their references.

Setting the scope at the start

The work scope should be established at the start of the project with clear deliverables and timelines. If you have outsourced design work, make sure that the deliverables such as user stories, information architecture, design, etc are well documented. These deliverables help the development team in writing the code adhering to the best standards.

Having a clear set of scope, deliverables and budget are crucial to a successful project. Not only will these help you monitor the progress, your partners can plan resources and allocate time accordingly. Not setting a scope at the start could lead to several iterations resulting in cost overrun and project delays.

Identifying the most suited tech platform

Enterprise software applications are built-in specific coding languages such as Python, Java, C, JavaScript, etc. There are various pros and cons of each coding language depending on the business needs. Hence it is important to brainstorm with your team / partner and select the right programming language for your software application. It is also important to think about the platform (desktop, mobile) your software will run on.

Outlining the features/functionalities clearly

Software application development is an iterative process. During the process, a lot of changes happen including adding/deleting/modifying features and functionalities. Frequent changes to these can slow down the project and will mostly impact the budget/timelines. Hence, it is important to identify the core features and functionalities clearly at the start. While minor modifications are acceptable, they are unlikely to have a major impact on the overall development life cycle.

Setting up effective communication

Effective communication is a key factor in the success of software development. Working with partners across the globe with different time zones, different cultural/linguistic differences, etc requires effective project management tools like Asana, Jira, Basecamp, Trello, etc and communication channels such as Slack, Zoom, Teams, etc. These tools enable teams to work together throughout the development life cycle efficiently.

Relaying timely feedback 

The output dependency from one phase to another makes the entire process dependent on timely feedback during all the phases. Any subsequent change to output from one phase due to lack of proper analysis and feedback results in multiple iterations across the life cycle, which is both time consuming and expensive. Hence it is important to have a frequent and open communication dialogue during each phase and evolve the product idea ahead of development.

Conclusion

Enterprise software application development is a complex and long decision involving many variables. For a successful execution, you need multiple partners that help you during the entire process. As we flagged above, it is important to have a well defined process during the entire development process. If you’ve any doubts related to software development and if you need assistance developing one then feel free talk to us here.

How to Migrate to .Net 5 without any hassles?

As 2020 came to an end, Microsoft announced their .Net 5 release along with a fixed schedule for release and support for future updates and EOLs. Going forward .Net, .Net Core, and Xamarin will be consolidated during the .Net 5 to .Net6 wave. This is likely to make the development process for Mobile, Web, and Desktop with .Net much more unified and easier. Here are some of the major highlights from a fairly beefy update:
  • .Net now supports single file applications that don’t necessitate for .Net to be on your machine. Now you can compile .Net in your application and get a small single file that you can copy to any machine.
  • One .Net means one SDK for mobile, web, desktop, and console.
  • Native support for ARM64 in .Net core
  • Smaller containers than ever before
  • Cross-platform Native UI

Migration Plan

As with any migration plan, first and foremost you need to be aware of everything that is not making it to the upgraded version. Earlier Core 2.0 borrowed some technologies from the .Net framework, that’s not the case with newer versions. Rather some things may be skipped in the new version for some technological reason or the other.
  • AssemblyLoadContext is replacing app domains, as the latter is quite an expensive runtime feature and not suitable for modern app development.
  • Remoting is being replaced by named pipes and gRPC
  • WebForms is being replaced by ASP.Net Blazor
  • WCF Server is being replaced by gRPC and Open source CoreWCF
  • WF is being replaced by Open source Corewf

How to Migrate your project to .Net 5

1. Ask if and why you need to migrate

The first step in migration is to understand the feasibility and goals for migration. No need to be over aggressive with the migration because .Net is not going anywhere. If you’re happy with how things are, then there is no need to migrate as .Net is part of Windows and is bound to get fixes for a considerably long period. On the other hand, if you want to innovate and leverage new features and technologies then .Net 5 is the way forward. Your migration approach will also depend on your choice of Operating System. If you’re sticking with the existing one or shifting to another. Pro Tip: Ensure that you have backups along the way so you can still ship working software. It’s futile to port in a big one-off migration. While it might work for small projects, not so much as your projects get bigger.

2. Analyze your app

Having worked months, even years on an app, one might think that they know the app inside out. It might be true for simple apps but in the case of complex projects, it’s easy to overlook obsolete things that might add to the difficulty of an already grueling undertaking. Things to keep in mind while auditing your app:
  • Use ApiPort to list outcode and its dependencies.
  • Legacy code can be a pain to carry forward. Analyze legacy code for feasibility if it seems obsolete and expensive to refactor then consider dropping before the port.
  • Analyze dependencies and ensure they have support for .net 5. If they are not supported then consider moving to modern alternatives before porting.

3. Convert Project

After understanding the needs for the port and deciding to ahead with it, you’ll need to convert your project. Conversion typically involves:
  • Replace packages.config with<packageReference> elements in the project
  • Another option would be to use Try-Convert to automate the process to migrate the project files to SDK style
Pro Tip: Consider only migrating the project files without changing the target framework as you’ll need click stops for big projects in case of unexpected downtime There are some limitations to Try-Convert method
  • It can’t convert some project types like ASP.NET and Xamarin
  • It doesn’t migrate any source code (*.cs), only project files(*.csproj)

4. Time to make the move

Replace the target framework string in the project file from the existing version to .Net 5. As stated earlier avoid moving everything at once you would want to start from the bottom with reusable libraries and make your way from there. Additionally, identify if you have shared components that need to continue to work on the existing .Net framework. Retarget those to .Net Standard and then retarget remainder to.Net 5.0

5. If you want to move to another OS

When you’re looking to change your operating system, ensure that you use a CI environment that can run your code in multiple operating systems. Azure DevOps, Github actions, etc. And last but not least, run tests to ensure that everything is working as expected. There are a lot of moving parts in an enterprise .Net project, and the scope for mistakes while porting is immense. It’s not a question of expertise but of time and resources. While the automated tools might make the process less of a pain but you’d still have to engage resources to make time-consuming changes in the source code. Currently handling numerous .Net projects, a few of which are under migration, Galaxy provides the needed expertise and resources to make the migration smoother with zero downtime. Contact us now for a free consultation on your .Net project.

When Should You Consider Outsourcing Software Development?

Outsourcing software development has been a strategic approach that has been adopted by many companies to not only fill in any technology gap but also to take advantage of lower pricing in offshore locations. Outsourcing is not a new approach and businesses have been dependent on it since the early 80s. Still, outsourcing is one of the most talked about business strategies and many still have their inhibitions and questions around whether to outsource, what are the benefits, what are the risks, when is the right time, how to find the right software development company, etc. In this article, we are going to talk about the benefits of outsourcing and when is the right time to outsource software development.

What are the key benefits of outsourcing software development?

Outsourcing is not just offloading your work to another company in an offshore location. There are many benefits of outsourcing software development –
  • Increased strategic focus on the core business functions: While the outsourcing partner is focusing on building your software product, businesses can focus on their core business functions including the growth areas.
  • Cost reduction: One of the benefits of outsourcing is cost reduction. If a business’ objective is to minimize software development costs, then there is no better option than a well-planned outsourcing.
  • Access to latest technology: If your business requires advanced and latest technology, then building such expertise in-house will be very expensive. This is where outsourcing to a specialized technology partner scores over in-house development. The outsourced company’s technology stack allows businesses to integrate state-of-the-art features and functionalities at fraction of a cost to develop these in-house.
  • Adjusting to project demand: Outsourcing provides benefits of adding scope and team members depending on the demand. Working with an in-house team has its challenges of scaling up or down quickly due to legal and regulatory issues regarding employment. Outsourcing provides business flexibility to scale the team up and down very quickly as per your software demands.
Outsourcing also has its fair share of challenges such as communication issues, cultural differences, improper project management, inability to handle big projects, etc. However, the benefits of a well-planned outsourcing strategy outweigh the challenges.

When outsourcing software development makes sense?

Outsourcing could play a strategic role in your business if you –
  • Need tech experts from global companies to supplement your in-house core team
  • Have hiring limitations due to lack of budget to hire in-house tech teams across different expertise such as design, development, QA, project managers, et al
  • Need to focus on your core business competencies rather than worrying about software development
  • Need to scale up the product after doing a prototype to test the market. Scaling up requires skilled resources across multiple teams such as server, security, maintenance, etc along with the usual development teams
  • Need to modernize the existing tech infrastructure with latest technologies

When to outsource? 

Once you have identified the need to outsource, the key question that needs to be addressed is when to outsource software development. Outsourcing makes sense for your business if –
  • Your region does not have the required skills or are unavailable due to existing demand scenario of such talent
  • Your team does not have additional bandwidth and hiring new resources is not a near-term option due to limitations around onboarding, employment challenges, etc
  • You have budgetary constraints around adding new resources to handle constantly changing technology stack
  • You are not able to focus on your core business competencies as management and monitoring of any project in-house is time consuming and challenging
  • You want a quick turnaround time and do not worry about hiring, training and other issues associated with in-house hiring. Most outsourced companies can start working on your projects right away, build an efficient roadmap and stick to strict deadlines to deliver your projects on schedule
  • You want to focus on costs. Outsourcing software development is an effective way to reduce overall development costs. This is mainly due to the pricing differential across different regions – Asia/Eastern Europe ($15-30/hour), South America ($30-$45/hour), North America ($80+/hour).

Conclusion

Outsourcing your software development needs is a tough decision involving many variables. Many businesses have been successful in outpacing their growth objectives and scaling up with the help of outsourced partners. A right software development partner can be a game-changer for your business. If you’ve any doubts related to software development and if you need assistance developing one then feel free talk to us here.

Creating forms in React – The Right Way!

In the world of web development, there are several front-end frameworks. Angular, Vue, React and a few others have gained immense popularity over the last few years. However, React has surpassed other frameworks in terms of popularity and demand:

React is used to build single-page applications and allows the creation of reusable UI components. Forms are an important component of React applications. They facilitate users’ interaction with the application. Some of the common use cases of forms are:

  • Login and Registration Forms
  • Contact Form
  • Checkout Forms
  • Create/Edit Order Forms
  • Adding or updating data into the application

It is virtually impossible to develop a React-based app without forms. At the very least, you will need it for the login and sign up screen, in case the data is retrieved.

In this article, we will share some best practices for creating forms in React. Let’s get started.

Forms using Controlled Components

We know that HTML elements like input remember what we type. Similarly, we can use the React component state to store data of forms. When the input data of forms elements is handled by the React component, it’s called a Controlled Component. Here, the only source of truth is a component state, not a DOM element.

Handling Forms

This describes how the data is handled when the value is changed or submitted. In HTML, the form data is usually handled by the DOM whereas, in React, components are used. When the data is handled by the components, it is stored in the component state.

Here is the code –

This is how one can collect the data from the user and get it right there in the React.

In the same way, if one wants to update the state, one can use the event handler “onChange”.

Now, to execute it, one can use the following code.

Conditional Rendering

If you do not want to display the h1 element until the user has made any input, you can add an if statement. Look at the example below and note the following:

1. Create an empty variable, in this example call it a header.

2. Add an if statement to insert content to the header variable if the user has done any input.

3. Insert the header variable in the output, using curly brackets.

Multiple Input Fields

You can control the values of more than one input field by adding a name attribute to each element. Here is how you can achieve this

  • When you initialize the state in the constructor, use the field names.
  • To access the fields in the event handler use the event.target.name and event.target.value syntax.
  • To update the state in the this.setState method, use square brackets [bracket notation] around the property name.

Validating Form Input

You can validate form input when the user is typing or you can wait until the form gets submitted.

Adding Error Message

Error messages in alert boxes can be a tad bit annoying! We recommend displaying the error when the user input is invalid.

Using React Hooks – Alternate Method

We can also handle the form state using React hooks. To do that we have useState() hook for storing state in a functional component. Let me explain this by creating a simple form with one input element and handle its data using a hook.

import React, { useState } from ‘react’; export default function ControlledFormWithHook() { const [name, setName] = useState(”); return ( <div> <form> <label>Name:</label> <input type=”text” onChange={(e) => setName(e.target.value)} /> </form> <br /> Name is: {name} </div> ); }

Here we have used a useState() hook to handle state.

Why use React-hooks-form?

One of the primary goals of React Hook Form is to reduce the amount of code that you have to write. As you can see from our final result, the React hooks form is elementary to use, and it takes a small amount of code.

Making The Right Choice

Forms are a crucial part of most web applications. It is imperative to know how to handle them, and fortunately, React provides a lot of ways to do just that.

For simple forms that don’t require heavy validations (or that can rely on HTML5 form validation controls), you can use the built-in state handling of the DOM given to us by default. There are quite a few things you can’t do (like programmatically changing the input values or live validation), but for the most straightforward cases (like a search field or a login field like above), you’ll probably get away with an alternative approach.

When you’re doing custom validation or need to access some form data before you submit the form, handling the state explicitly with controlled components is what you want. You can use regular useStateHooks, or build a custom Hook solution to simplify your code a bit.

Whatever you decide to use, handling forms in React has never been more straightforward than it is today. You can let the browser handle the simple forms while handling the state explicitly when the situation requires it. Either way – you’ll get the job done in fewer lines of code.

Contact Us right away to discuss your website or app development according to your business requirement and complexities.

About Galaxy Weblinks

We specialize in delivering end-to-end software design & development services and have hands-on experience with large, medium, and startup business development requirements. Our engineers also help in improving security, reliability, and features to make sure your business application scale and remain secure.

Craft CMS: Building the frontend of a website using Twig and GraphQL

Craft is a mature and tested content management system. Airbnb, W3C, Netflix, PBS, Salesforce, Moz, and countless other brands switched to Craft CMS for redesigning their websites. That for sure proves its credibility against other popular CMSs.

You can use Craft to design and develop complex and intuitive sites that rely heavily on PHP, databases, and query optimizations. However, you can also use Craft to design and develop simple sites where you do none of those things.

Craft CMS has ditched the traditional CMS systems that come with ready-to-go page templates, CSS frameworks, and pre-built themes. As a result, developers have a bespoke solution to build tier solutions. Craft CMS neither offers posts or pages or any bootstrap features and themes to build the frontend.

Craft CMS supports two distinctly different ways of building a front end:

Monolithic: building Twig templates for server-generated pages.

Headless: using a GraphQL API in combination with a separate front end codebase.

But before diving into these two frontend approaches, let’s find out what web developers, designers, and stakeholders love about Craft CMS.

Why Craft is a choice of many front-enders and website projects?

Both web designers and developers find Craft CMS features incredibly useful. Before installing any plugins, the options and functions developers have to work with are impressive. Here is a partial list of features and the reasons why Craft is preferred more for which many other CMSs require plugins:

  • It allows content managers to custom page layout building and preview updates in real-time.
  • One can manage all of their brand sites under one roof, whether it’s a multi-site, multilingual, or both. This is a major problem area with the majority of other CMSs.
  • With virtually no learning curve, the UI of the Craft control panel is very intuitive.
  • Craft is fast for the front end as well as the Control Panel and tops the many reasons for choosing a modern CMS over an older one.
  • Robust sitewide content indexing and search capabilities.
  • Robust custom fields for full control over your design and content.
  • Nearly all content is in one place: Entries. Editors love this and can easily find what they’re looking for.
  • Fine-grained user permissions and group management allow publishing workflows across different departments and individuals. And no, you don’t need a plugin for this.

Building frontend with Craft CMS using Twig templates

Twig is a template engine for PHP so instead of writing PHP you write in this simple Twig syntax.

Some developers are not keen on this, but Craft uses Twig as its template engine. The word “use” should be highlighted as a requirement, as there is no option of writing raw PHP anywhere inside the template.

It is standardized in a way that, when you look at your team’s Pull Requests, you probably don’t expect to see 100 lines of custom PHP that make no sense. You only see the code related to templates.

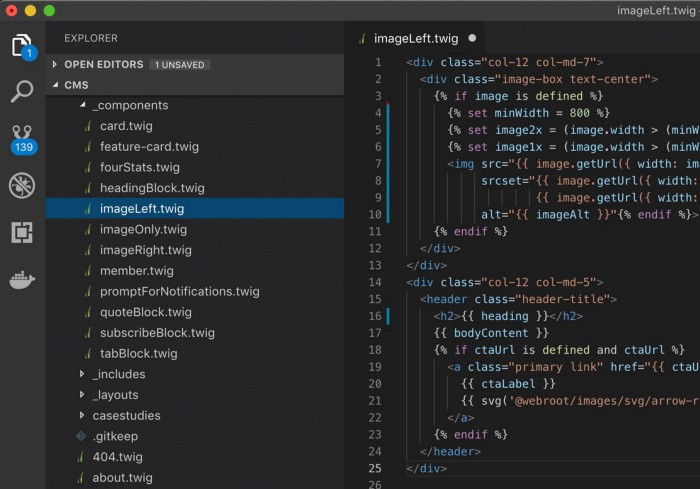
Apart from this, Twig makes it easy to “component-ize” your elements. This way you define the markup and layout for a component once, then reuse it throughout your site and pass variables.

You can define components for different content modules like image left, image right, headings, cards, etc. This ensures you’re consistent, reuse the same components throughout the site, and reduce duplicate code.

image code

Here’s how to use GraphQL + Craft CMS as a ​“head­less” CMS

Let’s say you’re not digging Twig or you would rather use one of the latest technologies (hello static site generators!). Craft’s templating system isn’t the only way to get content out of Craft. As of Craft 3.3, it provides a “headless” mode and GraphQL built-in with Craft’s Pro features.

That means you can use tools like Gatsby or Gridsome to build static sites with the comfort of Craft CMS. That brings Craft in line with the likes of WordPress that provides its REST API for fetching content to use somewhere else.

As a web devel­op­er, you’d use GraphQL if you were writ­ing a fron­tend that is sep­a­rate from the back­end. You’d be using Craft CMS as a ​“head­less” CMS for its excel­lent con­tent author­ing experience.

Per­haps you’re writ­ing the fron­tend in a frame­work like Svelte, Vue.js, React, or one of the frame­works that lay­ers on top of them like Grid­some, Gats­by, Nuxt.js, or Next.js. You could write a cus­tom API for Craft CMS using the Ele­ment API, but that can be a sig­nif­i­cant amount of work, and you’ll end up with some­thing bou­tique, rather than an indus­try standard.

This is where GraphQL for Craft CMS excels. By cre­at­ing your con­tent mod­els in Craft CMS, you auto­mat­i­cal­ly get a GraphQL API to access it, with no extra work on your part.

Conclusion

Craft abstracts all the field creation and setup to the admin panel. You only need to point it to the right Twig template and then use the fields you connected. Furthermore, it provides localization and multi-site management out of the box with no need for plugins.

The bottom line is Craft is an open-source, modern, affordable CMS with stellar security and first-party support. The features and flexibility it offers out of the box, along with its content-first approach, make it go-to for nearly every custom web project.

About Galaxy Weblinks:

We are your offshore CMS development partner! We offer expert capabilities in developing feature-rich solutions using the latest CMS technology trends. We have hands-on experience in CMS solutions like Craft, WordPress, Drupal for different business needs. We offer assistance from building custom CMS websites to website migration and maintenance processes.