Top 15 JavaScript Tips and Tricks to Increase your Speed and Efficiency

Most programming languages are flexible enough to allow programmers to achieve similar results in a variety of ways. JavaScript isn’t any different. JavaScript is without a doubt one of the coolest languages in the world, and it is growing in popularity by the day. With JavaScript, we frequently find multiple ways to achieve the same result, which can be perplexing at times.

Some of the applications are superior to the alternatives. With our profound expertise in JavaScript, we will happily share a few tips and tricks that would help you. Let’s get started.

1. Swap values with Array Destructuring

The destructuring assignment syntax is a JavaScript expression that allows you to extract values from arrays or properties from objects and store them in separate variables. We can also use it to quickly swap values, as shown below:

let a = 1, b = 2
[a, b] = [b, a]
console.log(a) // result -> 2
console.log(b) // result -> 1

2. Remove duplicates from an Array

This is a very simple trick. Assume we created an array with numbers, strings, and booleans, but the values are repeating themselves multiple times and we want to remove the duplicates. So here’s what we can do:

const array = [1, 3, 2, 3, 2, 1, true, false, true, ‘Kio’, 2, 3];
const filteredArray = […new Set(array)];
console.log(filteredArray) // [1, 3, 2, true, false, “Kio”]

3. Shuffle an Array

Making use of the inbuilt Math.random() method.

const list = [1, 2, 3, 4, 5, 6, 7, 8, 9];
list.sort(() => {
    return Math.random() – 0.5;
});
// Output
(9) [2, 5, 1, 6, 9, 8, 4, 3, 7]
// Call it again
(9) [4, 1, 7, 5, 3, 8, 2, 9, 6]

4. Nullish Coalescing Operator

The nullish coalescing operator (??) is a logical operator that returns its right-hand side operand when its left-hand side operand is null or undefined and otherwise returns its left-hand side operand.

const foo = null ?? ‘my school’;
// Output: “my school”

const baz = 0 ?? 42;
// Output: 0

5. Functional Inheritance

The process of receiving features by applying an augmenting function to an object instance is known as functional inheritance. The function provides a closure scope that can be used to keep some data private. The augmenting function uses dynamic object extension to add new properties and methods to the object instance.

They look like:

// Base function
function Drinks(data) {
  var that = {}; // Create an empty object
  that.name = data.name; // Add it a “name” property
  return that; // Return the object
};

// Function which inherits from the base function
function Coffee(data) {
  // Create the Drinks object
  var that = Drinks(data);
  // Extend base object
  that.giveName = function() {
    return ‘This is ‘ + that.name;
  };
  return that;
};

// Usage
var firstCoffee = Coffee({ name: ‘Cappuccino’ });
console.log(firstCoffee.giveName());
// Output: “This is Cappuccino”

6. Single-liner Palindrome check

Well, this is not a shorthand trick overall but it will give you a clear idea to play with strings.

function checkPalindrome(str) {
  return str == str.split(”).reverse().join(”);
}
checkPalindrome(‘naman’);
// Output: true

7. Simple Swap 2 values using Destructuring

let a = 5;
let b = 8;
[a,b] = [b,a]

[a,b]
// Output
(2) [8, 5]

8. Convert Decimal to Binary or Hexa

We can use some in-built methods like .toPrecision() or .toFixed() to achieve many functionalities while solving problems.

const num = 10;

num.toString(2);
// Output: “1010”
num.toString(16);
// Output: “a”
num.toString(8);
// Output: “12”

9. Short For Loop

You can write less code for a loop like this:

const names = [“Kio”, “Rio”, “Mac”];

// Long Version
for (let i = 0; i < names.length; i++) {
  const name = names[i];
  console.log(name);
}

// Short Version
for (let name of names) console.log(name);

10. Using length to resize and emptying an array

In javascript, we can override a built-in method called length and set its value to whatever we want.

Consider the following example:

let array_values = [1, 2, 3, 4, 5, 6, 7, 8]; 
console.log(array_values.length);
// 8 
array_values.length = 5; 
console.log(array_values.length);
// 5 
console.log(array_values);
// [1, 2, 3, 4, 5]

It can also be used in emptying an array, like this:

let array_values = [1, 2, 3, 4, 5, 6, 7,8];
console.log(array_values.length);
// 8 
array_values.length = 0;  
console.log(array_values.length);
// 0
console.log(array_values);
// []

11. Optional Chaining

The optional chaining ?. stops the evaluation if the value before ?. is undefined or null and returns undefined.

const user = {
  employee: {
    name: “Kapil”
  }
};
user.employee?.name;
// Output: “Kapil”
user.employ?.name;
// Output: undefined
user.employ.name
// Output: VM21616:1 Uncaught TypeError: Cannot read property ‘name’ of undefined

12. Arrow Functions

Although an arrow function expression is a more compact alternative to a traditional function expression, it has limitations and cannot be used in all situations. They refer to the environment in which they are defined because they have lexical scope (parental scope) and do not have their own this and arguments.

const person = {
name: ‘Kapil’,
sayName() {
    return this.name;
    }
}
person.sayName();
// Output
“Kapil”

However, 

const person = {
name: ‘Kapil’,
sayName : () => {
    return this.name;
    }
}
person.sayName();
// Output
“”

13. Rounding numbers

The toFixed() method converts a number rounding to a specified number of decimals.

var pi =3.1415;
pi = pi.toFixed(2);  // pi will be equal to 3.14

Note: toFixed() returns a string and not a number.

14. Quicker for loops compare to legacy onces

  • for and for..in gets you index by default, but you can use arr[index].
  • for..in accepts non numeric as well so avoid it.
  • forEach, for…of gets you an element directly.
  • forEach can get you an index also but for…of can’t.
  • for and for…of considers holes in array but other 2 do not.  

15. Ternary Operator is cool

You can avoid nested conditional if..elseif..elseif with ternary operators.

function Fever(temp) {
    return temp > 97 ? ‘Visit Doctor!’
      : temp < 97 ? ‘Go Out and Play!!’
      : temp === 97 ? ‘Take Some Rest!’;
}

// Output
Fever(97): “Take Some Rest!”
Fever(100): “Visit Doctor!”

Conclusion

In this article, we shared with you the top 15 tips for improving JavaScript performance. If you go ahead and implement all these changes, you will notice a significant improvement in the speed of your JavaScript web development and applications.

It may be difficult to remember all of these tips all at once, especially if you are working under a time constraint. If you require any additional assistance, please contact us. We hope you enjoyed this blog; please return to this space for more insightful content.

About Galaxy Weblinks

We specialize in delivering end-to-end software design & development services and have hands-on experience with popular front-end and back-end languages like JavaScript. Our back-end and front-end engineers also help in improving security, reliability, and features to make sure your business application scales and remain secure.

Impact of Design at Every Stage in Your Client Sales Funnel

Creating a website can be a difficult task. There are numerous design principles to consider, and you must find unique ways to capture and hold users’ attention.

The first impression of your content by a viewer does not have to result in a sale. It’s nice if it does, but your client and even you may be unaware of what your design is doing. Your main goal is to leave a lasting impression.

If done correctly, a website can act as a sort of sales funnel, attracting people to your product or service and convincing them to buy or call for more information. It is critical – and not easy – to create an effective funnel. One that assists you in identifying the right buyer early on and makes purchasing your product a pleasant experience.

This post will help you understand the various steps of building a sales funnel and the role of design in sales funnels.

Understanding sales funnel stages

Each stage of the sales funnel affects the users’ behavior. You must be intimately acquainted with them. Knowing each step allows you to employ tactics to increase the number of people who progress from one step to the next.

This has the potential to have a huge impact on your business.

Assume you double the number of people at two stages of your funnel. You double the number of leads and the percentage of closed customers. This means you’ll get four times as many new customers each month. And one of the most powerful concepts in business is defining and managing your sales funnel.

1. Awareness

This is the stage at which the prospect learns about your company and what it has to offer. This can happen through social media, word of mouth, Google searches, and so on.

The Role of Design:

Potential customers may become aware of a problem they are experiencing and possible solutions by discovering your product/service. This could become a right-place, right-time scenario in which customers buy what you’re selling right away.

  • Make Use of Strong Branding

Our first piece of advice for creating an effective website is to use consistent branding throughout. You should have a set of colors, fonts, and even shapes that you use regularly as a brand. When developing a website, make sure to keep these elements in mind. Take a look at the screenshots from BusySeed’s website below, for example. As you can see, the website development team has kept the structure, colors, font, and shapes consistent throughout the site. Using your brand’s elements liberally on all pages allows viewers to quickly grasp your brand’s tone and mood. It also makes you more distinguishable.

  • Create Eye-Catching Landing Pages

Landing pages are the pages of a website to which visitors are directed. The term “landing page” has recently evolved from a standalone page to any page that appears in an ad or a Google search. A website can now have multiple landing pages thanks to this new change. If you run an ad for Social Media Management, users will be directed to our social media page, which will serve as a landing page. You get the idea. As a result, any page on the site that will be used as a landing page requires special attention. The landing page should contain all of the information that a customer requires about a product or service.

This is the first step in developing a sales funnel and is critical for capturing and retaining attention. According to many studies, you only have about ten seconds to entice someone to visit your website before they click away to go somewhere else. Your landing pages should clearly state the service or product and include at least one call to action.

2. Interest

When customers reach the interest stage of the sales funnel, they are conducting research, comparing prices, and considering their options. This is the time to impress them with incredible content that benefits them but does not sell to them.

The Role of Design:

If you push your product or service from the start, you will turn off prospects and drive them away. The goal is to establish your expertise, assist the consumer in making an informed decision, and offer to assist them in any way you can.

  • Make Navigation Easier and More Convenient

Once you’ve gotten your potential customers into the sales funnel, it’s time to keep them there. How are you able to do this? This is a critical step in the website development process. It is up to you and your team to make the sales funnel a place where prospects want to go. One method is to provide easy-to-use navigation. Always include a header (or a menu on mobile) that links to your site’s other pages. Organize things into subpages to keep the header free of clutter. 

As an example, take a look at our screenshot. Subpages keep the header from being too busy, making it more user-friendly.

  • Visuals are a must

What is the best way to get people’s attention? Visuals! When creating a website, try to incorporate as many visuals as possible (without it being overwhelming). People are initially drawn in by the visuals and then stick around for the text. People enjoy watching videos. They always generate a lot of interest, whether on a website or as a social media post. 

Make use of videos whenever possible! Of course, we have photographs. Make certain that the images you use are consistent with your brand and that they demonstrate diversity. Remember that smiling faces make your brand more approachable! Icons, slideshow images, logos, and call-to-action buttons are also excellent visuals to use when designing a website.

All of these factors will assist you in attracting customers and keeping them on your site long enough for the sales funnel to begin working.

3. Decision

When a prospect reaches this stage of the sales funnel, he or she is ready to buy.

Because he or she may be considering two or three options — hopefully, including you — now is the time to make the most irresistible offer you can (packages, options, free shipping, discount) so that they do not hesitate any longer and purchase your product or service.

The Role of Design:

  • Remove all distractions.

Having too many distractions is one of the most common design flaws in sales funnels. Consider removing distracting features such as sidebars, excessive links, top navigation, or even too many images if your sales page or pages are on a larger website.

People make snap decisions. The quality of both the content and the design influences whether or not they stay on a website for more than a few seconds. Within this page or section of the funnel, there should be only one clear message.

Here’s a simple example from Wishpond, where they ask visitors for their contact information in exchange for a digital resource:

  • What action do you want your visitors to take next?
  • Are the next steps obvious?
  • Are there any extraneous elements that could confuse visitors or divert them from the next steps?

Getting rid of distractions is essential for effective funneling!

4. Action

That is the ultimate point in the sales funnel. By purchasing your product or service, the prospect becomes a customer of your company. It is critical to note that there may be additional stages to your sales funnel. Your interaction with the customer must extend beyond the purchase.

Now you must focus on customer retention by expressing gratitude for the purchase, inviting the customer to provide feedback, making your brand available for support, and so on.

The Role of Design:

  • Make it Easy For Consumers to Complete the Goal

The final stage of the sales funnel is to get the customer to complete a task. Filling out a lead form, contacting you directly, purchasing a product, or downloading an app/content are all examples of this. Whatever your goal is, it must be simple for customers to achieve. Make all your forms user-friendly and short. Have several points of contact. Make the checkout process as simple as possible. Make the app/content available for download directly from that page. 

Do everything in your power to keep things simple and inviting to achieve your desired result. The less time-consuming and complex a task is, the more likely it is that it will be completed. Make sure to use buttons to link to the goal pages so customers don’t have to search for them.

Netflix requests your payment method after the free trial period. You have several payment options, including gift code, credit card, and PayPal. There is a reminder on this page that you can cancel at any time.

Conclusion

Your viewers are eager to hear what story you can entice them to listen to, just as you would be less likely to go see a movie based on a text-only description rather than a full-color poster or trailer.

Many digital marketing strategies rely on sales funnels. When formatting and designing landing pages or websites in this day and age of internet buying and selling, there are numerous factors to consider.

To convert the most visitors, you must break down customer barriers while remaining true to your clear messaging. You only have a few seconds to make a big impression online, so use these funneling design tips to make the most of them!

Contact us if you are at the first step of creating an effective sales funnel by designing an attractive website or application. 

About Galaxy Weblinks

We specialize in delivering end-to-end software design & development services. Our UI/UX designers are creative problem-solvers with a decade of experience in all facets of digital and interactive design. We create compelling and human-focused experiences delivered through clean, and minimalist UI.

Animation and Motion Design: Top 5 Trends That Will Rule the Year 2024

As we step into 2024, the world of animation and motion design are redefining the ways in which stories are told, products are marketed, and information is conveyed. The profound impact of these mediums is evidenced by the recent success of Pixar’s “Soul,” which not only captivated audiences worldwide but also showcased the unparalleled ability of animation to explore complex themes with depth and sensitivity. This film, alongside others in the industry, showcases the significant role animation plays in today’s digital narrative.

1. Hyper-Realistic 3D Animation

Hyper-realistic 3D animation is setting new standards for visual storytelling, with movies like “Avatar: The Way of Water” pushing the boundaries of what’s possible. These films utilize cutting-edge technologies such as performance capture and advanced rendering to create immersive worlds that engage audiences in unprecedented ways. 

The trend towards hyper-realism is not confined to the big screen; it’s also prevalent in video games, virtual reality experiences, and simulations, offering a level of detail and realism that was once unimaginable.

2. AI-Driven Animation

The integration of AI in animation workflows has been a game-changer, automating time-consuming tasks and enabling more creative freedom. In 2023, Disney Research Studios unveiled an AI tool capable of automating the animation of complex facial expressions, reducing the animators’ workload and allowing for more nuanced character portrayals. This technological advancement represents a significant shift in how animations are produced, making the process faster and more cost-effective without compromising on quality.

3. Interactive Animation

Interactive animation is transforming viewers into active participants, offering personalized experiences across various platforms. An example of this trend can be seen in Netflix’s “Bandersnatch,” an interactive film that allows viewers to make choices that influence the story’s outcome. This innovation in storytelling demonstrates the potential of interactive animation to engage audiences in a deeply personal and immersive manner, a trend that is rapidly expanding into educational content, marketing, and web design.

4. Sustainability in Animation

The animation industry is increasingly embracing sustainable practices, with studios like Pixar and DreamWorks utilizing cloud computing and energy-efficient technologies to reduce their carbon footprint. These efforts are not only environmentally responsible but also resonate with the growing consumer demand for sustainable content. By prioritizing green technologies, the industry is setting a precedent for environmentally friendly production processes that are likely to become the standard in the years to come.

5. Motion Graphics as a Strategic Storytelling Tool

Motion graphics are becoming an indispensable tool for conveying complex ideas in a clear and engaging way. The use of motion graphics by organizations like the World Health Organization (WHO) to communicate important health guidelines during the COVID-19 pandemic highlights their effectiveness in reaching a broad audience with critical information. This trend underscores the versatility of motion graphics as a medium for educational content, corporate communications, and social media marketing.

Animating the Future: Lead the 2024 Trends with Galaxy Weblinks

The big moves in animation and motion design we’re seeing for 2024 are representing a whole new way of thinking about storytelling. It’s all about making stories more real, more interactive, and doing it in a way that’s better for our planet. For those of us in the biz, it’s not just about keeping up; it’s about leading the charge into what’s next.

At Galaxy Weblinks, we’re right there on the front lines with you. We’ve got the know-how and the tech to help you make the most of these trends. Want to bring ultra-realistic 3D animations to life, use AI to streamline your projects, or create interactive experiences that really pull your audience in? We’re here to help make that happen.

Let’s explore the endless possibilities of animation and motion design together. With Galaxy Weblinks, you’re not just making content; you’re making the future of storytelling. Let’s create something that not only stands out but also stands for something.

Hidden Cost of Building a Mobile App: The App Development Iceberg

What is the cost of developing a custom mobile application? Clutch took a survey of some of the world’s leading mobile app development companies to determine the average cost of mobile app development. And it yields startling results:

“The average cost of app development ranges between $25,275 and $171,450.”

In reality, determining the cost of custom mobile app development globally is one of the most difficult tasks. Even expert survey reports do not have the same answers for you.

Let us take a look.

  • According to a VDC survey of enterprise app developers, mobile apps cost an average of $140,000 per app.
  • According to a Kinvey survey of CIOs, the average cost of app development is $270,000 per app.
  • According to an EMM survey, more than 75% of enterprises budgeted more than $250,000 for mobility solutions.

However, when it comes to actual app development, these figures are far from accurate.

The Digital Product Iceberg

The unseen 90 percent of an iceberg’s underwater mass helps with flotation, provides structure, and determines whether ships pass by easily or are surprised by a submerged underwater ice formation they thought they had cleared.

Much of the important work that goes into creating a digital product happens beneath the surface. The great unseen chunk that gives your product structure and ‘makes it do what it needs to do’ includes the user research, planning, interactions, objectives, functional requirements, and user experience strategy.

In other words, the work beneath the surface is what determines whether your digital product succeeds or fails. Failure to complete any part of that critical work will hurt your structure.

The Tip of The Iceberg

What is the cost of building a mobile application? This question remains common irrespective of the size of your company or your requirements. 

Several online calculators can be used to get an approximate idea, but they will give you an estimate with a price tag of $20,000 to $35,000 for an app built with a variety of features. Smaller apps with basic features will cost anywhere from $10,000 to $50,000, depending on the complexity.

We believe that the online calculators are unable to provide you with a breakdown of the development costs, only an estimate. If the estimate comes to $20,000 and $35,000, we must ask why the range is so vast. Costs of app development are affected by many factors and parameters. So, to get an accurate estimate of the app development cost, you’ll need to understand how each factor affects the cost.

The estimated amount for support and maintenance cost, as well as the app’s complexity, play a large role in determining the cost of app development. This is difficult to estimate. It has been our experience that in 2021, the average cost of developing an app runs from $40,000 on the low end for a simple app to over $200,000 for a complex enterprise app. This cost can go down by around 30% if you opt for outsourcing the mobile application development.

Most likely, you’re looking at the higher end of this range if you need a highly functional digital product that works on multiple platforms and devices and can integrate with an overwhelming number of third-party apps, is visually appealing, is hosted in the cloud, and uses smartphone hardware features (like GPS, motion coprocessor, NFC technology, etc.).

What’s Beneath the Surface

In addition, you’ll have to think about ongoing maintenance costs. If the technology changes, something breaks, or you want new features, who will keep your app up to date? Other one-off solutions may require you to contact a Dev shop years later in hopes of getting a response. Most likely, it will be given to someone who has never seen your app before. Your full-time developer can cost you upwards of $90,000 per year in salary.

Maintenance is made easier for you by having a relationship with the company that built your app, but there are still costs associated with that. Apps, like websites, require a monthly hosting fee. The cost of continuously monitoring the performance of your app to ensure that your audience isn’t having problems will also be incurred. Unfortunately, people rarely report bugs, preferring instead to delete the app. In addition, you’ll need to budget for updates as iOS and Android evolve, plus licensing fees.

Avoiding the Product Shipwreck

Your digital product is doomed if your users are unhappy. Too many companies are doing things backward, and that is creating massive problems. It is estimated that they spend 90% of their time thinking about the surface-level app development, and only 10% of their time (we’re being generous) on the app development planning that needs to support the entire product. These companies have omitted crucial steps that are necessary for users to be guided properly. Instead of starting from scratch, they’re tempted to make assumptions. It’s a project shipwreck for you. 

Considering all of these factors, you may be wondering how anyone manages to create an app they’re proud of in the first place. It’s a lot to keep track of, from conception to creation and maintenance. App development can be done in a variety of ways: using a no-code platform, hiring a creative agency or dev shop, or working with a digital product design agency. Everything comes down to choosing the right approach for you in the long run.

To avoid shipwrecking your users, plan your app development approach before even thinking about the cost.

There is a lot of infrastructure behind every application. Think beyond the action you want users to take when building an app. This usually necessitates partnering with a digital agency that can help dig into the research, strategize, create a delightful user experience, and course correct any issues that arise.

Where To Start

Working with a creative agency or a dev shop is likely to be easier, but neither can provide a comprehensive approach to the problem at hand. They can help you create an app that works properly and help you fix any problems you run into along the way. As a result of their technical expertise, they may not anticipate every user’s need or provide an aesthetically pleasing final product. However, a creative agency may not have the technical expertise you require.

Sometimes the best solution is to hire an agency that specializes in digital product design and development. Help with brainstorming, user experience, design, and execution is available from a digital agency. With a long-term partner for your app’s development, you can scale and grow.

React Native vs Flutter: Choosing the Best Hybrid Framework for Mobile App Development

Developing apps for iOS and Android using one code base is a tempting proposition. With the introduction of React Native in 2015, the already disruptive hybrid app development framework gained momentum. Prominent organizations like UberEats, Discord, and Facebook are moving their apps to React Native.

Fast-Forward to 2017, Google introduces the alpha version of their own hybrid framework called Flutter. Since then, both of the frameworks have been proving to be a dilemma for product owners and consumers looking to build hybrid applications. Which one should you choose? React Native or Flutter? Let’s break it down and figure out what is the most suitable option for you.

React-Nativ
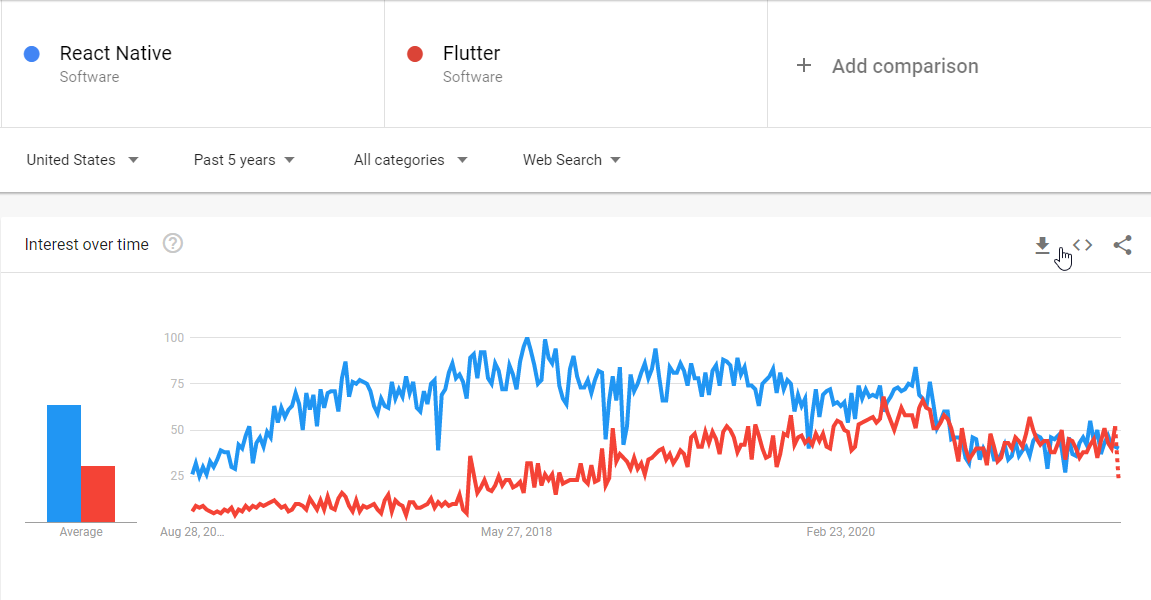
React Native and Flutter trends comparison on Google Trends

React Native vs Flutter | Productivity

One of the first things you must think about when deciding on a framework is productivity. How would it improve your efficiency? Whether the framework in question automates work functions or gets the work done in fewer lines of code.

1. Hot Reload 

This is a feature that developers love! There is nothing better than a smoothly running Hot Reload environment. React Native and Flutter both come equipped with Hot Reload. Hot Reload eliminates the need to manually recompile the application by selecting relevant commands repeatedly. This happens automatically with the help of Hot Reload whenever changes are made or new gadgets are connected. It also preserves the last state of the app. 

2. Code Structure

Unlike the previous feature, React Native and Flutter are pretty distinguishable in terms of code structure. 

  • Unlike React Native, Flutter doesn’t separate data, style, and templates.
  • You don’t need additional templating languages like JSX or XML or any special visual tools to build a layout in Flutter. 
  • Flutter lets you switch to different modes like design or code for different needs and better efficiency. 
  • Flutter has even introduced a new feature “Outline View and Flutter Inspector” to make layout building even easier. 

3. Installation and Setup

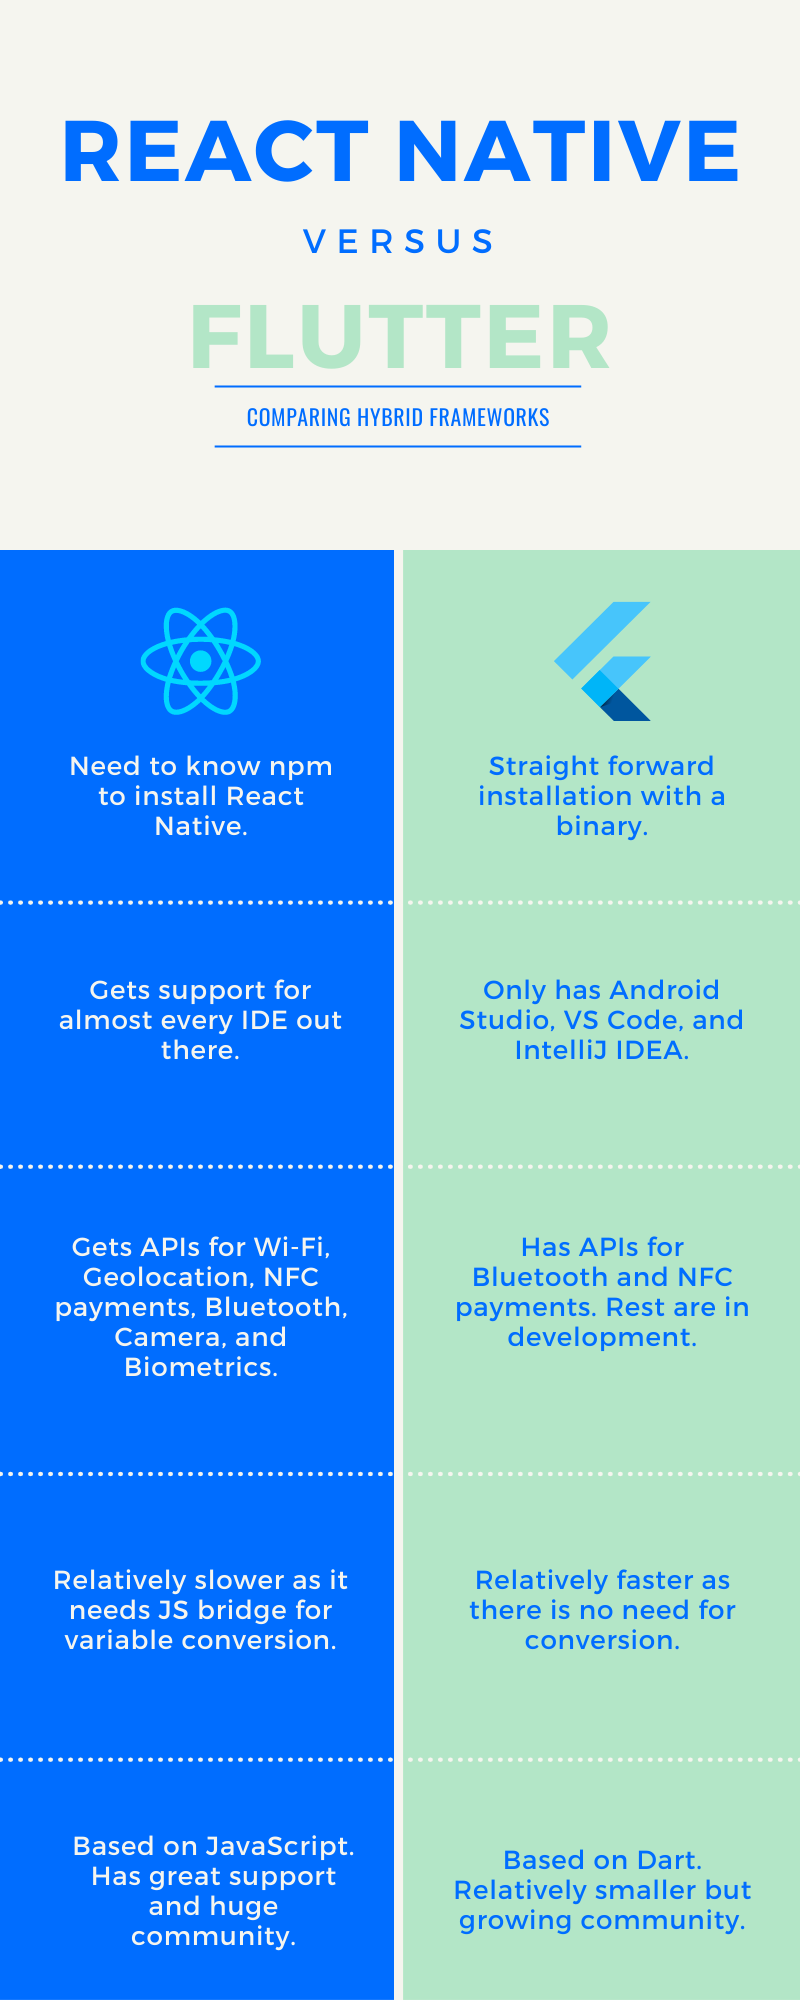
When it comes to installation, the process seems more convenient in Flutter for which you just have to download a binary corresponding to your system. Whereas in React Native’s case, the ease of installation depends on your familiarity with JavaScript. If you know your way around JavaScript then React Native installation would not be a problem. If you don’t, then you will need to learn npm for installations. 

4. IDE Support

React Native has an edge over Flutter over the IDE support department where it comes with support for almost every IDE out there. Whereas Flutter only gets Android Studio, VS Code, and IntelliJ IDEA. 

5. API

While RN lacks tools for drawing custom graphics, it makes it up in native interfaces, where it provides APIs for Wi-Fi, Geolocation, NFC payments, Bluetooth, Camera, and Biometrics. 

The APIs case for Flutter is pretty hard to make as a lot of the interfaces are still in development except for Bluetooth and NFC payments.

Programming Languages

React Native is based on JavaScript, which is quite popular in the development community. JS is the default scripting language for web development. While most of the popular JavaScript frameworks are for frontend development, Node.JS is making its mark in the backend. 

Flutter uses Dart, which is created by Google. Although it is among the lesser-known, Dart developers are quite fond of the black sheep. 

Performance

From the performance front, React Native lags behind Flutter as it requires a bridge to convert JS variables into native ones to interact with the native components. RN uses JS to build apps, and in order to interact with native components like OEM widgets, audio, and GPS, a JS bridge is required that converts these JS variables into native ones. However, RN utilizes libraries like react-native-swipe-view to make things faster.

In comparison, Flutter’s architecture lets you build fast native-looking apps without the need for a bridge for variable conversion. For this reason, Flutter is able to run animations at 60 FPS. 

Documentation

As Flutter is maintained by Google, the documentation is detailed and easy to explore and understand. React Native relies on external dev kits, and therefore, you will have to dig for documentation. However, the general RN documentation is easily available, and it happens to be quite detailed and helpful. 

UI Components

In Flutter you will find in-built UI elements named widgets in place of the native ones. These widgets are easily customizable and available for every popular mobile platform along with one that is platform-independent. 

And if you look at the external UI kits available for React Native. React Native wins by a huge margin as the number of React Native external UI kits is far greater than that of Flutter widgets. 

Community

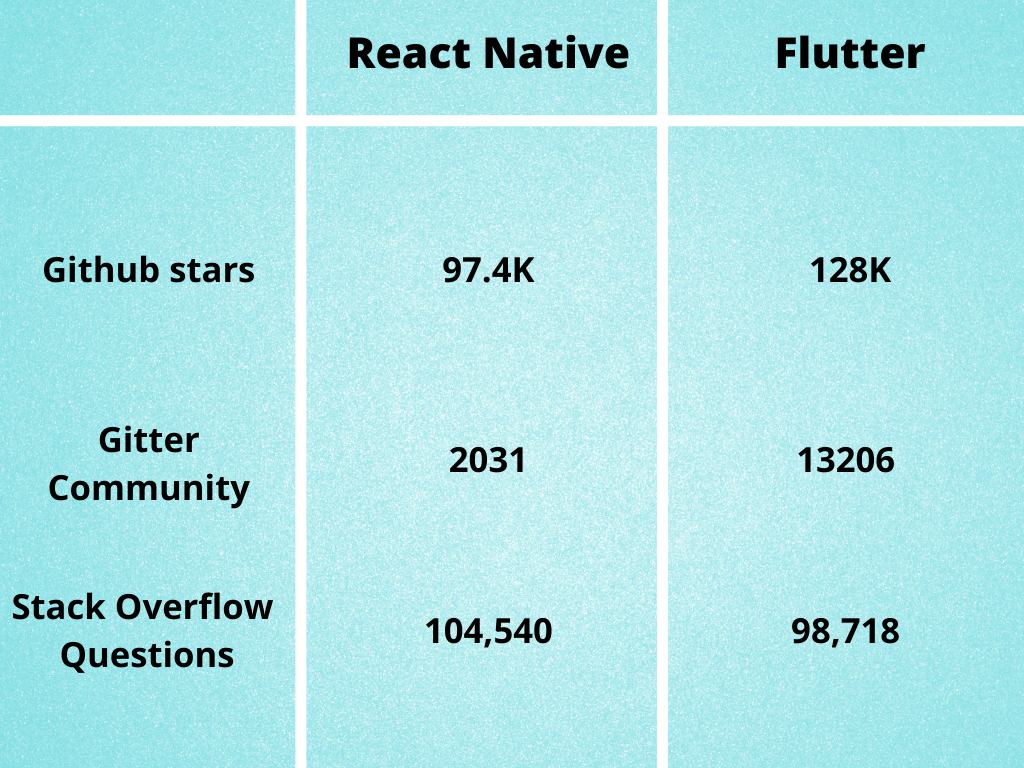
Considering the age of the frameworks, React Native is older and has a very rich and supportive community. Whereas Flutter’s community is constantly growing to become one of the most active ones. 

React-Flutter

Popular Apps made with React Native-

  • Discovery VR
  • Adidas Glitch
  • Wix
  • Walmart

Popular Apps made with Flutter

  • BMW App
  • NU Bank
  • Tencent
  • Square 
rnflutter-1

Wrap Up

Flutter is a comprehensive package that manages to provide fast and performant apps, but it comes with a caveat that it is based on Dart. Whereas more people will be inclined towards React Native as it is based on JavaScript, but it lags in speed. 

If performance and native-like experience are on top priority on your list, the Flutter will provide you that out of the box. And if you want to stick to JavaScript, and you are willing to do additional tweaks in order to extract faster performance out of your apps, React Native is your choice.

About Galaxy Weblinks
We specialize in delivering end-to-end software design & development services. Our UI/UX designers are creative problem-solvers with a decade of experience in all facets of digital and interactive design. We create compelling and human-focused experiences delivered through clean, and minimalist UI. Get in touch with us here.

8 Reasons Why Node.js is the Best Choice to Develop Ecommerce Web Apps

From a technical standpoint, an Ecommerce platform is a complex system. It needs to be user-friendly and easy-to-navigate at the frontend, and robust yet responsive at the backend. To make all the pieces work together, you’ll need dependable technology to back it up.

The Node.js framework is fast and scalable, but is it a good fit for your platform? Let’s find out.

It is a wise decision to create an Ecommerce app or website. While the store needs to look good and have a great user experience that can lead to more conversions, we also believe that the backend must be robust. Node.js is among our favorites in building Ecommerce websites.

Why do we recommend Node.js to create Ecommerce applications

Node.js is a JavaScript environment that allows you to create high-performance, scalable apps. It’s ideal for real-time collaboration tools, chats, streaming mobile apps, and other applications that require multiple I/O operations. If you want to read more about the technology, here’s a primer to Node.JS. It is essentially a server-side platform built on Google Chrome’s V8 engine. Node.js is well-known for its fast and scalable applications, as well as its extensive library of JavaScript library modules.

One of the most likely reasons Node.js is the best choice for Ecommerce web applications development is that it provides stability and aids in the incorporation of critical features such as a cart, payment gateways, and shopping options.

Furthermore, Node.js provides the benefit of rapid prototyping. You should be aware that top brands such as eBay, Uber, PayPal, LinkedIn, Netflix, Walmart, and the American Space Agency NASA use Node.js to build their primary applications. It could then be your turn to shine brightly among the stars.

Read more: Node.js vs Python | Which Backend Framework to Choose?

Let us look at the main reasons why Node.js is the best choice for developing Ecommerce web apps:

#1 Performance

  • Node.js facilitates multitasking by producing better results at a lower cost. It is much more convenient vis-a-vis other backend options. 
  • The buyer’s journey at an Ecommerce store involves numerous operations. The list includes adding items to the basket, changing product features, selecting payment methods, and so on. It is critical from the standpoint of performance that the technology serves such tasks efficiently. 
  • Node.js is also capable of handling multiple operations at the same time, making it an excellent choice for Ecommerce development.

#2 Scalability

Node.js allows for rapid scalability. Your Ecommerce store can grow significantly in a short period. It is an important consideration when selecting a technology. Node.js includes a mechanism for managing scalability and tailoring it to your specific requirements.

#3 Cross-Platform JavaScript Platform

One of the most significant advantages of Node.js is that it functions as a cross-platform development platform. In most cases, developers must be familiar with at least two programming languages to code, but Node.js is said to be an exception.

It can be implemented appropriately for both client-side and server-side applications. It also allows developers to choose code reusability if there is any modification. Isn’t it clear why Node.js is ruling the world of web applications today?

#4 Many Plugins and Packages in npm

Node.js includes a plethora of packages that can be easily integrated into your mobile or web app. As a result, instead of having to write everything from scratch, developers can rely on dependable open-source solutions. It significantly accelerates the development of Ecommerce. There are also excellent Ecommerce packages available.

#5 Budget-Friendly

Despite working in real-time, the Node.js I/O model is very effective and does not obstruct I/O operations. The website application can be updated more quickly.

It lowers development costs because you don’t need to hire two separate teams for front-end and back-end development. Only experienced Node.js resources will do justice to your project.

#6 One Language on Back-end and Front-end

Node.js is a JavaScript-based development environment, and it is used by many popular front-end frameworks (such as React, Ember, and Angular). As a result, you can create isomorphic applications written in a single language. It simplifies the development process, makes communication between front- and back-end teams much easier, and allows them to better understand both sides of the codebase. You could have a smaller and more efficient team that is easier to manage. Finally, because there is no technological diversity, recruiting new employees in the event of growth will not be a problem.

#7 Big and Active Community

A very active and vibrant community of Node.js developers contributes to Node.js’ continuous improvement. Due to this collaboration, the framework is well documented, and is being continuously supported, which makes the development process much easier and faster for everyone involved! Plugins, modules, plugins, and many other possibilities are available. In addition, if a problem arises, you’re likely to find the solution on StackOverflow.com.

Whereas, open-source JavaScript platforms such as Node.js have the advantage of having access to professional and well-experienced developers who can assist you in code correction and adding more functionality or features to your Ecommerce website.

#8 Uniformity in Data Streaming

Using Node.js, any HTTP request and its corresponding response travel through one data stream. Consequently, the files are much easier to process, which is great for Ecommerce sites that load N items at a time. As a result of the speedy uploading of the videos, customers can make quick purchase decisions.

Final Thoughts

In addition to Node.js, you’ll also need to consider what technologies you’ll be using for building your Ecommerce store. Everything must be consistent, including the frameworks and solutions. To avoid this, it’s best to use one of the Ecommerce platforms mentioned in the previous section. As a result, you’ll be able to avoid a lot of issues that could arise during the development of the app.

Node.js can be faster than other technologies in many cases. For building Ecommerce stores, it has proven to be a stable and fast solution. Software development is made easier and faster with the help of several ready-made frameworks. 

It’s important to note that the selection of a technology stack is based on many factors. Write to us, and we’ll help you make the right decision.

About Galaxy Weblinks

We specialize in delivering end-to-end web application design & development services and have hands-on experience with popular back-end frameworks like Node.js, Python, etc. We have expertise in customizing websites using multiple platforms, be it Shopify, Woocommerce, Magento. Contact us for your Ecommerce project today.

Partnering With a UI/UX Agency | Why You Should Outsource

Developers spend 50% of their time fixing issues that could have been avoided if user research had been conducted before code development began. (MeasuringU)

Thinking about outsourcing in terms of UI/UX can be a little jarring at first but Galaxy Weblinks is here to change that for you. UI/UX is the foundation of your product, be it for customers or employees, and nobody wants a shaky foundation. Before writing the code and starting the build of your application, laying out a detailed UI/UX strategy is a must. According to Forbes research, Intentional and strategic user experience has the potential to raise conversion rates by as much as 400%.

Galaxy’s approach to UI/UX outsourcing, strategy, research, and design is a homogenized effort that focuses on merging the desired outcomes for end-users and your company. There is no universal solution that fits all, and we understand that every project is different, that’s why we match your needs with the right team of performant designers and engineers. Our team of critical thinkers works with you towards a common goal of deploying robust and scalable UI/UX solutions that yield great business results. 

Our Process is Agile and Dependable

We know that constant communication and collaboration are key in an Agile development environment. Hence, our process adapts to your needs to provide optimum results. With development shops in the US, Australia, and India we ensure that all the important strategic interactions and work happens during your typical workday. 

We are also equipped to scale our services to handle the intense workload on short notice so that you can meet your deadlines. Timezone troubles are a thing of the past with us, we’ve made our schedules flexible, just give us a call, and we’re instantly available to talk status updates and plans, just like your internal teammate. 

Research is Crucial for our UI/UX Process

We try to understand the users, their pain points, and the functionality they require through our research. The answers to these questions are critical whether you’re designing a new application, revamping an existing one, or optimizing for different screen sizes. 

Apart from user interviews, our typical UI/UX research offering includes:

  • Heuristic Evaluation
  • Competitor Analysis
  • Survey Creation and Distribution
  • Interview Recording Transcripts
  • Analytics Data Report Summaries

We have paired these services with techniques that help in our Design Thinking methodology and aids our decision-making:

  • Empathy: Conduct stakeholder interviews and user research. 
  • Define: Develop affinity diagrams, MVP definitions, user personas, and user journey.
  • Ideation: Use UI sketches and Wireframes to brainstorm.
  • Prototype: Create hi-fi wireframes with design styles and final screens for testing and developer hand-off.
  • Testing: Test and collect user feedback at every stage to eliminate problems at the onset.

UI/UX Outsourcing Benefits

Our teams are proactive and highly skilled. So it doesn’t matter if you’re looking to disrupt the industry with a revolutionary solution, or building upon an existing solution, we’re here as your dependable offshore partners to see it through equipped with the right set of technologies and skill set. 

Here are some benefits of outsourcing UX development that will put things in perspective for you: 

  • Reduced development costs: Building what your users desire in the first place eliminates the need for code rework, ultimately saving costs.
  • Competitive advantages: Better UX leads to better business.
  • End-user loyalty: Fast, efficient, and transparent experiences result in better user loyalty.
  • New opportunities: Researching and presenting a user with what they might need will result in new business opportunities.

Why choose us as your UI/UX Design Outsourcing partner?

Based in Boston(MA), Galaxy is recognized as one of the fastest-growing private companies in the USA in 2021 by INC 5000

Our other recent accolades include: 

Our clients love our work and laud us for our commendable outcomes. Whether you need software to create your business foundation, new product offering for your customers, or something disruptive, our team can help you work towards your goals.

Our recipe for success 

With our proven methodologies we ensure that your solutions are the right kind of disruptive and your legacy solutions are modernized and made future-proof. We employ:

  • 6D
  • Lean UX
  • Double Diamond
  • User-Centered Design

With outsourcing, you get access to a top software company with the right talent and tools to help you realize your business goals and that too without the hassles of talent hunt, hiring, and management.

Galaxy as an outsourcing partner works alongside you through every stage of the development journey to deliver the best outcomes your business deserves. 

About Galaxy Weblinks
We specialize in delivering end-to-end software design & development services. Our UI/UX designers are creative problem-solvers with a decade of experience in all facets of digital and interactive design. We create compelling and human-focused experiences delivered through clean, and minimalist UI. Get in touch with us here.

Enhance Your User Interface With These 5 Tips

When it comes to design, even the trivial seeming things can have a huge impact in creating efficient, accessible, and beautiful UIs. This blog will address those tiny changes that yield big results in terms of your design and user experience. 

As the nursery rhyme goes “Little drops of water, little grains of sand, Make the mighty ocean, and the pleasant land”

1. Be Succinct. Cut the fluff

Work with your UX resources to keep the messages concise. Speak to your user in the language they understand. The general rule of thumb is to keep it simple. Avoid jargon and speak to them in a voice they understand, assisting them in achieving their goals more easily.

copy-trip

2. Increase the body font if your typeface allows

Articles, project descriptions, and other long-form content read better if the body copy is 20pt or more. It would also depend on the typeface that you’re using, but the more common ones look great at 20pt and provide for a better reading experience when going through exhaustively long texts. 

body-text

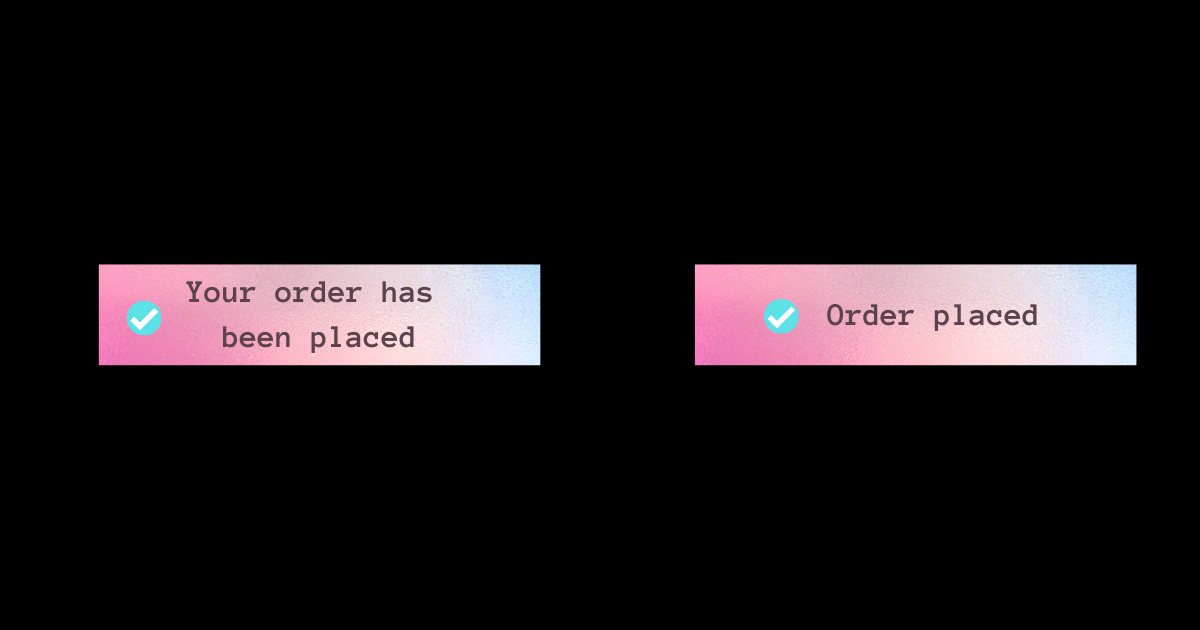
3. Use Icons and descriptions in error states

Colors can help convey messages but don’t rely on colors completely to convey crucial information. Using only colors in your design for important information like error states is like leaving out a large chunk of the audience at the mercy of guesswork. Introduce icons and descriptive texts along with the color to make it more inclusive and accessible. 

error-states-tips

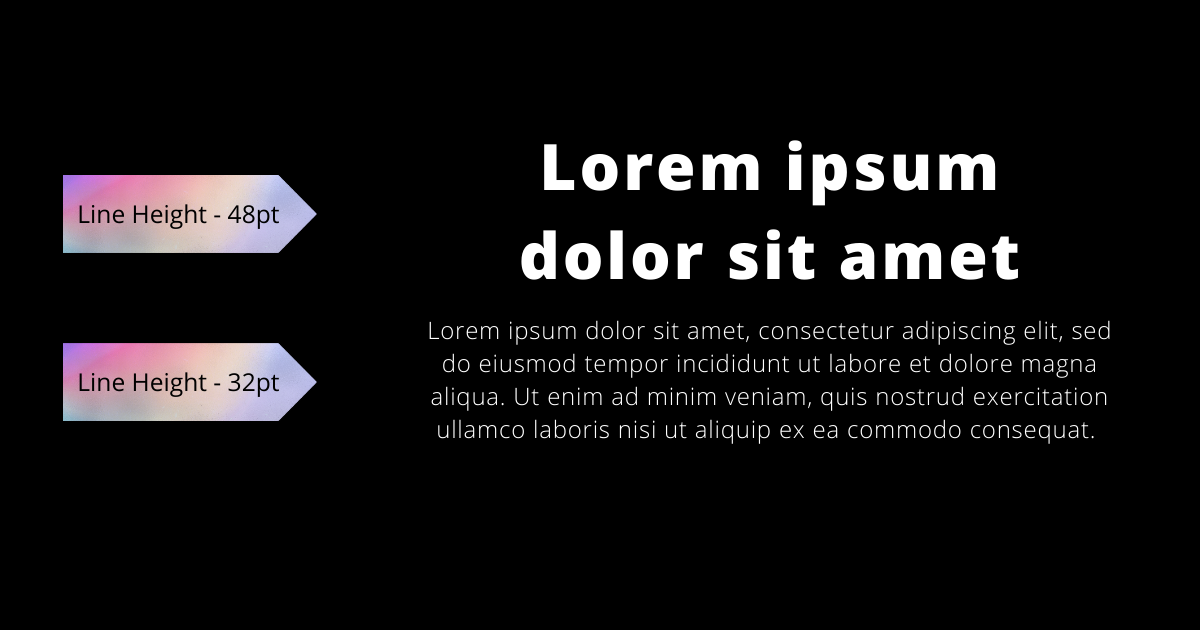
4. Decrease spacing and height in headings

Headings are shorter allowing you to play with letter space and line-height. But they are also bigger in font size than the body text, so the spacing between the letters appears optically larger. Reducing the letter-spacing will make headings look more balanced and provide a more optimal reading experience. 

line-height-tip

5. Utilize shadows and borders to highlight important stuff

Shadows and borders can help make the on-page elements appear sharper and more defined.  

With this nifty little tip, you can easily highlight on-page elements. Just don’t go overboard with the shadows, there’s a thin line between neat and tacky.  

Source: Smart_boy Dribbble

Wrap up

Us humans, we often complicate things that are fairly simple. Good UX can be as easy as going against your experimental instincts and sticking to the basics. These tips will help you in that basic pursuit. Use these tips as a guide for your next project, and you’ll be sure to deliver not only a functional product with great UX, but one that users will want to return to. 

About Galaxy Weblinks

We specialize in delivering end-to-end software design & development services. Our UI/UX designers are creative problem-solvers with a decade of experience in all facets of digital and interactive design. We create compelling and human-focused experiences delivered through clean, and minimalist UI. Get in touch with us here.

User Onboarding – Principles and Best Practices

A good user onboarding flow is much more than a simple tour of the product. Designing a good user onboarding process is essential for product growth and user retention. Without it, you may risk the retention levels plummeting. A product that does not assist the user in understanding its utility has a very low level of engagement.

That is true for any product, physical or digital. Try something that isn’t intended to be simple and self-explanatory. Remember the last time you bought something new and read the instruction manual before using it?

Continue reading for some core principles and best practices with fantastic examples!

Why User Onboarding?

According to a Profitwell user onboarding study, customers who said they received good onboarding on a new product were between 12% and 21% more willing to pay than the median. Users who responded negatively had a willingness to pay from 3% to 9%, indicating that poor onboarding does not necessarily detract much, but your product may lose a good willingness to pay.

However, retention is where things get interesting. When comparing the first 60 days of customers with poor integration perceptions to those with positive perceptions, customers with positive perceptions fall much lower in the first 21 days.

And they conclude that good onboarding is critical to encompass the value of a product with a customer or, at the very least, mitigating the slippage your customer will experience when you begin using the product. Especially for him or her to begin to see the value, significantly speeding up their journey.

However, this isn’t the case most of the time. Every step of the way, there’s a hidden risk of that user clicking the little red ‘X’ and never returning.

It occurs between 40% and 60% of the time.

It is rightfully referred to as the SaaS killer! Fortunately, that’s what we’re here for. We will share with you the 3 Principles of User Onboarding that will help you immensely. 

#1 For a business to succeed, onboarding must be a continuous process.

It all starts and ends with the idea that onboarding is a continuous process. Anything you look at can be viewed through the lens of Onboarding. Is this beneficial to the user? Is this moment clear to him as he navigates through your product offering? If we stop looking at the user’s journey at some point, what was once simple becomes a supplement that will require human assistance to solve. This is closely related to the day one mentality, in which every day is like your first day of attempting to assist the user.

#2 Onboarding is not a metric; it is a result.

That means we shouldn’t measure onboarding. We need to know how many users are registering, what the dropout rate is, and where, if any, our product’s “bottleneck” is. All of this is critical. The issue here is that the metric is the result of a job. If you follow the first principle (user obsession), this will almost certainly have a direct impact on the outcome. And how can the results be improved? Talk to your user all the time; don’t let this opportunity pass you by. Assist your user, and the results will follow.

#3 Obsession with Onboarding

Obsession with making your life easier and assisting you in getting started with your product. Obsessed with assisting the user in getting started autonomously without the assistance of others. It is unlikely that the user will engage if he or she is unable to enter your software or get started with your product. Understand your users’ realities. You don’t want to design for a market you’re unfamiliar with.

We’ve compiled six best practices for user onboarding to help you achieve your goal of converting new users into fully engaged customers who have integrated your product into their lives.

#1 Reduce Friction

Make experiences simple and practical! Determine what is not required to perform the key action on your product. Initial barriers are responsible if the user is abandoning just after the first few steps. Consider whether the content being inserted assists the user in achieving their goal or if it serves to solve a product problem. Even if the implementation is complex, the paradigm shift here is to guide decisions to solve problems for users.

Notion determines the type of account and requests authorization (if it is a Gmail, Hotmail, or similar account).

Source: Fullstory

#2 Know your customer and their needs

Sift Science has identified the two most important motivations of their ideal user: fighting fraud and preventing bad users. This onboarding model reassures the user that they are in the right place and reminds them of the value of the product.

Source: Sift Science

What is the reason your customers require your product?

If you don’t understand the big “why” for existing users, you won’t be able to master new user onboarding. Conduct customer surveys to learn what customers truly get out of the product, and then design your user onboarding experience around that value.

To properly serve your customers, you must be aware of the following:

  • Who are they? (e.g. their role)
  • What they desire (e.g. the metrics they care about)
  • What is the pain that your product alleviates?
  • What tasks must they complete? (e.g. what they report in their standup)
  • What is it that would prevent them from using your product? (e.g. what they consider risks)
  • The reason why any churning users end up churning (e.g. where they got stuck)

Once you’ve mastered these crucial (but easily overlooked) details, you can start treating user onboarding like a jigsaw puzzle rather than a guessing game.

#3 Use an onboarding checklist

A great way to organize your user onboarding is to create a checklist with a progress bar that includes all of the steps your new users must take. Checklists naturally elicit our desire to “close the loop” and encourage users to implement the key activation points. Add an incentive at the end, and you’re set.

Source: Postfity

Make it clear what skill level is displayed, what should be done, and, most importantly, why it is necessary. People like to have a reason for doing something. The combination of these factors aids in the development of simple and objective steps. Display a few steps at a time, and if possible, divide the task into smaller tasks. A 10-step onboarding process is a lot of work for the user and a waste of their time.

#4 Remove barriers to the Aha moment

An empty account equals an unsuccessful user on a platform that thrives on user content. Wistia lowers the barrier to entry by providing users with three simple options for getting started.

“Aha! I completely understand. I need this.”

That is what you want your users to experience as soon as possible. The Aha moment occurs when users recognize the value of your product and are willing to pay for it.

Source: Wistia

Tips for removing hurdles: 

  • Do not require account creation before attempting to use the product.
  • Request the user information in the later stages of onboarding
  • If you don’t have a free trial, share the Aha moment on your marketing site (include testimonials or highly relevant screenshot gifs).

#5 Videos for quick introductions

Videos are excellent tools for user onboarding. They can be used as a 1-2 minute introduction instead of a walkthrough or in a resource list. The more videos there are for highly visual products, the better. Why? Even if your user does not have time to use the product right away, they will remember it if they see someone else quickly reach the Aha moment. Snappa provides a one-minute blog header image tutorial so that users can see how useful the tool is right away.

Source: Airtable

#6 Webinars to help users master the tool

SEMrush has mastered the art of user onboarding webinars. Their “101” webinars teach new users how to use the platform, whereas their high-level SEO webinars increase user engagement over time, reinforce brand authority, and help push out content that attracts new users looking for professional development content.

There are few companies that do this well, but every SaaS platform has the opportunity to create introductory tutorials and professional development content tailored to their specific users.

Tailoring the onboarding journey does not end there 

Send emails based on behaviors such as time spent in-app or task completion after the initial welcome series to guide experienced users to the star features, and inexperienced users to the Aha moment.

Consider a project- or task-based trial rather than a time-based trial to avoid losing users who would be a good fit (just not right now)

Where in a user’s journey is it most likely that they will upsell and cross-sell? The answer will differ depending on whether the user is highly engaged or has not yet used the product.

Upselling and cross-selling can be automated by identifying the right subsets of users and presenting them with more product options. When you customize the experience and sell the right product add-ons to the right customers, you increase revenue while increasing customer satisfaction and delivering more value.

Every user onboarding flow differs depending on the type of product, but there is always an optimal way to entice users. We hope that the best practices and examples have provided you with some ideas for your next user onboarding design!

If you’re thinking ‘we do not have enough experience to deal with this or “what if I don’t have enough time”, contact us to get in touch with our UI/UX experts.

About Galaxy Weblinks

We specialize in delivering end-to-end software design & development services. Our UI/UX designers are creative problem-solvers with a decade of experience in all facets of digital and interactive design. We create compelling and human-focused experiences delivered through clean, and minimalist UI. 

9 Steps to Ensure High Speed of WordPress Website

WordPress powers more than 40% of the web today. WordPress is powered by thousands of different plugins, themes, and technologies and all of these have to coexist. Things can quickly turn into a nightmare for regular WordPress developers here when the website gives them trouble and they can’t identify the problem area. 

The speed of the website is of the utmost importance and remains a top priority regardless of the nature, size, and function of the website. In every technical audit, an improvement in website speed is given weightage. Poor page loading is a big turn-off for users, as well as a factor that drives them away. 

User experience, content, SEO, mobile-responsiveness, etc are a few of the elements that make a successful website. However, website speed has become more and more important over time. The 4gs and 5gs have made consumers impatient. Even if a website is fractionally slow, they would move on to something else. 

A study from Microsoft Corp. says people are generally losing concentration after eight seconds. It is an effect of an increasingly digitalized lifestyle on the brain.

The fact that visitors are mostly using mobile devices, often having a slower data connection than computers exacerbates the problem further. 

As a result, WordPress website owners are hard-pressed to make their websites fast. But, this demands a lot of technical knowledge.

Here we attempt to guide you in speeding up your website step by step. 

First Up – Backup

The process of speeding up a WordPress website may cause you to lose data and other important components of the website. To that end, always make a backup to restore in case of a mishap. A fresh backup can go back to how things were before. The first step will always be downloading both website files and the database. Do it manually or via a plugin, whatever is convenient to you.

Let’s get to the steps… 

Step One – Damage Assessment 

Post backup, it is time to see how the site’s current performance is in terms of page speed. Then follows the before/after comparison. If you have before/after data, you can draw the comparison and check if your actions made any difference. Some of the commonly used tools are – Pingdom, GTmetrix, Google PageSpeed Insights.

Plugging the URL into these sites to see the site’s performance. These testing tools will provide inputs on how the speed of the page can be improved. The recommendations will look like this:

  • Enable compression
  • Leverage browser caching
  • Reduce HTTP requests
  • Eliminate JavaScript and CSS above the fold
  • Optimize images
  • Minify CSS and JavaScript
  • Reduce server response time

Step Two – Eliminating Unnecessary Plugins and Themes

There are always some plugins on the site that are not useful or have outlived the initial purpose. These plugins put an extra, unnecessary burden on the site, increasing the loading time. HTTP requests can slow a site down, so log in and sort through the plugin list. Disable plugins that are not in use and also stop by the theme menu to see if there is anything that isn’t needed.

Step Three – Run Plugin Performance Profiler

With Performance Profiler, plugin performance can be scanned, pinpointing the ones slowing down the WordPress website.

Step Four – Update!

Upgrading WordPress, themes, and plugins gives you access to the latest features and also lets you take advantage of speed improvements. Proper up-gradation of each element constructing the website is necessary.

Step Five – Optimization of the Database

Data optimization can be done using plugins like WP-Optimize. It helps you remove the data overhead from database tables and unnecessary entries such as old post revisions and more.

Step Six – Image Optimization

Images often make up the bulk of any webpage, especially if they are completely composed of visuals. For that reason, we optimize images as much as possible. 

Step Seven – Enable Compression

Next, zip up the files to make them smaller so that browsers need less time to download and present them on the screen.

Step Eight – Turn on Browser Caching

Enabling browser caching basically means telling the browsers of visitors to store parts of the site on their hard drive for a quick future load. This way, resources that aren’t likely to change, can be reused next time.

Step Nine – Minify and Concatenate

Using plugins like Autoptimize to reduce the number of HTTP requests made by the browser by minifying and concatenating the CSS and JavaScript files.

About Galaxy Weblinks 

Galaxy Weblinks is your one-stop solution for WordPress solutions, We offer a complete range of IT services including WordPress development and WordPress optimization. Contact us now for the complete WordPress solutions.