Debug Tool in Craft 3: Here’s all you need to know about it

Before introducing the Debug Tool in Craft 3, Craft CMS made you install a separate web-based application, Web-Console. You could run shell commands on your server to check for errors and missing elements in the written code. Not a fancy deal though! Especially when Craft 3 was designed to be a problem-solver. The lack of a debug functionality was a major issue and ergo, Debug Tool was introduced. The coolest thing about this overlay toolbar is that you can diagnose particular pages on the spot. It shows you all sorts of essential things; number of users, logs, database enquiries, errors, time and memory.

Enabling the Debug Toolbar in Craft CMS

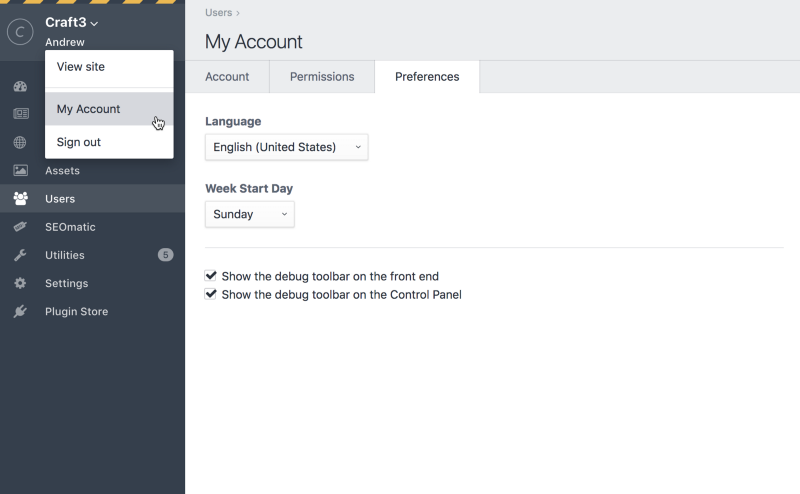
Make sure you have the admin login. Once you’re logged in, head to the ‘my account’ section in the drop down where it reads your username in the top left of your Control Panel.
You’ll find an option to change your preferences in the account section. Apart from the language and ‘week start day’ preference, you’ll find two check boxes with a description of what each one does. You can select either or both according to your usage and when and where you want the toolbar to appear.
  • Show the debug toolbar on the Front end
  • Show the debug toolbar on the control panel
Check the desired boxes, save and continue. Enable devmode to grant unrestricted access to all the useful statistics and elements of the tool. Otherwise, the tool will only show errors and warnings.

The Craft 3 Debug Toolbar

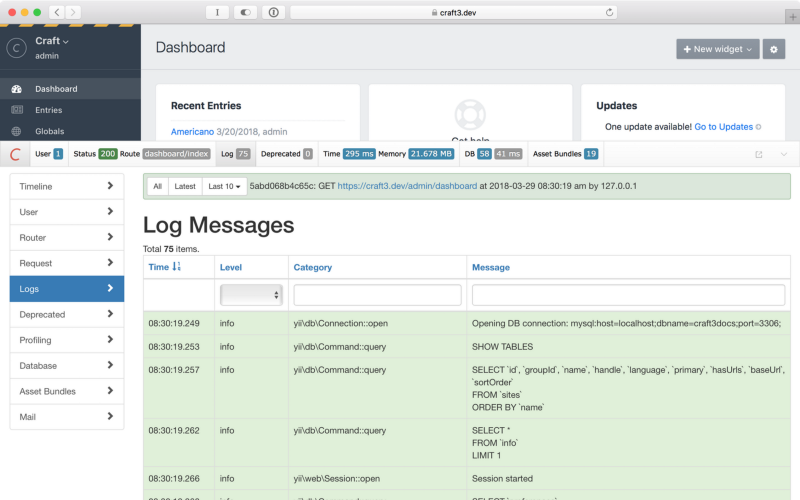
A collapsed overlay panel will appear in the bottom of your page. It reads Craft’s C from the logo itself. You can press on it to expand it. That overlay panel is Craft 3 debug toolbar. It shows you a handful of information and helps you keep a check on your page in real time. You can interact with the information shown in the toolbar by further expanding it half way through the page with a click. To use it in a separate tab, click on the “C”. The full version of the toolbar accommodates more information making it easier to keep track of all the errors, logs, and discrepancies.

Craft 3: Debug Toolbar Functionalities

The debugging toolbar is not for bug fixes only. It offers other perks too:
  • Timeline — It is basically a graphical presentation of your page’s performance. A graph of time and space vs the queries. It keeps track of your page’s load-time and memory used.
  • User — It provides information about users and their sessions.
  • Router — A table of rules that Craft checks before routing to a particular template.
  • Request — It shows all sorts of information from Parameters to headers to sessions and server global variables.
  • Logs — You can find all the error and warning related logs here.
  • Deprecated — Shows deprecation errors.
  • Profiling — Monitor your page’s performance with information about load time and peak memory usage.
  • Database — Shows the Database queries. It can be sorted by time and duration.
  • Asset Bundles — It contains the information of the assets being used.
  • Mail — It keeps a mail log if you’re using a mail tool on Craft.
Debug Tool provides you with crucial information about your website in real time. People who are migrating from Craft 2 will find this tool very useful because it eliminates the dependency on web console to monitor errors and logs. Craft’s minimalism has already made us a fan. These precise features with high functionality make it our favorite CMS. Our development shop is open for all kinds of Craft projects. Ping us here if you are looking for a Craft partner.

How to Setup a New Project in Craft CMS 3

There are two ways you can set up a new project in Craft 3, vis-a-vis, via Composer and Manual. Both the methods require extensive technical expertise & understanding of Craft CMS. With Composer method you have to know your commands and what you’re doing with them but in case of the manual method you just have to perform some simple operations.

Composer Method in Craft CMS

If you have a good understanding of Craft CMS, then you can setup a new Craft project with the some terminal commands. Though, before installing Craft with composer, do make sure that you’re running Composer version 1.3.0 or above. Here are the essential steps: Check the Composer version composer -V Run this command in case your Composer needs updating composer self-update When you’ve confirmed that you’re running a compatible version of the Composer, run the following command (substitute with the path where Composer should create the project): composer create-project craftcms/craft <PATH> The composer will do all the work and it will display a success message. Another way is to do it manually.

Manual Method to setup Craft CMS

You will have to download the archive from Craft’s website. Choose the archive format you’re familiar to work with. Extract the archive where you want your Craft project to be saved. Then follow these 5 steps:

Step 1: Setting up permissions

When you’re doing the manual setup, you have to download and extract the Craft archive in the desired place. The extraction will provide you with a Craft directory which has these files in it: config/… storage/ templates/ vendor/… web/… .env .env.example composer.json craft craft.bat LICENSE.md README.md Out of these files, there are some files for which PHP needs access permissions for different users to write on it. The files are: .env Composer.json Composer.lock config/license.key storage/* Vendor The permissions are defined on the basis of the relationship between the system user that the PHP is running as and ownership of the folders/files.
  • If they are the same user, use 744.
  • If they’re in the same group, then use 774.
  • If you’re not sure, then use 777.

Step 2: Securing the project with a security key

You have to set up a security key to encrypt the data of your project. Every project in Craft has a unique one. You can also use same security key for multiple environments running Craft. You can set a unique security key using the terminal or with a password generator. The password generator will help you to create a cryptographically secure key. Now you need to insert the generated key in your .env file. Open the .env file and insert the security key in between the quotes where it says: SECURITY_KEY=” “ Save the file.

Setting the security key with terminal

Run the following command in your project’s root directory: ./craft setup/security-key.

Step 3: Creating a database

Craft 3 supports MySQL 5.5+ and PostgreSQL 9.5+. So you can choose your database accordingly. But there are some recommended database settings:
  • For MySQL Default Character Set: utf8 Default Collation: utf8_unicode_ci
  • For PostgreSQL Character Set: UTF8

Step 4: Setting up a web server

With the database done setting up. You need a web server on which you can host your Craft project. Make sure you set the path of it’s document root to- web/directory(name of the directory) You will need to update your hosts file if you’re not using any local hosts like MAMP. You can find your respective host files here
  • For macOS/Linux/Unix: /etc/hosts
  • For Windows: \Windows\System32\drivers\etc\hosts
Enter http://<HOSTNAME>/index.php?p=admin in the address bar of your browser (substitute <HOSTNAME> with your web server’s host name). Just to check if the setup works. If there are no errors, Craft’s Setup Wizard will show!

Step 5: Running the setup

You can either run the setup from terminal or from the browser. In the terminal after running the setup command and telling the installer ‘how to connect to the database’, your installation should take care of itself. Browser setup on the other hand provides an interactive installer to setup your Craft.

With Terminal

Open your terminal to run the command ./craft setup Answer the questions about how to connect to your database to start the installation. After the installation, you can access your new Craft project.

With Browser

Open your browser and enter http://<HOSTNAME>/index.php?p=admin (substitute <HOSTNAME> with your web server’s host name) in the address bar of your browser to find Craft’s installer. Follow the instructions and your Craft should be up and running in few minutes. I. Accept the license agreement II. Enter the Database information III. Create an admin account IV. Enter the preferred system name, URL and language V. Finish You’re all set to tweak the website from your Craft control panel. If you’ve followed every step mentioned in this tutorial then you should be able to fire up your Craft projects right away. Both the methods require expertise in Craft CMS. You can connect with us here for further assistance and queries.

How To Create A Content Builder In Craft CMS?

The digital marketplace of 2024 places a critical demand on brands to transcend the confines of static, rigid templates and deliver exceptional, personalized customer experiences. Content Builder in Craft CMS emerges as a revolutionary tool, enabling businesses to create customized, engaging content without the constraints of coding. This innovation allows for the crafting of immersive experiences tailored to the unique needs and preferences of consumers, marking a significant leap towards greater flexibility and creativity in content creation. The shift away from one-size-fits-all website templates to dynamic, personalized content reflects the evolving expectations of today’s digital audiences. With Craft CMS’s Content Builder, brands are empowered to construct captivating, code-free content landscapes, fostering deeper connections with their audience. This tool is indispensable for any brand aiming to stand out in the competitive digital environment of 2024, offering a pathway to crafting content that resonates and truly engages.

Why Do You Need a Content Builder?

Using Craft CMS’s Content Builder brings several key advantages that can transform how you create and manage content:

Making Content Creation Easy for Everyone:

Content creation isn’t just for developers anymore. A 2023 report from HubSpot shows that 74% of marketers see creating engaging content as their biggest challenge. The Content Builder lets people without technical skills, like marketers or business owners, jump into content creation. This change means quicker content updates, more flexibility, and content that really connects with your audience. Imagine your marketing team putting together dynamic landing pages or your sales team customizing product pages on their own, without needing a developer.

Letting Your Creativity Flow:

Forget being stuck with standard templates. The Content Builder gives you the freedom to drag and drop elements, designing layouts that show off your brand’s personality and meet your audience’s interests. Use text, images, videos, forms, and more to create anything from interactive landing pages and personalized product showcases to engaging blog posts or fun learning modules. This tool lets your creativity shine, helping you stand out.

Boosting Your Website’s SEO:

In today’s online world, being visible on search engines is crucial for drawing in organic traffic and leads. The Content Builder helps you cleverly include keywords, headings, and links in your content. This not only engages your audience but also boosts your site’s search engine ranking, bringing more potential customers your way. Great content leads the way, and the Content Builder equips you to craft content that’s both engaging and discoverable.

Building Your Content Piece by Piece:

Here’s how to make the most of the Content Builder:

Choosing Your Tools: 

Craft CMS offers a wide range of field types to help you put your content together. There are Matrix fields for flexible layouts, Rich Text fields for stories, Assets for beautiful visuals, and even Live Data fields for up-to-date content. Picking the right tools is the first step to captivating your audience.

Mapping Out Your Content: 

Before you start creating, take some time to plan. Think about the layouts you want, identify elements you might reuse, and consider how to guide users through their journey on your site. Know what your audience enjoys, set clear goals for your content, and understand how it fits into your wider marketing strategy. Good planning makes sure your content always lands well.

Making It User-Friendly: 

Design with your audience in mind. Aim for layouts that are easy to get around on any device, use visual cues to draw attention, and make sure your calls to action stand out. The best content looks great, is easy to access, and gets users to take action.

Adding Extra Features: 

Take your Content Builder further with plugins. Look into SuperTable for detailed layouts, Feed Me for auto-updating content, or Formidable for interactive forms. Plugins are your secret weapon, enhancing your Content Builder and giving you new ways to connect with your audience. By making content creation more accessible and allowing for greater creativity, Craft CMS’s Content Builder is essential for businesses aiming to make an impact in the digital world of 2024.

Real-World Success Stories:

See how the Content Builder has already made a big difference for businesses and their customers:

RedSky Travel

This popular adventure travel agency started using the Content Builder to make unique landing pages for each travel destination. These pages have fun interactive maps, custom trip plans based on what the visitor likes, and forms that update in real time to let you book your adventure right away. This approach makes it easier for travelers to find exactly what they’re looking for, leading to more people reaching out to book trips. In fact, RedSky Travel’s inquiries went up by 30% after they began using the Content Builder, proving it’s a game-changer for offering personalized experiences and getting more bookings.

Green Thumb Garden Supply

This online gardening store uses the Content Builder to put together product pages that not only look great but are also interactive. They feature galleries full of images, detailed specs, and care guides for plants that change based on where the customer lives. This hands-on way of showing products boosts customer interest, helps them understand products better, and, most importantly, increases sales. Green Thumb Garden Supply noticed a 25% increase in the value of the average order after bringing in the Content Builder, showing how it can make product pages more engaging and encourage customers to spend more.

Crafting the Future with Galaxy Weblinks

In 2024, making your website stand out is crucial. With Craft CMS, you can create a site that really connects with your audience. This isn’t just about technology; it’s about bringing your digital vision to life. Galaxy Weblinks is here to help you do just that. We have the expertise in Craft CMS to help you build a website that not only looks great but also engages your visitors. Think of us as your partner in making your website more than just another URL. Ready to make your website truly engaging? Get in touch with Galaxy Weblinks. Let’s make your site something special together.

Running Outdated Drupal? You Need to PATCH NOW!

Are you using outdated Drupal version for your website? Your website is open to hackers now! Everyone is calling it Drupalgeddon2! Here is the big news, Drupal recently found a major security vulnerability in their older versions. They have decided to release an URGENT security update, even though the 7.x, 8.3.x & 8.4.x are no longer supported now. The security vulnerability might give hackers access to your data and can take away your control from the website. Focusing on these issues, Drupal introduced an urgent security patch to address a highly critical security vulnerability. The designated flaws CVE-2018-7600 was found in the software’s core, and affects the older versions. Drupal produced patches for their older versions of its latest software – 7.x, 8.3.x, and 8.4.x. This will save you from database updates and quickly update without the possible side effects of a minor version update. What to do next if you are using Drupal 7.x, 8.3.x & 8.4.x.? Get hold of your developer and get the security release implemented immediately!
DO NOT PUT IT ON YOUR TODO LIST. GET IT DONE NOW.
The community has been expressing concerns over security in outdated versions and this is just the first wave. After you are done with the security release, plan on migrating the website to the latest version. Safety is the choice you make! Connect with our Drupal security expert now. You can read more about the official security release here

3 steps in choosing the right development team

the right development team

So you are ready to jump in and take your business or idea and create an online presence! But with no experience in building websites, you begin the process of finding a development team for whom you can trust and rely. You find yourself being faced with hundreds of freelance designers and companies (from around the world) offering similar services and trying to win your business.  You receive a roller coaster of bids ranging from $2,000 to $20,000 for the same type of work.  It’s insane and confusing at the same time. In this article, our goal is to give you a head start in your search for the right technology partner. We want you to ask the right questions to your prospective individual or team so that you have a thorough understanding of what the entire process will look like from the beginning stages through the end results.  This is an important investment for you, so take the time needed to research properly.

Step 1 – Understand & Document Your Needs

This is an obvious first step which has to be done specifically when you decide to choose a team working overseas. It’s important to put your thoughts down on paper.  It doesn’t have to be organized or with bullet points but clear enough for you to look back and review it.  Your list can be just of the main features you want on the website or an example of similar websites that you would like to emulate. Just jot down what you have in mind so you can share with your potential candidates later.

The first sign that you have chosen the right team will be if they review your requirements and have well thought out responses. Granted if you expect the team to “fine tune” your requirements and offer specific feedback, there will probably be a fee attached, which is totally reasonable to expect.  However, they should be able to do a cursory review of the initial scope of work and definitely get a sense of what you are trying to accomplish.

At this point it might be difficult for you to know your budget but it will certainly  help you once you are ready to filter the candidates.

Step 2 – Research Potential Developers

It’s always good to ask your business associates for recommendations but it’s important for you to do your due diligence.  You need to become an investigator in this process.  If the developer has testimonials on their site, read through them.  If they don’t, ask them for a list of previous clients for whom you can contact. Once you have that list, ask the following questions:

1. How long did the project take from start to finish? 2. What is the online experience of each of the members of the development team? 3. Who was your point of contact during the project? Was it someone who had hands-on experience developing a site or an account manager who acted more like a liaison? This is an important question.  You want to be able to work directly with the people who are building your site (or who have built previous sites), not a customer service representative who just wants to make sure you are happy. This is critical because those with direct experience can give you advice on what will work and what won’t work on your website.  They will take on your project as if it’s their own.  And for a business owner who has limited time during the day, it is imperative that you can trust someone to run with the project.

Step 3 – Dont Let Price Dictate Your Decision

It’s tempting to go to a freelancing site and hire the cheapest bid. After all, who doesn’t want to save money? Unfortunately, the cheapest bid doesn’t always equate to the best quality. It also doesn’t mean that the bid will actually be what the freelance charges you. Many freelancers entice people with cheap bids only to increase the price later. Think about it. How can someone give you an accurate bid on your project without knowing the details about it first?

Here’s our advice:

Although you have your budget in mind, don’t offer up the number when seeking out bids.  The higher you say your budget is, the higher someone will pad their bill.  Make a short list of 3-5 developers whose quotes range anywhere from [min bid] to [max bid]

Interview the developers within the different price ranges to see where the differences are in their offerings.  Ask some of the questions we mentioned earlier. Be really direct about your questions.  In other words, be sure to ask:

1. Who will be my main point of contact and does that person have “x” number of years experience with online marketing, site development, e-commerce, etc.?  During the interview process, tell them the general idea of what you’re looking for and see if they respond with their own ideas for improvement.  Those with years of experience will know what works and what doesn’t and won’t hesitate to tell you.

2.  Ask how accessible the team will be?  How quickly can I contact someone and how fast is the response time?

3.  Ask how flexible the team is.  There are many companies out there that once you put in an official work order for the project, that will be the direction they will go in.  But what if during the middle of the project you discover a better way to improve the customer’s online experience.  Will your development team be flexible enough to change directions?  Are they knowledgeable enough to suggest taking the project in a different direction? Many are not.

While the responsibilities of finding the right mean stack development team may seem daunting, it is critical to the success of your website and ultimately the success of your business.  Don’t skimp on any of the above steps .   An experienced, flexible and enthusiastic team will be an absolute pleasure to work with as they help turn your vision into reality and will make your investment worth every penny.