How to migrate a Craft 2 project to Craft 3?

Craft 3 update changed a lot of things. Added functionalities aside, the process of installing and maintaining the CMS also changed with this breakpoint release.

Craft 3 almost makes it necessary to migrate your website from Craft 2. It is better in every aspect, including security and the extended plugin store. The store comes with plugin trials and 30-day license return policy.

For the incremental updates, you just had to click on a button. But with the breakpoint release, Craft CMS tweaked its ways of handling things.

It is advised to get an expert’s help for the migration because there are a lot of things that can go wrong with the migration, for instance:

  • Control panel prompting to install Craft instead of the update database dialogue.
  • Database configuration settings which are no longer needed

Also, to avoid errors, you have to follow the same naming schemes that were used in your old database; like using same prefixes with the new database connection settings.

There are two steps involved in the migration process of a Craft 2 project.

  • Craft 3 Installation
  • Manual Migration

Step 1: Craft 3 Installation

To install Craft 3, follow the same steps as mentioned in ‘How to setup a new Craft CMS project’ and then proceed with the migration.

You need to take care of the following requirements before proceeding with the installation:

  • Craft 3 requires PHP 7+ and at least 256 MB of memory for PHP
  • The installation requires Craft 2.6.2788
  • Make sure that your plugins are ported to Craft 3 (check the status at the bottom of the update page)
  • Keep a backup of your old database.

After the installation, proceed with the migration process. According to the Craft 3 upgrade documentation following are the steps you need to follow to migrate your Craft 2 project to Craft 3.

Step 2: Manual Migration

Import your database connection settings from your old database file craft/config/db.php to your .env file in the Craft 3 directory.

Now copy the following settings and configuration files from the old Craft 2 directory to the new Craft 3 directory.

  • Copy settings from craft/config/general.php to config/general.php
  • Copy craft/config/license.key file to config/
  • Copy configuration files from craft/config/redactor/ to config/redactor/
  • Copy files from craft/storage/rebrand/ to storage/rebrand/
  • Copy photos from craft/storage/userphotos/ to storage/userphotos/
  • Copy templates from craft/templates/ to templates/
  • Copy the changes made, if any, from public/index.php file to web/index.php file
  • Copy other files from old public/ to web/ directory.

After copying the files to the web/directory, update the web server to point to it. Enter the Craft’s control panel URL in the browser. It should prompt you to update your database.

Known problems with the migration from Craft 2 to Craft 3

If all goes well you will be able to run the latest Craft 3 with your old database intact. If not then you might be facing the following problems.

Craft installer pops up when accessing the control panel

Your old database connection settings are not matching with the new .env file. It is most likely happening because of a wrong DB_TABLE_PREFIX.

“Setting unknown property:

craft\config\DbConfig::initSQLs” error.

The initSQLs database configuration setting was used in Craft 2 to fix MySQL 5.7 support. It is redundant in Craft 3. Remove the line beginning with ‘initSQLs’ in the config/db.php file to delete the setting.

To avoid major hassles and loss of database, it is recommended that you get a Craft partner onboard. In case you have further queries, you can connect with our Craft CMS experts here.

More Craft CMS Features: Matrix and Its Powerful Friends

Craft CMS’s consistency can be seen in its regular updates & latest features. Matrix is one of those early features that helped Craft dominate the CMS game. Matrix is the protagonist of the Craft’s story since its inception but there are some unsung heroes that need some attention too.

Categories & Tags in Craft CMS

Categories and tags is one of the most powerful features of Craft CMS for content classification. It allows you to organize your content by defining a taxonomy beforehand. You can create category groups from which, the categories are assigned to different entries.

Define Taxonomies with Category in Craft CMS

To define a Taxonomy you have to create a parent group to accommodate different categories in it. Go into categories section in settings. Inside it you can create a parent category group to define a taxonomy.

Meta level categorization with Tags in Craft CMS

Craft supports folksonomy as well. You can categorize the content with the help of electronic tags to define a folksonomy. The process of creating tags and tag groups is same as the categories. Create a folksonomy from the settings. Assign to the entries in the tag field. Tags provide meta level categorization which also helps in SEO. Categories & tags will help you create a content structure which makes your content consumable.

Matrix in Craft CMS

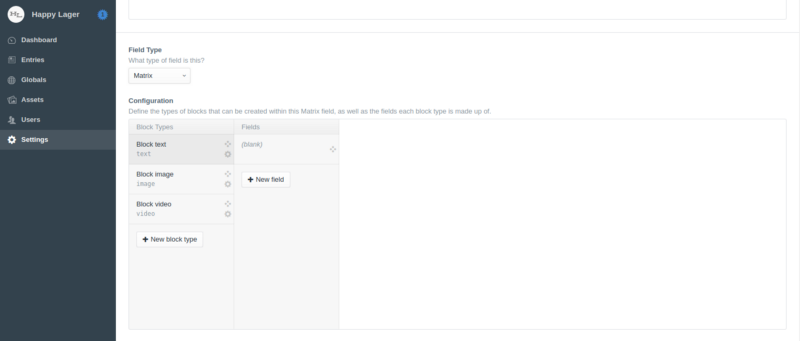
In our earlier blog about ‘why to choose Craft’ we listed Matrix as one of the defining features of Craft CMS. The feature lets you create and manage content blocks. You can add, reorder, and move content blocks; be it text, code, or rich media. And the coolest thing about the content blocks is that the reordering doesn’t affect the code in the template. One of the key benefits of the matrix field is that you don’t have to rely on predefined themes and their content structures. The only problem with the thematic approach is that you have to make-do with whatever the theme designer deemed right. The sections are made of fields, which are made with content blocks and using these content types we create entries. The matrix is a multi functional field which can accommodate almost every type of entry.

Where to find the Matrix?

You can find the matrix in the sections where you define field type and the amount of blocks the field is going to have. Just select matrix from the field type drop down and configure it accordingly. If you want a minimalistic powerful website with necessary content elements then Craft’s Matrix field is the answer.

Image Editor in Craft CMS

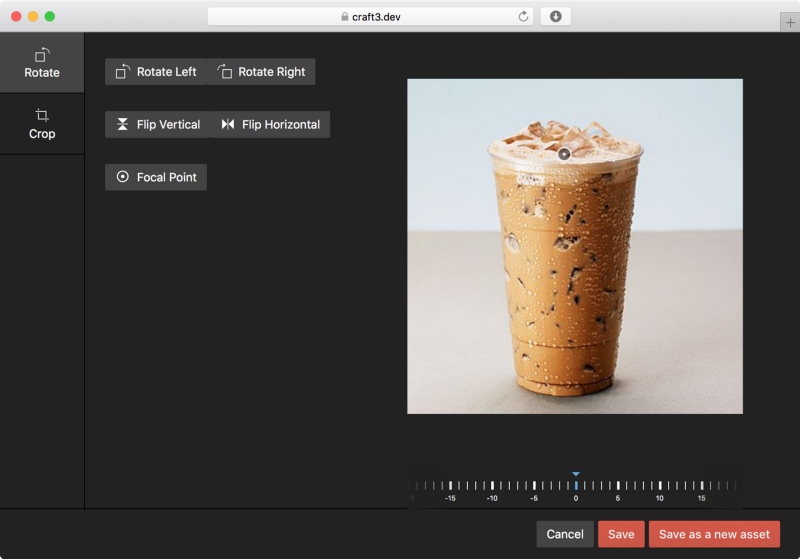
Before Image Editor’s introduction in Craft 3, the only options to edit the images were through Image Transforms or with plugins like Tiny image. Craft’s inbuilt Image Transform lacked essential editing elements and was only helpful in defining universal image rules. Image editor on the other hand provides a rich editor which lets you crop, rotate, flip, and straighten images. You can even manually set focal points for responsive images. Edits don’t affect the quality of the image and can be overwritten or saved as a new asset. You can access the image editor from assets in the control panel:
  • Open control panel
  • Click on the assets
  • Select an asset
  • Click on the drop down with a gear icon on it
  • Select edit image

Image Source:craftcms.com

Edit image option will open the image editor for the selected asset. Overwrite the changes with save button or save the image as a new asset.

Plugin Store in Craft CMS

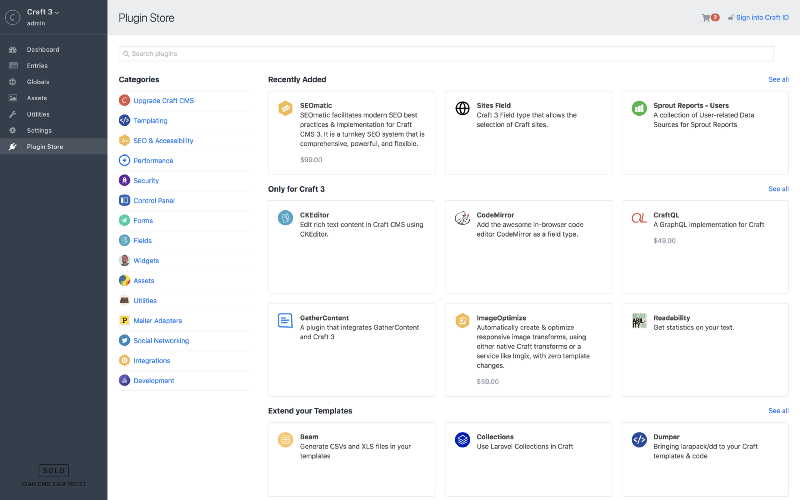
Plugins are mini applications for added functionality. There are more than 200 plugins in Craft CMS’ plugin store, each one enhances Craft in one way or another.

Image Source:craftcms.com

Plugins are infamous as vulnerability of WordPress but that’s not the case with Craft because:
  • It has One-click installation and updation.
  • It has centralized license management.
  • It allows you to try a plugin before you buy it, on a non-public domain like Craft.test.
  • It has a 30-day return policy on paid plugins licences.

One-Click Updates in Craft CMS

All the functionalities are a waste if you have to update them one by one. Craft solves this problem like a real problem solver via one-click update feature. Craft alerts you in the control panel with a notification badge and its clever designing allows the system to notify according to the update priority. For example; if it’s just an incremental update, it would just show a notification badge and if it’s a critical update the control panel will turn red. Update priority is one of the most practical & essential elements on Craft CMS.You can’t possibly miss a critical update with the control panel turning red. Critical updates are meant for security enhancements or to fix a vulnerability. Skipping them leaves your website vulnerable to attacks. Craft’s one-click update provides all the incremental and critical updates in a ready-to-install package. It is easy that way and no one skips any important updates.

Relations with entities in Craft CMS

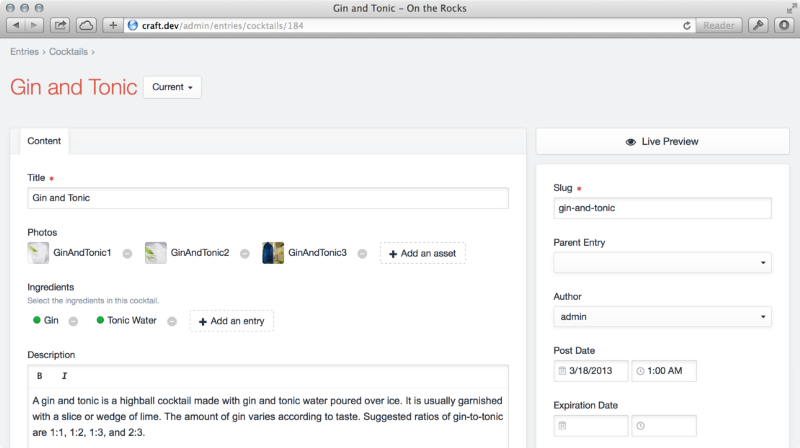
You can link entries, assets, categories/tags, & users — the four relational field types — using Craft’s Relationship engine. For example you can relate a case study with the services page section to show which services were used during the development process.

Creating relationships in Craft CMS

  • Create a new entries field
  • Select the sources from which entries will be taken
  • Drop the new field in the layout of the desired section

Image Source:craftcms.com

You can find the new category entries field in the section, while creating a new entry. Now you can relate content elements to each other. These basic Craft features have made website development a complete new ballgame. We have partnered with agencies and companies for extensive Craft CMS projects. To know how we roll our dices, ping us here.

Debug Tool in Craft 3: Here’s all you need to know about it

Before introducing the Debug Tool in Craft 3, Craft CMS made you install a separate web-based application, Web-Console. You could run shell commands on your server to check for errors and missing elements in the written code. Not a fancy deal though! Especially when Craft 3 was designed to be a problem-solver. The lack of a debug functionality was a major issue and ergo, Debug Tool was introduced. The coolest thing about this overlay toolbar is that you can diagnose particular pages on the spot. It shows you all sorts of essential things; number of users, logs, database enquiries, errors, time and memory.

Enabling the Debug Toolbar in Craft CMS

Make sure you have the admin login. Once you’re logged in, head to the ‘my account’ section in the drop down where it reads your username in the top left of your Control Panel.
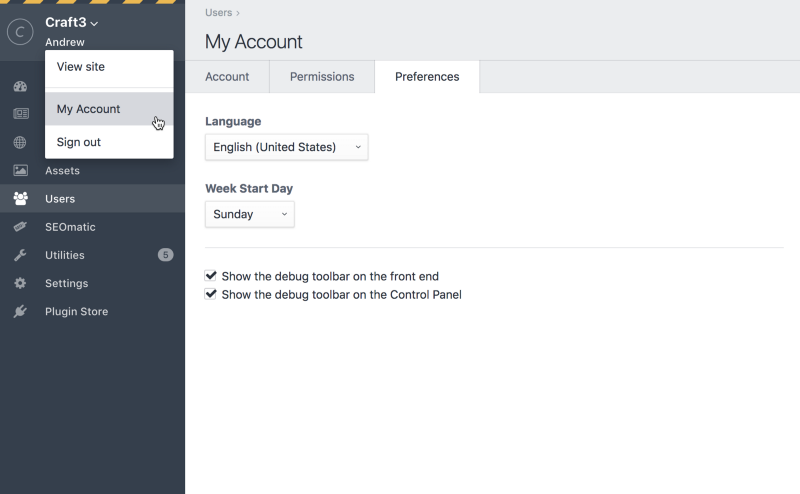
You’ll find an option to change your preferences in the account section. Apart from the language and ‘week start day’ preference, you’ll find two check boxes with a description of what each one does. You can select either or both according to your usage and when and where you want the toolbar to appear.
  • Show the debug toolbar on the Front end
  • Show the debug toolbar on the control panel
Check the desired boxes, save and continue. Enable devmode to grant unrestricted access to all the useful statistics and elements of the tool. Otherwise, the tool will only show errors and warnings.

The Craft 3 Debug Toolbar

A collapsed overlay panel will appear in the bottom of your page. It reads Craft’s C from the logo itself. You can press on it to expand it. That overlay panel is Craft 3 debug toolbar. It shows you a handful of information and helps you keep a check on your page in real time. You can interact with the information shown in the toolbar by further expanding it half way through the page with a click. To use it in a separate tab, click on the “C”. The full version of the toolbar accommodates more information making it easier to keep track of all the errors, logs, and discrepancies.

Craft 3: Debug Toolbar Functionalities

The debugging toolbar is not for bug fixes only. It offers other perks too:
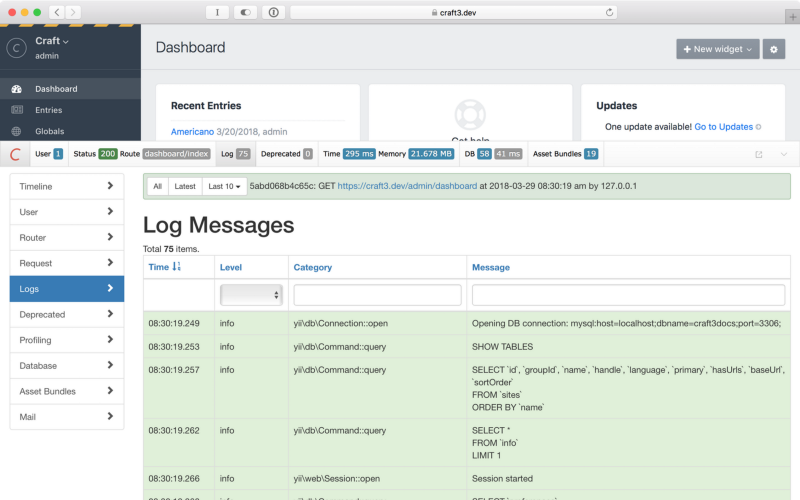
  • Timeline — It is basically a graphical presentation of your page’s performance. A graph of time and space vs the queries. It keeps track of your page’s load-time and memory used.
  • User — It provides information about users and their sessions.
  • Router — A table of rules that Craft checks before routing to a particular template.
  • Request — It shows all sorts of information from Parameters to headers to sessions and server global variables.
  • Logs — You can find all the error and warning related logs here.
  • Deprecated — Shows deprecation errors.
  • Profiling — Monitor your page’s performance with information about load time and peak memory usage.
  • Database — Shows the Database queries. It can be sorted by time and duration.
  • Asset Bundles — It contains the information of the assets being used.
  • Mail — It keeps a mail log if you’re using a mail tool on Craft.
Debug Tool provides you with crucial information about your website in real time. People who are migrating from Craft 2 will find this tool very useful because it eliminates the dependency on web console to monitor errors and logs. Craft’s minimalism has already made us a fan. These precise features with high functionality make it our favorite CMS. Our development shop is open for all kinds of Craft projects. Ping us here if you are looking for a Craft partner.

How to Setup a New Project in Craft CMS 3

There are two ways you can set up a new project in Craft 3, vis-a-vis, via Composer and Manual. Both the methods require extensive technical expertise & understanding of Craft CMS. With Composer method you have to know your commands and what you’re doing with them but in case of the manual method you just have to perform some simple operations.

Composer Method in Craft CMS

If you have a good understanding of Craft CMS, then you can setup a new Craft project with the some terminal commands. Though, before installing Craft with composer, do make sure that you’re running Composer version 1.3.0 or above. Here are the essential steps: Check the Composer version composer -V Run this command in case your Composer needs updating composer self-update When you’ve confirmed that you’re running a compatible version of the Composer, run the following command (substitute with the path where Composer should create the project): composer create-project craftcms/craft <PATH> The composer will do all the work and it will display a success message. Another way is to do it manually.

Manual Method to setup Craft CMS

You will have to download the archive from Craft’s website. Choose the archive format you’re familiar to work with. Extract the archive where you want your Craft project to be saved. Then follow these 5 steps:

Step 1: Setting up permissions

When you’re doing the manual setup, you have to download and extract the Craft archive in the desired place. The extraction will provide you with a Craft directory which has these files in it: config/… storage/ templates/ vendor/… web/… .env .env.example composer.json craft craft.bat LICENSE.md README.md Out of these files, there are some files for which PHP needs access permissions for different users to write on it. The files are: .env Composer.json Composer.lock config/license.key storage/* Vendor The permissions are defined on the basis of the relationship between the system user that the PHP is running as and ownership of the folders/files.
  • If they are the same user, use 744.
  • If they’re in the same group, then use 774.
  • If you’re not sure, then use 777.

Step 2: Securing the project with a security key

You have to set up a security key to encrypt the data of your project. Every project in Craft has a unique one. You can also use same security key for multiple environments running Craft. You can set a unique security key using the terminal or with a password generator. The password generator will help you to create a cryptographically secure key. Now you need to insert the generated key in your .env file. Open the .env file and insert the security key in between the quotes where it says: SECURITY_KEY=” “ Save the file.

Setting the security key with terminal

Run the following command in your project’s root directory: ./craft setup/security-key.

Step 3: Creating a database

Craft 3 supports MySQL 5.5+ and PostgreSQL 9.5+. So you can choose your database accordingly. But there are some recommended database settings:
  • For MySQL Default Character Set: utf8 Default Collation: utf8_unicode_ci
  • For PostgreSQL Character Set: UTF8

Step 4: Setting up a web server

With the database done setting up. You need a web server on which you can host your Craft project. Make sure you set the path of it’s document root to- web/directory(name of the directory) You will need to update your hosts file if you’re not using any local hosts like MAMP. You can find your respective host files here
  • For macOS/Linux/Unix: /etc/hosts
  • For Windows: \Windows\System32\drivers\etc\hosts
Enter http://<HOSTNAME>/index.php?p=admin in the address bar of your browser (substitute <HOSTNAME> with your web server’s host name). Just to check if the setup works. If there are no errors, Craft’s Setup Wizard will show!

Step 5: Running the setup

You can either run the setup from terminal or from the browser. In the terminal after running the setup command and telling the installer ‘how to connect to the database’, your installation should take care of itself. Browser setup on the other hand provides an interactive installer to setup your Craft.

With Terminal

Open your terminal to run the command ./craft setup Answer the questions about how to connect to your database to start the installation. After the installation, you can access your new Craft project.

With Browser

Open your browser and enter http://<HOSTNAME>/index.php?p=admin (substitute <HOSTNAME> with your web server’s host name) in the address bar of your browser to find Craft’s installer. Follow the instructions and your Craft should be up and running in few minutes. I. Accept the license agreement II. Enter the Database information III. Create an admin account IV. Enter the preferred system name, URL and language V. Finish You’re all set to tweak the website from your Craft control panel. If you’ve followed every step mentioned in this tutorial then you should be able to fire up your Craft projects right away. Both the methods require expertise in Craft CMS. You can connect with us here for further assistance and queries.