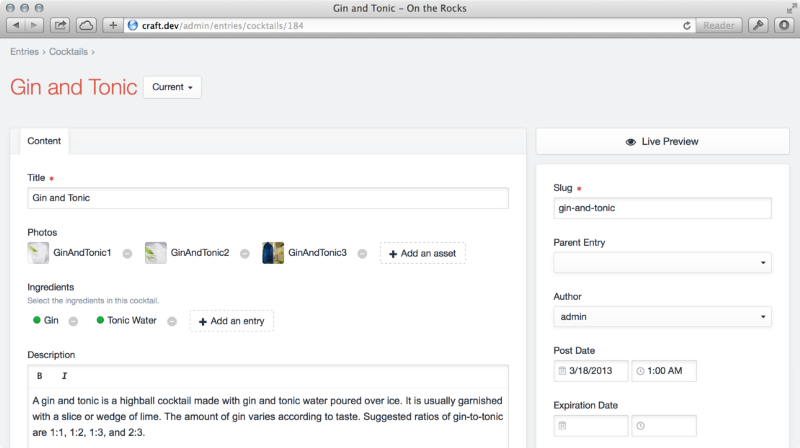
Craft CMS: Building the frontend of a website using Twig and GraphQL

Craft is a mature and tested content management system. Airbnb, W3C, Netflix, PBS, Salesforce, Moz, and countless other brands switched to Craft CMS for redesigning their websites. That for sure proves its credibility against other popular CMSs.

You can use Craft to design and develop complex and intuitive sites that rely heavily on PHP, databases, and query optimizations. However, you can also use Craft to design and develop simple sites where you do none of those things.

Craft CMS has ditched the traditional CMS systems that come with ready-to-go page templates, CSS frameworks, and pre-built themes. As a result, developers have a bespoke solution to build tier solutions. Craft CMS neither offers posts or pages or any bootstrap features and themes to build the frontend.

Craft CMS supports two distinctly different ways of building a front end:

Monolithic: building Twig templates for server-generated pages.

Headless: using a GraphQL API in combination with a separate front end codebase.

But before diving into these two frontend approaches, let’s find out what web developers, designers, and stakeholders love about Craft CMS.

Why Craft is a choice of many front-enders and website projects?

Both web designers and developers find Craft CMS features incredibly useful. Before installing any plugins, the options and functions developers have to work with are impressive. Here is a partial list of features and the reasons why Craft is preferred more for which many other CMSs require plugins:

  • It allows content managers to custom page layout building and preview updates in real-time.
  • One can manage all of their brand sites under one roof, whether it’s a multi-site, multilingual, or both. This is a major problem area with the majority of other CMSs.
  • With virtually no learning curve, the UI of the Craft control panel is very intuitive.
  • Craft is fast for the front end as well as the Control Panel and tops the many reasons for choosing a modern CMS over an older one.
  • Robust sitewide content indexing and search capabilities.
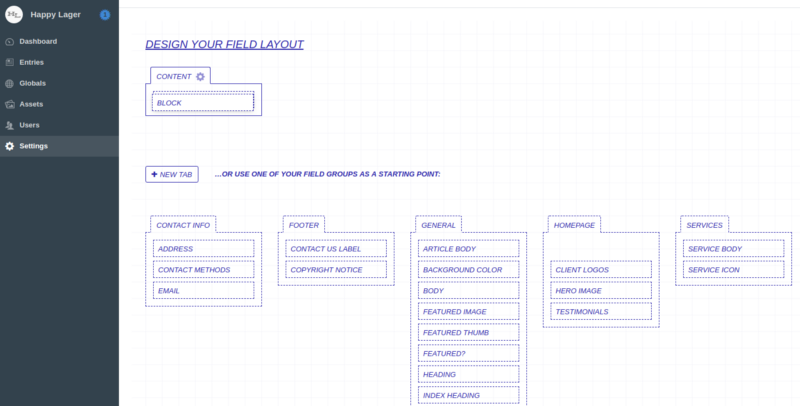
  • Robust custom fields for full control over your design and content.
  • Nearly all content is in one place: Entries. Editors love this and can easily find what they’re looking for.
  • Fine-grained user permissions and group management allow publishing workflows across different departments and individuals. And no, you don’t need a plugin for this.

Building frontend with Craft CMS using Twig templates

Twig is a template engine for PHP so instead of writing PHP you write in this simple Twig syntax.

Some developers are not keen on this, but Craft uses Twig as its template engine. The word “use” should be highlighted as a requirement, as there is no option of writing raw PHP anywhere inside the template.

It is standardized in a way that, when you look at your team’s Pull Requests, you probably don’t expect to see 100 lines of custom PHP that make no sense. You only see the code related to templates.

Apart from this, Twig makes it easy to “component-ize” your elements. This way you define the markup and layout for a component once, then reuse it throughout your site and pass variables.

You can define components for different content modules like image left, image right, headings, cards, etc. This ensures you’re consistent, reuse the same components throughout the site, and reduce duplicate code.
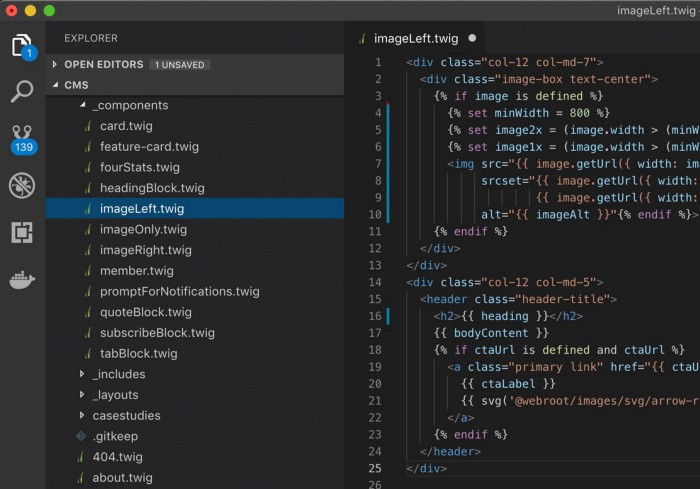
image code

Here’s how to use GraphQL + Craft CMS as a ​“head­less” CMS

Let’s say you’re not digging Twig or you would rather use one of the latest technologies (hello static site generators!). Craft’s templating system isn’t the only way to get content out of Craft. As of Craft 3.3, it provides a “headless” mode and GraphQL built-in with Craft’s Pro features.

That means you can use tools like Gatsby or Gridsome to build static sites with the comfort of Craft CMS. That brings Craft in line with the likes of WordPress that provides its REST API for fetching content to use somewhere else.

As a web devel­op­er, you’d use GraphQL if you were writ­ing a fron­tend that is sep­a­rate from the back­end. You’d be using Craft CMS as a ​“head­less” CMS for its excel­lent con­tent author­ing experience.

Per­haps you’re writ­ing the fron­tend in a frame­work like Svelte, Vue.js, React, or one of the frame­works that lay­ers on top of them like Grid­some, Gats­by, Nuxt.js, or Next.js. You could write a cus­tom API for Craft CMS using the Ele­ment API, but that can be a sig­nif­i­cant amount of work, and you’ll end up with some­thing bou­tique, rather than an indus­try standard.

This is where GraphQL for Craft CMS excels. By cre­at­ing your con­tent mod­els in Craft CMS, you auto­mat­i­cal­ly get a GraphQL API to access it, with no extra work on your part.

Conclusion

Craft abstracts all the field creation and setup to the admin panel. You only need to point it to the right Twig template and then use the fields you connected. Furthermore, it provides localization and multi-site management out of the box with no need for plugins.

The bottom line is Craft is an open-source, modern, affordable CMS with stellar security and first-party support. The features and flexibility it offers out of the box, along with its content-first approach, make it go-to for nearly every custom web project.

About Galaxy Weblinks:

We are your offshore CMS development partner! We offer expert capabilities in developing feature-rich solutions using the latest CMS technology trends. We have hands-on experience in CMS solutions like Craft, WordPress, Drupal for different business needs. We offer assistance from building custom CMS websites to website migration and maintenance processes.

How to use Macros with Twig in Craft CMS — DRY

Templating is one of the most commonly used processes in web development. It helps with easier management during the development & design process. Apart from the management, templating helps with keeping the visual consistency.

Craft CMS comes with a cool templating engine — Twig. And we love to use macros to work on redundant parts while working on a Craft CMS project. Macros can be compared to ‘functions’ in PHP also known as DRY templating in other languages. We usually use it to generate markups that have slight final variations in the implementation.

To simplify your code you must first make a visual hierarchy of the page you’re working on. That way you can determine the components you’re going to need. Make macros for those components in the twig templating engine.

Macro implementations can be changed based on the parameters passed to it. For instance footers, dates, images and other media are a recurring part of a website. You can make macros for these components.

Skeleton of Twig Macro

{% macro coolMacroName (parameter 1,…..) %} {content of macro goes here} {% endmacro %}

To call the macro – {% import ‘_macroFilename’ as ‘macroVariable’ %} {{ macrovariable.coolMacroName(parameter1, parameter2,….) }}

The best practice is to add the relevant macros to a file and then call the file as a variable. Use the variable to call the macro at the places you need.

The first Macro we use often is-

Macro for responsive image component in Craft CMS

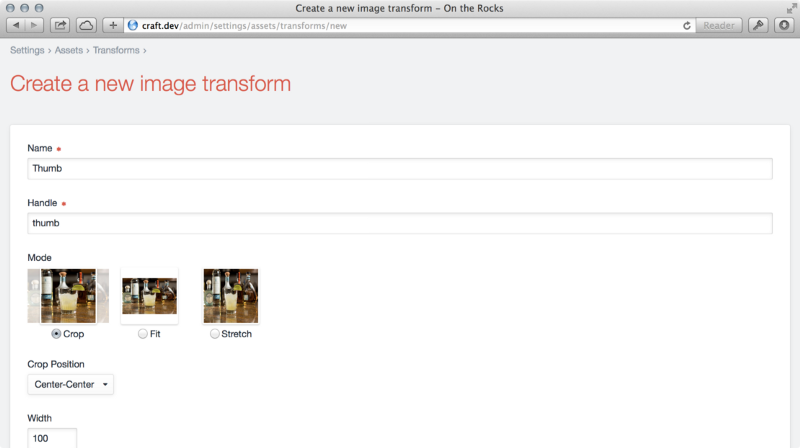
You can reduce and automate a lot of work which goes in responsive image formatting. Utilize Craft’s ‘Image transforms’ with a twig for images and define your transform macros in it. You will also have to define different types of macros for different image formatting needs.

A macro for Device-pixel ratio adaptable fixed size images and other one for variable size responsive images. Also add an internal class to call it inside your twig image file for additional attributes.

Macro for video component in Craft CMS

Videos are an integral part of every website, so making a twig component for it seems practical, otherwise you will spend your precious time writing and tweaking html code for videos.

In the macro define the logic of the video component. The file should have proper information about the component, the parameters which are accepted, the value each parameter requires, and whether the parameter is optional or not. You also need to mention, what the arrays and objects are made of because without that information you yourself and other developers won’t know, what information can/must or cannot be passed while calling the component.

Making macros for date formatting in Craft CMS

Dates might look like a trivial part of a template but it gets tedious and complex when you have to define its format in every other template.

You can contain different modifiable date formats in a macro. It saves you the effort of having to define it time and again and maintaining consistency all along. Short or long, just define the format in a macro and call it wherever you need it.

Reduce repeated reference of paths in Craft CMS

Include tag in twig allows you to call a template within a template. Each one you make gets stored in /templates/ folder by default, even your include templates.

You can call these partial templates separately followed by the same path or make a macro instead to reduce the repeated reference of path.

To achieve code consistency, store your ‘include’ templates separately. So that you can call the include templates within the macro. You can also call your ‘include templates’ from multiple locations.

Final words

That’s pretty much it. Apart from few other variations, creating macros for page components is a good and effective way to reduce the redundancy and complexity of the code. You can always go through this detailed video for macros here.

We’ve been experimenting with several DRY techniques ourselves. It improves the speed of our work cycle.

How are you using Twig & its components? If you need help with your Craft CMS project, connect with us right away.

Craft Vs Perch: A Clash Of Customizable CMSs

In our earlier blogs we’ve favoured Craft CMS heavily because of its ‘content first’ philosophy. Perch also majorly focuses on the content but with functionality shredded down to the absolute basics. It’s so minimalistic and that it is considered to be appropriate for small-scale projects only. Anyways, Perch has its perks as compared to conventional CMSs. Let’s put it to the test against the reigning champion, Craft CMS.

Feature comparison of Craft & Perch

Craft is loaded with crucial features, vis-a-vis:

Live Preview

Craft allows you to review the edits as you’re making them in a split screen window mode.

Matrix

Gives you the full control of your content, from layout and placement to the order.

Localization

You can create locales for the desired language and enable with just a click.

One-click updates

Simply update everything with one click from the control panel. The updater even notifies you according to the nature of the update; whether it’s incremental or critical.

Built from scratch

Craft CMS team clearly states that we don’t make any assumptions about your content. You get full control of your website and you can craft it the way you want. On the other hand, Perch has the following features to offer:

Preview

You get to see the changes only after when they are saved in the draft. A bit old fashioned to be honest but it goes with Perch’s tagline of ‘a very little CMS’

Custom Fields

The feature lets you create custom fields throughout the page.

Localization

Perch lets you localize your webpages by creating separate pages or duplicating regions for each language.

Updates

Updating in Perch is a bit cumbersome. You need to replace the old files with the new ones.

Retrofit or build from scratch

You can retrofit an existing website or build a minimal website from scratch.

Documentation comparison of Craft & Perch

Documentation is a crucial part of a CMS. It is important to define the features and inner workings of a CMS so that the new users know how to use it. It’s a map for the CMS users. Documentation, if not done properly, might mislead your users. There is nothing more off-putting than lack of documentation. Users are trying to find their way around the new CMS and if there is no good map, they’ll probably get lost and bounce-off faster than light from a mirror.

Craft

As far as the documentation is concerned Craft excels at it. You will immediately find everything you’re looking for. From update logs and feature definitions to essential how tos; Craft’s documentation has got it all.

Perch

Being the older CMS of the two, extra years in development hasn’t added much in favour of Perch CMS. Perch documentation is enough to get a hold of the basics but it disappoints when you’re half-way into the development process. Especially when you’re trying to give additional functionalities to your CMS with add-ons.

Community Support comparison of Craft & Perch

Documentation can only do so much, the real knowledge and solutions are derived from the dedicated communities formed around the CMS. The community makes up for the lack of documentation and helps you solve on-site issues.

Craft

Craft has a proactive community of dedicated developers and users that help to keep Craft as current as it can be. The Craft community just keeps growing as more people fall in love with the CMS.

Perch

Perch doesn’t aim to be a big CMS and hence it remains that way with 0.1% of the market share. It has a simple and functional CMS to offer but it’s not backed by convenient documentation and a good community support.
  • Perch Slack channel is no longer active
  • 3725 followers on Twitter
  • 615 fans on Facebook

User Interface comparison of Craft & Perch

User interface determines how you interact with the content. Both the CMSs provide you with a dashboard to edit and manipulate your content using the interface. The simpler the interface the lesser the struggle to understand it.

Craft

Craft focuses on providing powerful and bespoke results. The interface hence is equipped with essential functionalities to handle large amounts of data gracefully. Although it is considered to be highly-technical and dev-friendly, Craft CMS offers a conveniently easy drag and drop interface for layout design.

Perch

Perch on the other hand stays true to its principle of being basic with the user interface too. It is comprehensive and doesn’t require extensive technical expertise. However to people who want more control over their content it is basically under equipped.

Development Cycle comparison of Craft & Perch

Craft uses an unconventional and complex data structure, hence the bigger learning curve. Singles, structures, and channels as data structures give you unmatched control and editing capabilities. For front-end development Craft utilizes Twig templating engine for advanced templates and data manipulation. Perch uses PHP functions for the development as compared to Twig in Craft. The content structure is pretty straight forward, it features pages, regions, and shared regions for data manipulation. For the added functionality of reusing content throughout the page you need to upgrade to larger version of Perch which is Perch Runway. Both the CMSs have their benefits but it is rather important and practical to go with the CMS which is flexible and future-proof. While Perch is a straight forward CMS which doesn’t try too hard to be something it’s not, it is only good for small projects and businesses with a tight budget. On the contrary, Craft CMS provides necessary functionalities paired with high-end security. It is a capable and viable choice for both developers and content editors. Looking at the security track record of Craft we’ve always chosen Craft CMS over every other CMS for our clients. In case you are confused about how

How to migrate a Craft 2 project to Craft 3?

Craft 3 update changed a lot of things. Added functionalities aside, the process of installing and maintaining the CMS also changed with this breakpoint release.

Craft 3 almost makes it necessary to migrate your website from Craft 2. It is better in every aspect, including security and the extended plugin store. The store comes with plugin trials and 30-day license return policy.

For the incremental updates, you just had to click on a button. But with the breakpoint release, Craft CMS tweaked its ways of handling things.

It is advised to get an expert’s help for the migration because there are a lot of things that can go wrong with the migration, for instance:

  • Control panel prompting to install Craft instead of the update database dialogue.
  • Database configuration settings which are no longer needed

Also, to avoid errors, you have to follow the same naming schemes that were used in your old database; like using same prefixes with the new database connection settings.

There are two steps involved in the migration process of a Craft 2 project.

  • Craft 3 Installation
  • Manual Migration

Step 1: Craft 3 Installation

To install Craft 3, follow the same steps as mentioned in ‘How to setup a new Craft CMS project’ and then proceed with the migration.

You need to take care of the following requirements before proceeding with the installation:

  • Craft 3 requires PHP 7+ and at least 256 MB of memory for PHP
  • The installation requires Craft 2.6.2788
  • Make sure that your plugins are ported to Craft 3 (check the status at the bottom of the update page)
  • Keep a backup of your old database.

After the installation, proceed with the migration process. According to the Craft 3 upgrade documentation following are the steps you need to follow to migrate your Craft 2 project to Craft 3.

Step 2: Manual Migration

Import your database connection settings from your old database file craft/config/db.php to your .env file in the Craft 3 directory.

Now copy the following settings and configuration files from the old Craft 2 directory to the new Craft 3 directory.

  • Copy settings from craft/config/general.php to config/general.php
  • Copy craft/config/license.key file to config/
  • Copy configuration files from craft/config/redactor/ to config/redactor/
  • Copy files from craft/storage/rebrand/ to storage/rebrand/
  • Copy photos from craft/storage/userphotos/ to storage/userphotos/
  • Copy templates from craft/templates/ to templates/
  • Copy the changes made, if any, from public/index.php file to web/index.php file
  • Copy other files from old public/ to web/ directory.

After copying the files to the web/directory, update the web server to point to it. Enter the Craft’s control panel URL in the browser. It should prompt you to update your database.

Known problems with the migration from Craft 2 to Craft 3

If all goes well you will be able to run the latest Craft 3 with your old database intact. If not then you might be facing the following problems.

Craft installer pops up when accessing the control panel

Your old database connection settings are not matching with the new .env file. It is most likely happening because of a wrong DB_TABLE_PREFIX.

“Setting unknown property:

craft\config\DbConfig::initSQLs” error.

The initSQLs database configuration setting was used in Craft 2 to fix MySQL 5.7 support. It is redundant in Craft 3. Remove the line beginning with ‘initSQLs’ in the config/db.php file to delete the setting.

To avoid major hassles and loss of database, it is recommended that you get a Craft partner onboard. In case you have further queries, you can connect with our Craft CMS experts here.

More Craft CMS Features: Matrix and Its Powerful Friends

Craft CMS’s consistency can be seen in its regular updates & latest features. Matrix is one of those early features that helped Craft dominate the CMS game. Matrix is the protagonist of the Craft’s story since its inception but there are some unsung heroes that need some attention too.

Categories & Tags in Craft CMS

Categories and tags is one of the most powerful features of Craft CMS for content classification. It allows you to organize your content by defining a taxonomy beforehand. You can create category groups from which, the categories are assigned to different entries.

Define Taxonomies with Category in Craft CMS

To define a Taxonomy you have to create a parent group to accommodate different categories in it. Go into categories section in settings. Inside it you can create a parent category group to define a taxonomy.

Meta level categorization with Tags in Craft CMS

Craft supports folksonomy as well. You can categorize the content with the help of electronic tags to define a folksonomy. The process of creating tags and tag groups is same as the categories. Create a folksonomy from the settings. Assign to the entries in the tag field. Tags provide meta level categorization which also helps in SEO. Categories & tags will help you create a content structure which makes your content consumable.

Matrix in Craft CMS

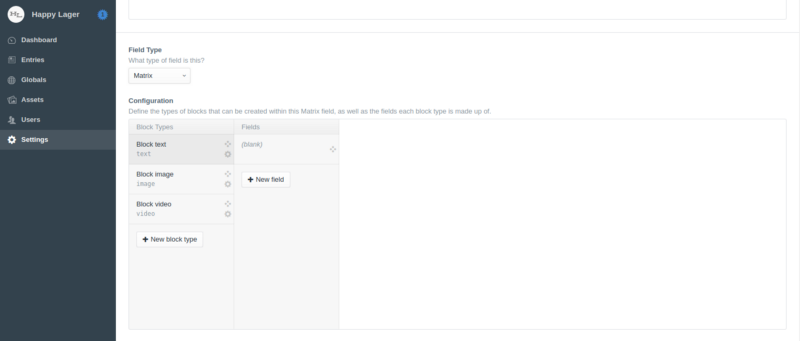
In our earlier blog about ‘why to choose Craft’ we listed Matrix as one of the defining features of Craft CMS. The feature lets you create and manage content blocks. You can add, reorder, and move content blocks; be it text, code, or rich media. And the coolest thing about the content blocks is that the reordering doesn’t affect the code in the template. One of the key benefits of the matrix field is that you don’t have to rely on predefined themes and their content structures. The only problem with the thematic approach is that you have to make-do with whatever the theme designer deemed right. The sections are made of fields, which are made with content blocks and using these content types we create entries. The matrix is a multi functional field which can accommodate almost every type of entry.

Where to find the Matrix?

You can find the matrix in the sections where you define field type and the amount of blocks the field is going to have. Just select matrix from the field type drop down and configure it accordingly. If you want a minimalistic powerful website with necessary content elements then Craft’s Matrix field is the answer.

Image Editor in Craft CMS

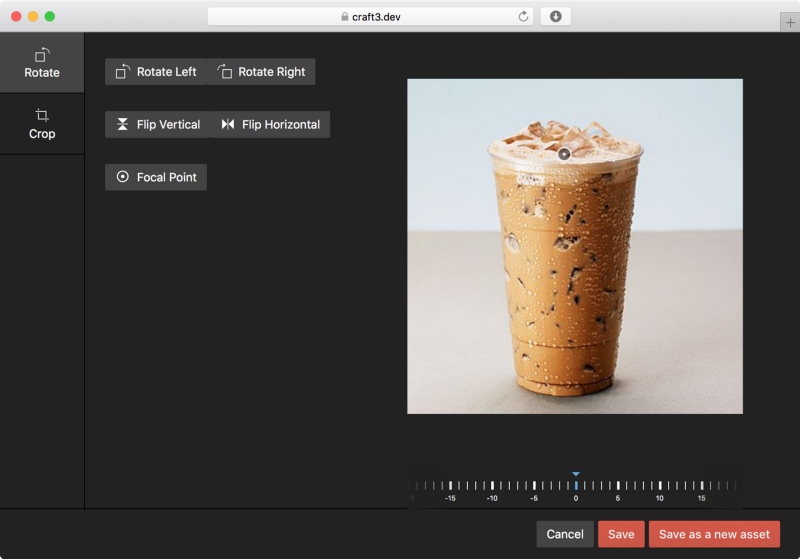
Before Image Editor’s introduction in Craft 3, the only options to edit the images were through Image Transforms or with plugins like Tiny image. Craft’s inbuilt Image Transform lacked essential editing elements and was only helpful in defining universal image rules. Image editor on the other hand provides a rich editor which lets you crop, rotate, flip, and straighten images. You can even manually set focal points for responsive images. Edits don’t affect the quality of the image and can be overwritten or saved as a new asset. You can access the image editor from assets in the control panel:
  • Open control panel
  • Click on the assets
  • Select an asset
  • Click on the drop down with a gear icon on it
  • Select edit image

Image Source:craftcms.com

Edit image option will open the image editor for the selected asset. Overwrite the changes with save button or save the image as a new asset.

Plugin Store in Craft CMS

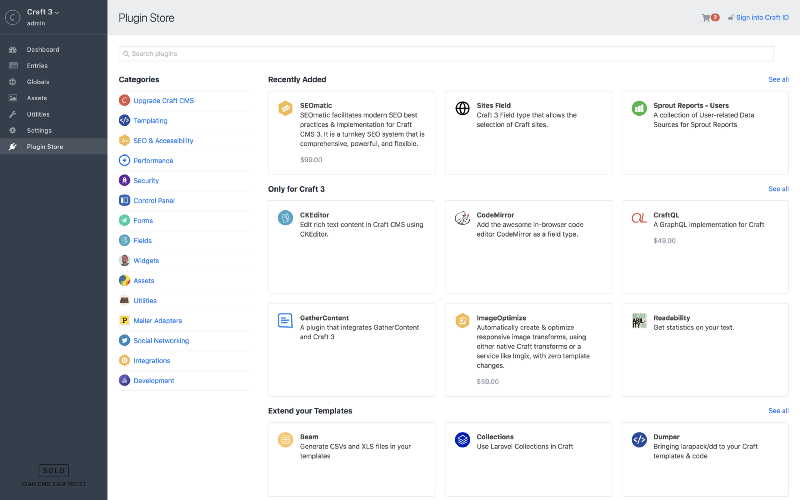
Plugins are mini applications for added functionality. There are more than 200 plugins in Craft CMS’ plugin store, each one enhances Craft in one way or another.

Image Source:craftcms.com

Plugins are infamous as vulnerability of WordPress but that’s not the case with Craft because:
  • It has One-click installation and updation.
  • It has centralized license management.
  • It allows you to try a plugin before you buy it, on a non-public domain like Craft.test.
  • It has a 30-day return policy on paid plugins licences.

One-Click Updates in Craft CMS

All the functionalities are a waste if you have to update them one by one. Craft solves this problem like a real problem solver via one-click update feature. Craft alerts you in the control panel with a notification badge and its clever designing allows the system to notify according to the update priority. For example; if it’s just an incremental update, it would just show a notification badge and if it’s a critical update the control panel will turn red. Update priority is one of the most practical & essential elements on Craft CMS.You can’t possibly miss a critical update with the control panel turning red. Critical updates are meant for security enhancements or to fix a vulnerability. Skipping them leaves your website vulnerable to attacks. Craft’s one-click update provides all the incremental and critical updates in a ready-to-install package. It is easy that way and no one skips any important updates.

Relations with entities in Craft CMS

You can link entries, assets, categories/tags, & users — the four relational field types — using Craft’s Relationship engine. For example you can relate a case study with the services page section to show which services were used during the development process.

Creating relationships in Craft CMS

  • Create a new entries field
  • Select the sources from which entries will be taken
  • Drop the new field in the layout of the desired section

Image Source:craftcms.com

You can find the new category entries field in the section, while creating a new entry. Now you can relate content elements to each other. These basic Craft features have made website development a complete new ballgame. We have partnered with agencies and companies for extensive Craft CMS projects. To know how we roll our dices, ping us here.

Debug Tool in Craft 3: Here’s all you need to know about it

Before introducing the Debug Tool in Craft 3, Craft CMS made you install a separate web-based application, Web-Console. You could run shell commands on your server to check for errors and missing elements in the written code. Not a fancy deal though! Especially when Craft 3 was designed to be a problem-solver. The lack of a debug functionality was a major issue and ergo, Debug Tool was introduced. The coolest thing about this overlay toolbar is that you can diagnose particular pages on the spot. It shows you all sorts of essential things; number of users, logs, database enquiries, errors, time and memory.

Enabling the Debug Toolbar in Craft CMS

Make sure you have the admin login. Once you’re logged in, head to the ‘my account’ section in the drop down where it reads your username in the top left of your Control Panel.
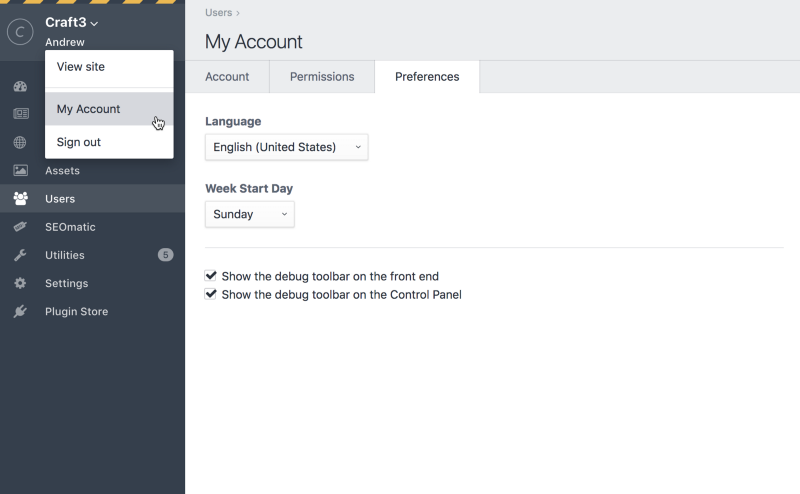
You’ll find an option to change your preferences in the account section. Apart from the language and ‘week start day’ preference, you’ll find two check boxes with a description of what each one does. You can select either or both according to your usage and when and where you want the toolbar to appear.
  • Show the debug toolbar on the Front end
  • Show the debug toolbar on the control panel
Check the desired boxes, save and continue. Enable devmode to grant unrestricted access to all the useful statistics and elements of the tool. Otherwise, the tool will only show errors and warnings.

The Craft 3 Debug Toolbar

A collapsed overlay panel will appear in the bottom of your page. It reads Craft’s C from the logo itself. You can press on it to expand it. That overlay panel is Craft 3 debug toolbar. It shows you a handful of information and helps you keep a check on your page in real time. You can interact with the information shown in the toolbar by further expanding it half way through the page with a click. To use it in a separate tab, click on the “C”. The full version of the toolbar accommodates more information making it easier to keep track of all the errors, logs, and discrepancies.

Craft 3: Debug Toolbar Functionalities

The debugging toolbar is not for bug fixes only. It offers other perks too:
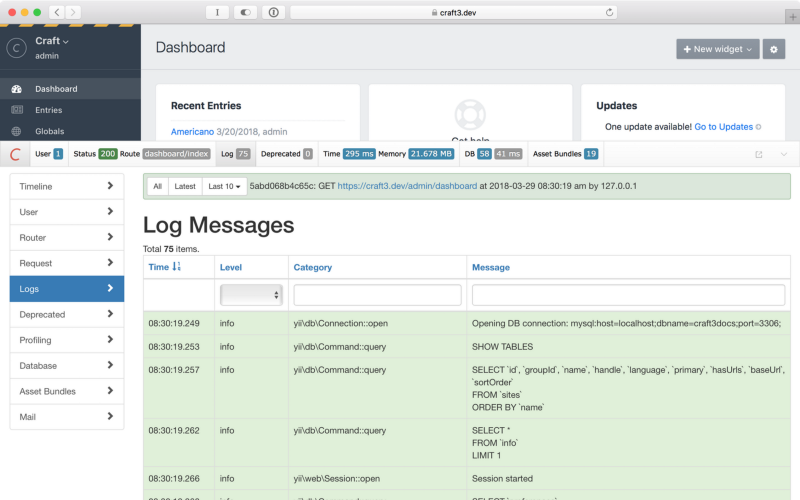
  • Timeline — It is basically a graphical presentation of your page’s performance. A graph of time and space vs the queries. It keeps track of your page’s load-time and memory used.
  • User — It provides information about users and their sessions.
  • Router — A table of rules that Craft checks before routing to a particular template.
  • Request — It shows all sorts of information from Parameters to headers to sessions and server global variables.
  • Logs — You can find all the error and warning related logs here.
  • Deprecated — Shows deprecation errors.
  • Profiling — Monitor your page’s performance with information about load time and peak memory usage.
  • Database — Shows the Database queries. It can be sorted by time and duration.
  • Asset Bundles — It contains the information of the assets being used.
  • Mail — It keeps a mail log if you’re using a mail tool on Craft.
Debug Tool provides you with crucial information about your website in real time. People who are migrating from Craft 2 will find this tool very useful because it eliminates the dependency on web console to monitor errors and logs. Craft’s minimalism has already made us a fan. These precise features with high functionality make it our favorite CMS. Our development shop is open for all kinds of Craft projects. Ping us here if you are looking for a Craft partner.

How to Setup a New Project in Craft CMS 3

There are two ways you can set up a new project in Craft 3, vis-a-vis, via Composer and Manual. Both the methods require extensive technical expertise & understanding of Craft CMS. With Composer method you have to know your commands and what you’re doing with them but in case of the manual method you just have to perform some simple operations.

Composer Method in Craft CMS

If you have a good understanding of Craft CMS, then you can setup a new Craft project with the some terminal commands. Though, before installing Craft with composer, do make sure that you’re running Composer version 1.3.0 or above. Here are the essential steps: Check the Composer version composer -V Run this command in case your Composer needs updating composer self-update When you’ve confirmed that you’re running a compatible version of the Composer, run the following command (substitute with the path where Composer should create the project): composer create-project craftcms/craft <PATH> The composer will do all the work and it will display a success message. Another way is to do it manually.

Manual Method to setup Craft CMS

You will have to download the archive from Craft’s website. Choose the archive format you’re familiar to work with. Extract the archive where you want your Craft project to be saved. Then follow these 5 steps:

Step 1: Setting up permissions

When you’re doing the manual setup, you have to download and extract the Craft archive in the desired place. The extraction will provide you with a Craft directory which has these files in it: config/… storage/ templates/ vendor/… web/… .env .env.example composer.json craft craft.bat LICENSE.md README.md Out of these files, there are some files for which PHP needs access permissions for different users to write on it. The files are: .env Composer.json Composer.lock config/license.key storage/* Vendor The permissions are defined on the basis of the relationship between the system user that the PHP is running as and ownership of the folders/files.
  • If they are the same user, use 744.
  • If they’re in the same group, then use 774.
  • If you’re not sure, then use 777.

Step 2: Securing the project with a security key

You have to set up a security key to encrypt the data of your project. Every project in Craft has a unique one. You can also use same security key for multiple environments running Craft. You can set a unique security key using the terminal or with a password generator. The password generator will help you to create a cryptographically secure key. Now you need to insert the generated key in your .env file. Open the .env file and insert the security key in between the quotes where it says: SECURITY_KEY=” “ Save the file.

Setting the security key with terminal

Run the following command in your project’s root directory: ./craft setup/security-key.

Step 3: Creating a database

Craft 3 supports MySQL 5.5+ and PostgreSQL 9.5+. So you can choose your database accordingly. But there are some recommended database settings:
  • For MySQL Default Character Set: utf8 Default Collation: utf8_unicode_ci
  • For PostgreSQL Character Set: UTF8

Step 4: Setting up a web server

With the database done setting up. You need a web server on which you can host your Craft project. Make sure you set the path of it’s document root to- web/directory(name of the directory) You will need to update your hosts file if you’re not using any local hosts like MAMP. You can find your respective host files here
  • For macOS/Linux/Unix: /etc/hosts
  • For Windows: \Windows\System32\drivers\etc\hosts
Enter http://<HOSTNAME>/index.php?p=admin in the address bar of your browser (substitute <HOSTNAME> with your web server’s host name). Just to check if the setup works. If there are no errors, Craft’s Setup Wizard will show!

Step 5: Running the setup

You can either run the setup from terminal or from the browser. In the terminal after running the setup command and telling the installer ‘how to connect to the database’, your installation should take care of itself. Browser setup on the other hand provides an interactive installer to setup your Craft.

With Terminal

Open your terminal to run the command ./craft setup Answer the questions about how to connect to your database to start the installation. After the installation, you can access your new Craft project.

With Browser

Open your browser and enter http://<HOSTNAME>/index.php?p=admin (substitute <HOSTNAME> with your web server’s host name) in the address bar of your browser to find Craft’s installer. Follow the instructions and your Craft should be up and running in few minutes. I. Accept the license agreement II. Enter the Database information III. Create an admin account IV. Enter the preferred system name, URL and language V. Finish You’re all set to tweak the website from your Craft control panel. If you’ve followed every step mentioned in this tutorial then you should be able to fire up your Craft projects right away. Both the methods require expertise in Craft CMS. You can connect with us here for further assistance and queries.

How To Get Started With SEO In Craft CMS?

Forget the gold rush days of keyword stuffing and black-hat tactics. Today’s SEO landscape is a carefully cultivated ecosystem, and Craft CMS stands tall as a fertile ground for organic growth. Craft CMS, known for its flexibility and user-friendly interface, offers a fertile ground for implementing effective SEO strategies. This guide explores how to harness the full potential of SEO within Craft CMS, ensuring your website not only ranks higher in search results but also meets the evolving expectations of both search engines and users.

Setting the SEO Foundation in Craft CMS

To ensure your Craft CMS site ranks well in search engine results and offers an outstanding user experience, focusing on foundational SEO settings is critical. Let’s explore some of the essential steps for optimizing your Craft CMS site, providing a more detailed and structured approach to each key area.

1. Enhancing SEO with Built-in Fields

Utilizing Meta Titles and Descriptions:

Craft CMS is equipped with specific fields for meta titles and descriptions, crucial for telling search engines what your page is about. To make the most of these:
  • Craft Compelling Meta Titles: Keep them under 60 characters to ensure they display fully in search results. Incorporate main keywords at the beginning and your brand name towards the end.
  • Write Descriptive Meta Descriptions: Aim for about 160 characters, using active voice and including a call-to-action. Mention primary keywords naturally to improve relevance and click-through rates.

2. Customizing URLs for Enhanced SEO

Implementing SEO-Friendly URL Structures:

Craft CMS offers the flexibility to tailor your URLs, a feature you should leverage to boost your SEO:
  • Include Relevant Keywords: Ensure URLs reflect your content’s primary keywords, enhancing relevance and searchability.
  • Maintain Simplicity and Readability: Use hyphens to separate words, keep URLs short, and avoid unnecessary parameters or numbers.
  • Follow a Logical Structure: Organize your content hierarchically, using URL paths that indicate the relationship between pages, which helps users and search engines navigate your site more effectively.

3. Maximizing Visibility with Rich Snippets

Implementing Schema Markup:

Schema markup is a form of structured data that you can add to your Craft CMS site to help search engines return more informative results for users:
  • Identify Appropriate Schema Types: Depending on your content, choose from a variety of schema types like Article, Local Business, Event, or Product.
  • Use Craft CMS Plugins: Tools like SEOmatic for Craft CMS can simplify the process of adding schema markup to your site, automating much of the work and ensuring your pages stand out in SERPs with rich snippets.
  • Test Your Implementation: Utilize Google’s Rich Results Test tool to verify that your schema markup is correctly implemented and visible to search engines.

Advanced SEO Techniques in Craft CMS

Here are the strategies to master advanced SEO techniques for enhanced visibility and user experience of your Craft CMS site.

1. Site Speed Optimization

Why Site Speed Matters:

A fast-loading website is essential for both SEO and user satisfaction. Google prioritizes site speed in its ranking algorithm, understanding that users prefer websites that load quickly.

How to Optimize Site Speed in Craft CMS:

  • Optimize Images: Use Craft CMS’s built-in image transformation capabilities to serve images at the correct size and format, reducing unnecessary file size without compromising quality.
  • Implement Caching: Craft CMS supports several caching strategies, such as template caching, that can significantly reduce load times by storing copies of dynamic content for faster retrieval.
  • Minimize and Combine Files: Minify CSS and JavaScript files to eliminate unnecessary characters. Consider combining multiple files into one where possible to reduce the number of HTTP requests.

2. Mobile Optimization

The Importance of Mobile-Friendliness:

With over half of global web traffic coming from mobile devices, having a mobile-optimized site is non-negotiable for SEO success.

Achieving Mobile Optimization in Craft CMS:

  • Responsive Design: Ensure your Craft CMS theme is responsive, meaning it automatically adjusts to fit the screen size of the device it’s being viewed on. Craft CMS’s templating system allows for flexible design implementation.
  • Touchscreen Readiness: Make sure all elements are easily navigable on a touchscreen, with adequately spaced links and easily accessible navigation menus.
  • Speed Considerations: Mobile users often rely on cellular data, making site speed even more critical. Apply all site speed optimization strategies with a mobile-first mindset.

3. Strategic Content Creation and Management

Content’s Role in SEO:

Quality content drives engagement, shares, and backlinks, all of which are critical factors in SEO rankings. Consistently publishing relevant, high-quality content positions your site as an authoritative source in your niche.

Maximizing Content Impact in Craft CMS:

  • Keyword Optimization: Research and integrate relevant keywords naturally into your content, titles, and meta descriptions to improve visibility.
  • Content Structure: Use headings (H1, H2, H3) to structure your content for easy readability. This not only benefits users but also helps search engines understand the hierarchy and relevance of your information.
  • Update Regularly: Keep your content fresh and up-to-date. Regular updates signal to search engines that your site is active, encouraging them to crawl your site more frequently.

Leveraging SEO Plugins and Tools in Craft CMS

The integration of Google Analytics and Google Search Console with Craft CMS sites offers valuable insights into traffic patterns, keyword rankings, and user behavior, enabling data-driven decisions to refine SEO strategies. Craft CMS’s ecosystem includes powerful plugins like SEOmatic, which simplify tasks like generating sitemaps and optimizing meta tags, ensuring your site is fully optimized for search engines.

Boost Your Craft CMS Site with Strategic SEO Implementation

As we navigate the digital landscape of 2024, the significance of SEO in crafting a successful online presence cannot be overstated. By implementing the strategies outlined in this guide, you can utilize the full potential of your Craft CMS site, ensuring it not only ranks high in search results but also delivers an exceptional user experience. However, SEO is an ongoing journey that requires expertise, dedication, and a keen eye for evolving trends. This is where Galaxy Weblinks comes in. Our team of SEO specialists and Craft CMS experts are equipped to take your website to the next level. From strategic SEO planning to execution and monitoring, we provide comprehensive solutions tailored to your unique needs. Ready to enhance your site’s SEO and drive measurable results? Contact Galaxy Weblinks today for a free discovery call. Let’s collaborate to ensure your Craft CMS site is perfectly aligned with your business goals and poised for success in the competitive digital arena of 2024.

How To Create A Content Builder In Craft CMS?

The digital marketplace of 2024 places a critical demand on brands to transcend the confines of static, rigid templates and deliver exceptional, personalized customer experiences. Content Builder in Craft CMS emerges as a revolutionary tool, enabling businesses to create customized, engaging content without the constraints of coding. This innovation allows for the crafting of immersive experiences tailored to the unique needs and preferences of consumers, marking a significant leap towards greater flexibility and creativity in content creation. The shift away from one-size-fits-all website templates to dynamic, personalized content reflects the evolving expectations of today’s digital audiences. With Craft CMS’s Content Builder, brands are empowered to construct captivating, code-free content landscapes, fostering deeper connections with their audience. This tool is indispensable for any brand aiming to stand out in the competitive digital environment of 2024, offering a pathway to crafting content that resonates and truly engages.

Why Do You Need a Content Builder?

Using Craft CMS’s Content Builder brings several key advantages that can transform how you create and manage content:

Making Content Creation Easy for Everyone:

Content creation isn’t just for developers anymore. A 2023 report from HubSpot shows that 74% of marketers see creating engaging content as their biggest challenge. The Content Builder lets people without technical skills, like marketers or business owners, jump into content creation. This change means quicker content updates, more flexibility, and content that really connects with your audience. Imagine your marketing team putting together dynamic landing pages or your sales team customizing product pages on their own, without needing a developer.

Letting Your Creativity Flow:

Forget being stuck with standard templates. The Content Builder gives you the freedom to drag and drop elements, designing layouts that show off your brand’s personality and meet your audience’s interests. Use text, images, videos, forms, and more to create anything from interactive landing pages and personalized product showcases to engaging blog posts or fun learning modules. This tool lets your creativity shine, helping you stand out.

Boosting Your Website’s SEO:

In today’s online world, being visible on search engines is crucial for drawing in organic traffic and leads. The Content Builder helps you cleverly include keywords, headings, and links in your content. This not only engages your audience but also boosts your site’s search engine ranking, bringing more potential customers your way. Great content leads the way, and the Content Builder equips you to craft content that’s both engaging and discoverable.

Building Your Content Piece by Piece:

Here’s how to make the most of the Content Builder:

Choosing Your Tools: 

Craft CMS offers a wide range of field types to help you put your content together. There are Matrix fields for flexible layouts, Rich Text fields for stories, Assets for beautiful visuals, and even Live Data fields for up-to-date content. Picking the right tools is the first step to captivating your audience.

Mapping Out Your Content: 

Before you start creating, take some time to plan. Think about the layouts you want, identify elements you might reuse, and consider how to guide users through their journey on your site. Know what your audience enjoys, set clear goals for your content, and understand how it fits into your wider marketing strategy. Good planning makes sure your content always lands well.

Making It User-Friendly: 

Design with your audience in mind. Aim for layouts that are easy to get around on any device, use visual cues to draw attention, and make sure your calls to action stand out. The best content looks great, is easy to access, and gets users to take action.

Adding Extra Features: 

Take your Content Builder further with plugins. Look into SuperTable for detailed layouts, Feed Me for auto-updating content, or Formidable for interactive forms. Plugins are your secret weapon, enhancing your Content Builder and giving you new ways to connect with your audience. By making content creation more accessible and allowing for greater creativity, Craft CMS’s Content Builder is essential for businesses aiming to make an impact in the digital world of 2024.

Real-World Success Stories:

See how the Content Builder has already made a big difference for businesses and their customers:

RedSky Travel

This popular adventure travel agency started using the Content Builder to make unique landing pages for each travel destination. These pages have fun interactive maps, custom trip plans based on what the visitor likes, and forms that update in real time to let you book your adventure right away. This approach makes it easier for travelers to find exactly what they’re looking for, leading to more people reaching out to book trips. In fact, RedSky Travel’s inquiries went up by 30% after they began using the Content Builder, proving it’s a game-changer for offering personalized experiences and getting more bookings.

Green Thumb Garden Supply

This online gardening store uses the Content Builder to put together product pages that not only look great but are also interactive. They feature galleries full of images, detailed specs, and care guides for plants that change based on where the customer lives. This hands-on way of showing products boosts customer interest, helps them understand products better, and, most importantly, increases sales. Green Thumb Garden Supply noticed a 25% increase in the value of the average order after bringing in the Content Builder, showing how it can make product pages more engaging and encourage customers to spend more.

Crafting the Future with Galaxy Weblinks

In 2024, making your website stand out is crucial. With Craft CMS, you can create a site that really connects with your audience. This isn’t just about technology; it’s about bringing your digital vision to life. Galaxy Weblinks is here to help you do just that. We have the expertise in Craft CMS to help you build a website that not only looks great but also engages your visitors. Think of us as your partner in making your website more than just another URL. Ready to make your website truly engaging? Get in touch with Galaxy Weblinks. Let’s make your site something special together.